Vented Gas Fireplace Insert Installation: A Comprehensive Guide
Installing a vented gas fireplace insert can significantly enhance the aesthetics and functionality of a living space. These inserts offer the ambiance of a traditional wood-burning fireplace with the convenience and efficiency of gas. However, proper installation is crucial for safety and optimal performance. This article provides a comprehensive guide to the installation process, outlining essential steps and considerations.
A vented gas fireplace insert is designed to be installed directly into an existing wood-burning fireplace. Unlike vent-free models, vented inserts require a functioning chimney to exhaust combustion byproducts. This venting system is critical for removing carbon monoxide and other potentially harmful gases from the home. The selection of the correct insert size, venting components, and professional installation are all paramount for a safe and efficient operation.
Before embarking on an installation project, homeowners should thoroughly research local building codes and regulations, as these can vary significantly. Obtaining the necessary permits is essential to ensure compliance and avoid potential penalties. Engaging a qualified and licensed gas fireplace installer is highly recommended, as they possess the expertise to perform the installation safely and in accordance with established industry standards.
Key Point 1: Pre-Installation Assessment and Preparation
The first step in a vented gas fireplace insert installation involves a thorough assessment of the existing fireplace and chimney. This inspection aims to determine the structural integrity of the chimney, the suitability of the fireplace opening, and the compatibility of the insert with the existing gas line. Any necessary repairs or modifications should be addressed before proceeding with the installation.
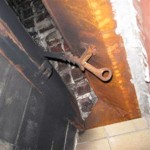
The chimney liner is a crucial component of a vented gas fireplace system. Over time, chimney liners can deteriorate due to exposure to heat, moisture, and corrosive byproducts. A compromised liner can lead to dangerous gas leaks and structural damage. Therefore, the chimney should be inspected for cracks, gaps, or other signs of deterioration. If the existing liner is damaged or unsuitable, it must be replaced with a new, appropriately sized liner designed for gas fireplace inserts.
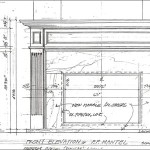
The fireplace opening must be measured accurately to ensure that the chosen insert will fit properly. Sufficient clearance space around the insert is also necessary to allow for proper ventilation and to prevent overheating. Any obstructions, such as protruding bricks or damper components, may need to be removed or modified to create a suitable opening. The hearth, the area in front of the fireplace opening, should also be assessed to ensure it meets the required safety standards for heat resistance and fire protection.
Once the fireplace and chimney have been inspected and prepared, the gas line must be assessed. A qualified gas technician should inspect the gas line to ensure it is properly sized and capable of supplying the required gas pressure to the insert. If the existing gas line is inadequate, it may need to be upgraded or replaced. A shut-off valve should be installed near the fireplace opening for easy access in case of emergencies or maintenance.
Finally, ensure all flammable materials are cleared from the area surrounding the fireplace during the installation process. Dust sheets and protective coverings should be used to protect floors and furniture from dust and debris. Proper ventilation should be maintained to minimize exposure to fumes and dust particles. The safety of the installation personnel and the protection of the surrounding environment are of utmost importance.
Key Point 2: Venting System Installation
The venting system is the most critical aspect of a vented gas fireplace insert installation. Proper venting ensures that combustion byproducts, such as carbon monoxide, are safely and efficiently expelled from the home. The venting system typically consists of a flexible or rigid liner that runs from the insert’s flue collar to the top of the chimney. The liner must be sized and installed according to the manufacturer’s specifications and local building codes.
There are two primary types of venting systems used for vented gas fireplace inserts: direct vent and B-vent. Direct vent systems draw combustion air from outside the home and exhaust combustion byproducts directly outside through a sealed pipe. B-vent systems, on the other hand, draw combustion air from inside the home and exhaust combustion byproducts through the chimney. The choice between direct vent and B-vent depends on the insert model, the existing chimney configuration, and the homeowner's preferences.
Installing a chimney liner typically involves threading the liner down the chimney from the top. This process can be challenging and requires specialized tools and techniques. The liner must be securely attached to the insert’s flue collar and properly sealed at the top of the chimney to prevent leaks. The liner should also be insulated to minimize heat loss and condensation, improving the efficiency of the fireplace.
The venting system must be properly sized to ensure adequate draft. Insufficient draft can lead to incomplete combustion, resulting in carbon monoxide production and potential safety hazards. Oversized venting systems, on the other hand, can cause excessive heat loss and reduce the efficiency of the fireplace. A qualified installer will use appropriate calculations and measurements to determine the optimal venting system size for the specific insert and chimney configuration.
Before completing the venting system installation, it is essential to conduct a thorough inspection to ensure that all connections are secure and that there are no leaks. Smoke testing can be used to verify that the venting system is functioning properly and that the chimney is drafting correctly. Any deficiencies should be corrected immediately to ensure the safety and efficiency of the fireplace.
Key Point 3: Insert Placement and Gas Line Connection
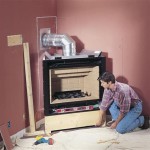
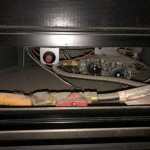
Once the venting system is in place, the gas fireplace insert can be placed into the fireplace opening. The insert should be centered within the opening and securely positioned to prevent movement or tipping. Shims or spacers can be used to level the insert and ensure a proper fit. The insert's trim kit can then be installed to provide a finished look and to seal any gaps between the insert and the fireplace surround.
Connecting the gas line to the insert is a critical step that must be performed by a qualified gas technician. The gas line should be connected to the insert’s gas valve using appropriate fittings and sealants. All connections should be tightened securely to prevent leaks. A leak test should be performed using a gas leak detector to ensure that there are no leaks in the gas line or connections.
After the gas line is connected, the insert can be wired to the electrical system. The electrical connection is typically used to power the insert's blower, ignition system, and other auxiliary features. The wiring should be done in accordance with local electrical codes and the manufacturer’s instructions. A qualified electrician should be consulted if there are any questions or concerns about the electrical connection.
Before igniting the insert for the first time, it is essential to purge the gas line. Purging the gas line removes any air or contaminants that may have entered the line during installation. The insert’s manufacturer’s instructions will provide specific guidance on how to purge the gas line safely and effectively.
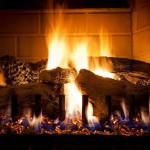
Following the purge, the insert can be ignited and tested. The flame should be observed to ensure that it is burning properly and that there are no unusual odors or noises. The insert’s various features, such as the blower and remote control, should be tested to ensure they are functioning correctly. The installer should also explain the insert’s operation and maintenance procedures to the homeowner.
In conclusion, installing a vented gas fireplace insert requires careful planning, meticulous execution, and adherence to safety regulations. By following the steps outlined in this guide and engaging qualified professionals, homeowners can enjoy the warmth and ambiance of a gas fireplace with confidence. The key is to prioritize safety, compliance, and proper installation techniques to ensure a long-lasting and efficient fireplace system.

Fireplace Insert Venting Demystified Gas Direct Vent Inserts

What Are The Best Ways To Vent A Gas Fireplace Zoroast

How To Select And Install A Gas Fireplace Log Set Fireplaces Direct Learning Center

Why Choose A Fireplace Insert Made In America Xtrordinair

How To Install Gas Fireplace Insert Heat Glo

How To Buy A Gas Fireplace Insert Buyer S Guide From Regency

Venting A Gas Fireplace Through Existing Chimney Design Inserts

Vented Vs B Vent Direct Free Dixie S

Majestic 30 Ruby Direct Vent Gas Fireplace Insert Deals

Convert To Gas Installing Fireplace Inserts Doctor Flue
Related Posts