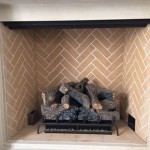
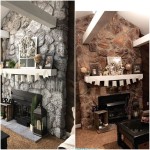
Tile Over Old Stone Fireplace: Transform Your Hearth with Style
If you're contemplating a fireplace makeover, tiling over your old stone facade is an excellent way to enhance its aesthetic appeal and functionality. However, this endeavor requires careful planning and adherence to specific techniques. Here's a comprehensive guide to help you successfully tile over your old stone fireplace:
Assessment and Preparation:
Thoroughly inspect your stone fireplace to assess its condition. Ensure the surface is level, stable, and free of any loose fragments or crumbling areas. If necessary, make any repairs to the stone to ensure a secure base for the tile. Clean the fireplace thoroughly using a degreaser and a stiff brush to remove any dirt, dust, or debris.
Backer Board Installation:
Installing a backer board is crucial to provide a level and stable substrate for the tile. Use a cement backer board or a fiberglass mesh backer board, which are highly recommended for fireplace applications due to their heat resistance and durability. Measure and cut the backer board to fit over the fireplace surface and secure it using screws or nails.
Priming and Thinset Application:
Prime the backer board using a bonding primer specific for use with tile to enhance adhesion. Once the primer has dried, apply a thin layer of thinset mortar over the backer board using a notched trowel. Ensure the thinset is evenly distributed and follows the manufacturer's instructions for mixing and application.
Tile Selection and Layout:
Choose tiles that are suitable for fireplace applications, such as porcelain, ceramic, or natural stone. Consider the size, style, and color of the tiles to complement your decor. Plan the tile layout beforehand, including any necessary patterns or designs, and dry-fit the tiles on the fireplace surface to ensure a proper fit.
Tile Installation:
Apply additional thinset mortar to the tiles using the notched trowel and position them onto the prepared fireplace surface. Press the tiles firmly into place and tap them with a rubber mallet to ensure proper adhesion. Maintain a consistent grout line spacing using tile spacers. Allow the thinset to set for the recommended time before proceeding to the next step.
Grouting and Sealing:
Once the thinset has set, apply sanded grout to the tile joints using a grout float. Press the grout into the joints and smooth it out. Remove excess grout using a damp sponge and allow the grout to dry and cure completely. Seal the tiles and grout using a penetrating sealer designed for fireplaces to protect them from heat, moisture, and stains.
Final Touches:
Once the sealant has dried, you can add finishing touches to your tiled fireplace. Install a hearth pad or firebox liner for added safety and aesthetic appeal. You may also choose to add decorative elements such as fireplace mantel, surround, or decorative molding to enhance the overall look.
Tiling over your old stone fireplace can elevate its appearance and functionality while adding a touch of personal style to your living space. By following these steps and using appropriate materials and techniques, you can create a beautiful and durable tiled fireplace that will provide warmth and ambiance for years to come.

Read This Before Your Stone Fireplace Makeover Understanding Undertones

Pebble Tile Is The Perfect Way To Cover Ugly Old Tiles

Our Fireplace Makeover West House Visuals Stone Home

Over Grouted Fireplace Project Love Living Here

How To Tile A Fireplace Even If It S Brick The Handyman Daughter

How To Tile A Fireplace Even If It S Brick The Handyman Daughter

12 Stacked Stone Fireplace Ideas For Optimal Coziness

Read This Before Your Stone Fireplace Makeover Understanding Undertones

A Step By Guide To Fireplace Refacing Diy Family Handyman
/102661017-6a23c040b71843379188b96b21ac1a08.jpg?strip=all)
How To Tile A Fireplace


