Tile Fireplace Surround Makeover: A Comprehensive Guide
A fireplace serves as a focal point in many homes, providing warmth and ambiance. Over time, however, the fireplace surround, particularly if tiled, can become dated, damaged, or simply no longer align with the homeowner’s aesthetic preferences. A tile fireplace surround makeover is a project that can dramatically transform the look of a living space, offering an opportunity to modernize, personalize, and even increase the home's value. This article provides a comprehensive guide to undertaking a tile fireplace surround makeover, covering planning, material selection, preparation, installation, and finishing touches.
Planning and Design Considerations
Before any physical work begins, careful planning is crucial. This stage involves assessing the existing fireplace surround, defining the desired aesthetic, and creating a detailed design plan. The existing tile surround must be evaluated for structural integrity. Look for cracks, loose tiles, or signs of water damage. These issues must be addressed before proceeding with any new tile installation. It is also essential to determine if any alterations to the underlying structure are necessary or desired, such as expanding the surround horizontally or vertically.
Defining the aesthetic is a critical step. Consider the overall style of the room and how the fireplace surround will complement it. Modern, traditional, rustic, and minimalist styles are just a few examples. Research different tile types, colors, patterns, and textures to find options that align with the desired aesthetic. Websites like Pinterest, Houzz, and home improvement blogs can provide inspiration and ideas. Obtain physical samples of the selected tiles to assess their appearance in the room's lighting conditions and against existing decor.
Creating a detailed design plan involves sketching out the desired layout of the new tile surround. This plan should include precise measurements, tile placement, and any decorative elements, such as borders or accent tiles. It is beneficial to create a scaled drawing or use a design software program to visualize the final result. The design plan should also specify the type of grout to be used, as this can significantly impact the overall look. Color-matched grout blends seamlessly with the tiles, while contrasting grout can create a more defined pattern.
Consider local building codes and safety regulations related to fireplaces. Some municipalities have specific requirements for fireplace surround materials and clearances from combustible materials. It's essential to research and comply with these regulations to ensure the safety and legality of the project. Consult with a local building inspector or contractor if necessary.
Finally, establish a realistic budget for the project. This budget should include the cost of materials (tiles, grout, adhesive, sealant), tools, and any professional labor if required. It's prudent to add a contingency fund to cover unexpected expenses that may arise during the makeover process.
Material Selection and Tool Acquisition
Choosing the right materials is paramount to the success of the tile fireplace surround makeover. Different tile types offer varying aesthetic appeal, durability, and suitability for fireplace applications. Ceramic, porcelain, natural stone (such as granite, marble, or slate), and glass are common choices.
Ceramic tiles are a cost-effective option that comes in a wide variety of colors, patterns, and sizes. They are relatively easy to cut and install but are less durable than porcelain. Porcelain tiles are denser and more durable than ceramic, making them a better choice for high-traffic areas or fireplaces that experience frequent use. They are also more resistant to moisture and staining.
Natural stone tiles offer a unique and luxurious look. Granite is a durable and heat-resistant option, while marble provides a classic and elegant aesthetic. Slate is a rustic and textured choice. Natural stone tiles require regular sealing to protect them from staining and moisture. Glass tiles can add a modern and vibrant touch to a fireplace surround. They are available in a range of colors and finishes, including translucent and iridescent options. Glass tiles are relatively easy to clean but may be more prone to scratching than other tile types.
Selecting the appropriate adhesive and grout is just as important as choosing the tiles. Use a thin-set mortar specifically designed for tile installation. This mortar provides a strong bond between the tiles and the underlying surface. Choose a grout that is compatible with the selected tile type and the desired aesthetic. Epoxy grout is more resistant to staining and water damage than cement-based grout, making it a good choice for areas prone to moisture. Select a sealant designed for fireplaces to protect the tiles and grout from heat and moisture.
Gather all necessary tools before starting the project. Essential tools include a tile saw (wet saw), a notched trowel, a rubber grout float, a sponge, a level, a measuring tape, a pencil, safety glasses, and gloves. A wet saw is necessary for cutting tiles to the required size and shape. A notched trowel is used to apply the thin-set mortar evenly to the surface. A rubber grout float is used to apply grout to the tile joints. A sponge is used to clean excess grout from the tile surface. A level ensures that the tiles are installed evenly and straight. Measuring tape and a pencil are used for accurate measurements and marking. Safety glasses and gloves are essential for protecting the eyes and hands from dust, debris, and chemicals.
Preparation and Installation
Proper preparation is crucial for a successful tile fireplace surround makeover. The first step is to protect the surrounding area from dust and debris. Cover furniture, floors, and any adjacent surfaces with plastic sheeting or drop cloths. Use painter's tape to protect edges and trim.
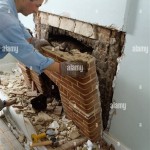
Remove the existing tile surround carefully. Use a chisel and hammer to gently pry the tiles away from the wall. Wear safety glasses and gloves to protect yourself from flying debris. If the existing tiles are difficult to remove, use a heat gun to soften the adhesive. Scrape away any remaining adhesive or mortar from the wall using a scraper or putty knife. Ensure the surface is clean, smooth, and free of any debris.
Prepare the surface for tile installation by applying a layer of cement board or backer board to the fireplace surround. These boards provide a stable and moisture-resistant surface for the tiles. Cut the cement board to the appropriate size using a utility knife or circular saw. Attach the cement board to the wall using screws designed for cement board. Ensure the cement board is flush with the surrounding surfaces.
Apply the thin-set mortar to the cement board using a notched trowel. Hold the trowel at a 45-degree angle and create even ridges in the mortar. Press the tiles firmly into the mortar, using a slight twisting motion to ensure good adhesion. Use tile spacers to maintain consistent spacing between the tiles. Check the level of the tiles frequently to ensure they are installed evenly. Cut tiles to fit around the edges and corners of the fireplace surround using a wet saw.
Allow the thin-set mortar to cure for at least 24 hours before proceeding with grouting. Remove the tile spacers and clean any excess mortar from the tile joints. Apply the grout to the tile joints using a rubber grout float. Press the grout firmly into the joints, ensuring they are completely filled. Remove excess grout from the tile surface using a damp sponge. Rinse the sponge frequently to avoid smearing the grout. Allow the grout to cure for at least 48 hours before sealing.
Final Touches and Maintenance
After the grout has cured, apply a sealant to protect the tiles and grout from moisture and staining. Use a sealant specifically designed for tile and grout. Apply the sealant according to the manufacturer's instructions. Allow the sealant to dry completely before using the fireplace. Clean the tile surface with a mild detergent and water. Avoid using abrasive cleaners or scouring pads, as these can damage the tile surface.
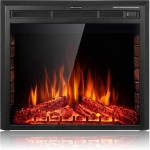
Inspect the tile surround regularly for any signs of damage or wear. Repair any cracks or loose tiles promptly to prevent further damage. Reapply sealant as needed to maintain protection from moisture and staining. Regularly clean the fireplace glass with a fireplace glass cleaner. This will help to maintain the clarity of the glass and prevent buildup of soot and creosote.
Consider adding decorative elements to enhance the look of the fireplace surround. A mantel can provide a focal point and a place to display decorative items. Fireplace screens can add a touch of elegance and protect the room from sparks and embers. Fireplace tools, such as a poker, shovel, and tongs, can be both functional and decorative.
By following these steps, homeowners can successfully undertake a tile fireplace surround makeover, transforming the look of their living space and creating a warm and inviting atmosphere.

Diy Fireplace Makeover Katie Lamb

How To Paint Tile Easy Fireplace Makeover Setting For Four Interiors

Fireplace Makeover Stacy Risenmay

No Demo Fireplace Surround Makeover Step 2 Of Our Pocketful Posies

Fireplace Makeover How To Tile Over A Surround Love Remodeled

110 Diy Fireplace Makeover How To Paint Tile Jessica Welling Interiors

Er Friendly Fireplace Makeover With L Stick Tiles The Homes I Have Made

Diy Fireplace Makeover At Home With The Barkers

How To Paint Tile Easy Fireplace Makeover Setting For Four Interiors

Painting Fireplace Tile Ridiculously Easy Diy Makeover Tiny Hands Tidy Home