Thermocouples for Heatilator Gas Fireplaces: Function, Replacement, and Troubleshooting
A thermocouple is a crucial safety component within Heatilator gas fireplaces. It is a thermoelectric device designed to detect the presence of a pilot flame and, consequently, allow the main gas valve to remain open. Without a properly functioning thermocouple, the gas fireplace will not operate safely or reliably. This article will explore the function of a thermocouple within a Heatilator gas fireplace, detail the process of replacement, and provide troubleshooting guidance for common issues.
Understanding the Function of a Thermocouple
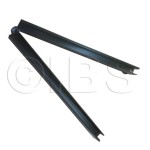
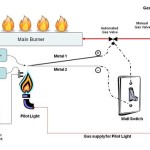
The thermocouple operates on the principle of the Seebeck effect, which states that when two dissimilar metals are joined together at two junctions and those junctions are held at different temperatures, a voltage is produced. In a gas fireplace, the thermocouple consists of two dissimilar metal wires, typically Chromel and Alumel, welded together at one end, known as the hot junction. This hot junction is positioned directly within the pilot flame.
When the pilot flame heats the hot junction, a small millivolt electrical current is generated. This current travels along the wires to the gas valve, specifically to the safety shutoff mechanism, often referred to as the pilot safety valve. The electrical current energizes a small electromagnet within the gas valve. This electromagnet pulls and holds the valve open, allowing gas to flow to the main burner. If the pilot flame extinguishes, the hot junction cools, the millivolt output ceases, the electromagnet de-energizes, and the pilot safety valve closes, shutting off the gas supply to both the pilot and the main burner. This prevents the uncontrolled release of gas into the home.
The specific millivolt output required to hold the gas valve open varies depending on the model of Heatilator gas fireplace, but it typically falls within a range of 20-30 millivolts when measured at the gas valve. This is a critical threshold; if the thermocouple output drops below this level, the gas valve will close, leading to flame failure.
Beyond the basic function of flame detection, the thermocouple also contributes to the overall safety of the fireplace by ensuring that gas is only released when a sustainable flame source is present. This mitigates the risk of gas accumulation and potential explosions. The thermocouple is a passive device, meaning it does not require an external power source to operate. Its reliance solely on the heat of the pilot flame provides a reliable and independent safety mechanism.
The lifespan of a thermocouple can vary based on factors such as frequency of use, pilot flame quality, and the presence of contaminants in the gas supply. Over time, the hot junction can corrode or become coated with deposits, reducing its ability to generate sufficient millivoltage. Regular inspection and maintenance are essential for ensuring its continued functionality.
Replacing a Thermocouple in a Heatilator Gas Fireplace
Replacing a thermocouple is a relatively straightforward task, but it requires careful attention to detail and adherence to safety precautions. Prior to commencing the replacement, it is imperative to turn off the gas supply to the fireplace. Locate the gas shut-off valve, typically found near the fireplace or in the gas supply line, and turn it to the "off" position. Allowing the fireplace to cool down completely is also recommended to avoid any risk of burns.
Next, access the pilot burner assembly. This usually involves removing the fireplace's front panel or grate, depending on the specific Heatilator model. Consult the owner's manual for detailed instructions on accessing the pilot burner assembly. Once the assembly is accessible, carefully examine the existing thermocouple. Note its routing and connections to the pilot burner and the gas valve. This will serve as a guide during the installation of the new thermocouple.
Disconnect the old thermocouple from the gas valve. This connection is typically a threaded fitting. Use a wrench to loosen and remove the fitting. Avoid excessive force, as this could damage the gas valve. Disconnect the other end of the thermocouple from the pilot burner bracket. This may involve loosening a screw or clip that secures the thermocouple in place.
Install the new thermocouple by reversing the removal process. Securely attach one end of the thermocouple to the pilot burner bracket, ensuring that the hot junction is positioned directly within the path of the pilot flame. Connect the other end of the thermocouple to the gas valve, tightening the threaded fitting securely. It is crucial to ensure that the connections are tight to prevent gas leaks, but avoid over-tightening, which could damage the threads.
Once the new thermocouple is installed, turn the gas supply back on to the fireplace. Follow the manufacturer's instructions for relighting the pilot flame. Carefully observe the pilot flame to ensure that it is stable and engulfs the hot junction of the thermocouple. Allow the pilot flame to burn for a few minutes, then attempt to ignite the main burner. If the main burner ignites and remains lit, the thermocouple replacement was successful. If the main burner fails to ignite or extinguishes shortly after ignition, further troubleshooting is required.
After the replacement is complete, it is essential to perform a leak test on all gas connections that were disturbed during the process. This can be done by applying a soapy water solution to the connections and observing for the formation of bubbles, which indicate a gas leak. If a leak is detected, immediately turn off the gas supply and tighten the connections further. Repeat the leak test until no leaks are present.
Troubleshooting Common Thermocouple Issues
Several issues can arise with thermocouples that may prevent a Heatilator gas fireplace from operating correctly. One common problem is a dirty or corroded hot junction. Over time, soot, dust, and other contaminants can accumulate on the hot junction, reducing its ability to generate sufficient millivoltage. This can be addressed by carefully cleaning the hot junction with a fine-grit sandpaper or steel wool. Ensure that all debris is removed after cleaning.
Another potential issue is a loose or corroded connection at the gas valve. A poor electrical connection will impede the flow of millivoltage from the thermocouple to the gas valve, preventing the safety shutoff mechanism from remaining open. Inspect the connection at the gas valve for signs of corrosion or looseness. Clean the connection with a wire brush or contact cleaner, and ensure that the fitting is securely tightened.
A damaged thermocouple wire can also cause problems. If the wires are bent, kinked, or physically damaged, the millivolt output may be reduced. Inspect the wires along their entire length for any signs of damage. If damage is detected, the thermocouple should be replaced.
If the pilot flame is weak or unstable, it may not provide sufficient heat to the hot junction of the thermocouple. Ensure that the pilot burner orifice is clean and free of obstructions. A clogged orifice can restrict the flow of gas to the pilot burner, resulting in a weak flame. Consult the owner's manual for instructions on cleaning the pilot burner orifice.
Testing the thermocouple's millivolt output is a valuable diagnostic step. A multimeter can be used to measure the voltage generated by the thermocouple. With the pilot flame lit and heating the hot junction, connect the multimeter leads to the thermocouple terminals at the gas valve. A reading of less than 20 millivolts typically indicates that the thermocouple is failing and needs to be replaced.
In some cases, the problem may not be with the thermocouple itself, but rather with the gas valve. If the gas valve's safety shutoff mechanism is faulty, it may not respond to the millivoltage generated by the thermocouple. This can be difficult to diagnose without specialized equipment. A qualified technician should inspect the gas valve and determine if it needs to be repaired or replaced.
It is beneficial to routinely inspect the pilot light and thermocouple. Look for a strong, blue pilot flame engulfing the thermocouple. If the flame is yellow, weak, or inconsistent, it suggests the pilot assembly needs cleaning or adjustment. Furthermore, regular cleaning and inspection of the thermocouple connections can prevent issues related to corrosion and loose connections.

Heatilator Pse Thermocouple 2103 511

Heatilator Gas Sit Thermocouple 200 2950

Pcoa075 Heatilator Thermocouple Heatilatorparts Com

Heatilator Gas Fireplace Troubleshooting

Heatilator Amp Heat N Glo Natural Gas Pilot Assembly 4021 736 Com

Heatilator Heatnglo Direct Vent Fireplace 27 Thermocouple Robertshaw 446 511

Heatilator Direct Vent Fireplace Natural Gas Sit Pilot Assembly 30200 Bourlier S Barbecue And

68577 Heatilator Thermopile 750mv Heatilatorparts Com

Outdoor Kitchen Bbq Ods Gas Pilot Burner Parts Heatilator Fireplace Thermocouple For Stove Camping Pipe Line Wood China Spare Machine Made In Com

Heatilator Fire Parts Com
Related Posts