Stone Veneer Over Brick Fireplace: A Comprehensive Guide
The fireplace, a traditional focal point in many homes, provides warmth, ambiance, and aesthetic appeal. While brick fireplaces offer a classic and durable foundation, they can sometimes appear dated or clash with evolving interior design preferences. Stone veneer provides a versatile and cost-effective solution to update the look of a brick fireplace without the extensive demolition and reconstruction associated with removing the original brick. This article provides a comprehensive guide to understanding the process, benefits, and considerations involved in applying stone veneer over an existing brick fireplace.
Stone veneer, unlike natural stone, is a manufactured product designed to replicate the appearance and texture of real stone. It is typically made from a lightweight concrete mix molded to mimic the shapes and colors of various stone types, including fieldstone, river rock, and ledgestone. This lightweight nature makes stone veneer easier to handle and install than natural stone, reducing the structural demands on the existing fireplace structure. Furthermore, stone veneer offers greater consistency in color and size, simplifying the design and installation process.
The application of stone veneer over a brick fireplace can dramatically transform the room's aesthetic, adding texture, depth, and a touch of sophistication. The process involves preparing the brick surface, applying a mortar bed, and carefully adhering the stone veneer pieces. The finished result is a visually appealing and durable surface that enhances the fireplace's appearance and integrates seamlessly with the surrounding décor.
Key Point 1: Assessing the Existing Brick Fireplace
Before embarking on a stone veneer project, a thorough assessment of the existing brick fireplace is crucial. This evaluation determines the structural integrity of the brick, identifies any necessary repairs, and ensures the surface is properly prepared to receive the veneer. A compromised brick structure can lead to veneer failure and potentially hazardous conditions.
The initial step involves a visual inspection for cracks, loose bricks, or signs of water damage. Cracks can indicate structural issues, while loose bricks need to be re-mortared or replaced. Water damage can weaken the brick and mortar, compromising the adhesion of the stone veneer. If significant damage is present, consulting a qualified mason or structural engineer is recommended.
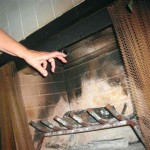
Cleaning the brick surface is also essential. Over time, brick can accumulate soot, dust, and grime, which can interfere with the bonding of the mortar. A wire brush can be used to remove loose debris, followed by a thorough cleaning with a detergent solution or a specialized brick cleaner. Pressure washing can be effective, but care must be taken to avoid damaging the brick or forcing water into the mortar joints.
Once the brick is cleaned, any loose or crumbling mortar joints should be removed and re-mortared. This process, known as repointing, involves carefully chiseling out the old mortar and replacing it with fresh mortar. Repointing ensures a stable and level surface for the stone veneer. The mortar should be allowed to cure completely before proceeding with the veneer installation.
Finally, the brick surface needs to be properly prepared to provide a strong mechanical bond for the mortar bed. This typically involves applying a scratch coat. A scratch coat is a thin layer of mortar that is applied to the brick surface and then scratched with a notched trowel. The scratches create a textured surface that allows the subsequent mortar bed to adhere more effectively.
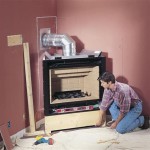
Key Point 2: Installation Process: Mortar and Veneer Application
The success of any stone veneer project hinges on the proper application of the mortar and the accurate placement of the veneer pieces. This stage requires careful attention to detail and adherence to the manufacturer's instructions for the specific stone veneer product being used. Deviations from recommended procedures can lead to adhesion problems, aesthetic imperfections, and premature failure of the veneer.
Choosing the right type of mortar is critical. A polymer-modified mortar specifically designed for stone veneer is recommended. These mortars offer superior adhesion, flexibility, and water resistance compared to standard mortar mixes. The mortar should be mixed according to the manufacturer's instructions, ensuring a consistent and workable consistency. Avoid adding excessive water, as this can weaken the mortar and reduce its bonding strength.
The mortar bed should be applied to the scratch coat in a consistent thickness, typically around ½ to ¾ of an inch. Using a notched trowel helps to create uniform ridges in the mortar, which provide additional surface area for the veneer to adhere to. Work in small sections to prevent the mortar from drying out before the veneer is applied. Ensure the mortar is evenly distributed across the surface, avoiding gaps or air pockets.
When placing the stone veneer, apply a thin layer of mortar to the back of each piece. This "buttering" technique ensures complete contact between the veneer and the mortar bed. Press each stone firmly into the mortar, using a slight twisting motion to ensure a strong bond. Maintain consistent spacing between the stones, using spacers if necessary, to achieve the desired aesthetic. Remove any excess mortar that squeezes out between the stones immediately.
Pay close attention to the pattern and arrangement of the stone veneer. Dry-laying the stones before applying mortar can help visualize the final appearance and ensure a balanced and aesthetically pleasing design. Avoid placing identical stones next to each other, and vary the sizes and shapes of the stones to create a natural and random look. Consider the overall symmetry and balance of the fireplace when arranging the veneer.
As the installation progresses, regularly check the veneer for plumb and level. Use a level to ensure that the stones are aligned vertically and horizontally. Minor adjustments can be made while the mortar is still wet. Once the mortar has cured, it will be difficult to make adjustments without damaging the veneer or the substrate.
Key Point 3: Considerations for Fireplace Safety and Design
While enhancing the appearance of the fireplace is a primary goal, safety considerations must remain paramount throughout the project. Fireplaces generate significant heat, and the materials used in the renovation must be non-combustible and able to withstand high temperatures. Additionally, proper design considerations are essential to ensure the finished fireplace complements the room's style and provides adequate clearance for combustible materials.
Stone veneer itself is typically non-combustible, making it a suitable material for fireplace surrounds. However, the mortar used to adhere the veneer must also be heat-resistant. Verify that the mortar is rated for fireplace applications and can withstand the temperatures generated by the firebox. Avoid using any combustible materials, such as wood trim or wallpaper, near the fireplace opening.
Maintaining proper clearances between the fireplace opening and combustible materials is crucial to prevent fires. Building codes typically specify minimum distances that must be maintained between the fireplace and flammable surfaces, such as mantels, moldings, and furniture. Adhere to these codes to ensure safe operation of the fireplace. Consult with a local building inspector if there are any uncertainties regarding clearance requirements.
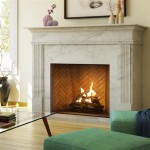
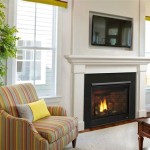
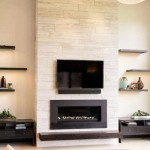
The design of the stone veneer surround should complement the overall style of the room. Consider the existing architectural features, color scheme, and furniture when selecting the type and color of stone veneer. A rustic stone veneer can create a cozy and inviting atmosphere, while a sleek and modern veneer can add a touch of sophistication. Choose a veneer that enhances the room's aesthetic and integrates seamlessly with the existing décor.
The size and scale of the stone veneer should be proportional to the size of the fireplace and the surrounding room. A large and imposing veneer can overwhelm a small space, while a small and understated veneer may get lost in a larger room. Consider the dimensions of the fireplace and the overall proportions of the room when selecting the size and shape of the veneer stones.
Proper ventilation is also essential for safe fireplace operation. Ensure that the chimney is properly cleaned and inspected before using the renovated fireplace. A blocked or damaged chimney can lead to dangerous carbon monoxide buildup. Consider installing a chimney cap to prevent birds, debris, and rain from entering the chimney. Regular maintenance and inspections are crucial to ensure the safe and efficient operation of the fireplace.
Ultimately, applying stone veneer over a brick fireplace is a transformative project that can significantly enhance the aesthetic appeal and value of a home. By carefully assessing the existing structure, properly preparing the surface, using appropriate materials, and paying attention to safety and design considerations, homeowners can achieve a stunning and durable fireplace surround that will provide years of enjoyment. The process requires meticulous attention to detail and adherence to best practices, but the resulting transformation is well worth the effort.

Installing Stone Veneer Over A Brick Fireplace Grand River

Pin By Tarra Wills Efkarpidis On For The Home Brick Fireplace Remodel Stone

Stone Veneer Over A Brick Fireplace Updates The Look

Stone Veneer Over A Brick Fireplace Updates The Look

Stone Veneer Over A Brick Fireplace Updates The Look

Can You Put Stone Veneer Over Brick

Can Stone Veneer Be Applied Over Brick Deluca Masonry Construction

Fireplace Facelift Using Natural Stone Veneer

Stone Veneer Fireplace Makeover Our Client Wanted To Update His Brick They Want

Installing Stone Veneer Over A Brick Fireplace Grand River