Stone Over Brick Fireplace: A Transformative Renovation
Many homeowners face the aesthetic dilemma of an outdated brick fireplace. While brick possesses a certain charm, its style might clash with contemporary or evolving interior design preferences. One popular and effective solution is to overlay the existing brick with stone. This transformation can significantly alter the fireplace's appearance, adding texture, sophistication, and a more modern or rustic feel, depending on the chosen stone.
The decision to cover brick with stone is a significant undertaking. It involves careful planning, selection of appropriate materials, and adherence to building codes. The "before and after" results can be dramatic, showcasing the potential to revitalize a living space. This article will explore the intricacies of this renovation process, highlighting key considerations and potential challenges.
Assessing the Existing Brick Fireplace
Prior to embarking on a stone overlay project, a thorough assessment of the existing brick fireplace is crucial. This evaluation determines the feasibility of the project and identifies any underlying structural issues that must be addressed before proceeding.
The first step involves inspecting the condition of the brick itself. Look for cracks, crumbling mortar, or any signs of water damage. These issues can compromise the stability of the fireplace and must be repaired before any stone is applied. Re-pointing, the process of replacing damaged mortar, is a common repair. In cases of severe damage, individual bricks may need to be replaced.
Next, evaluate the firebox and chimney. Ensure that the firebox is in good working order and that the chimney is properly lined and free of obstructions. A professional chimney sweep should inspect and clean the chimney to ensure safe and efficient operation. Any necessary repairs to the firebox or chimney must be completed before the stone overlay is installed.
Finally, consider the overall dimensions and design of the existing fireplace. These factors will influence the choice of stone and the design of the new façade. Accurate measurements are essential for ordering the correct amount of stone and for ensuring a proper fit.
Selecting the Right Stone
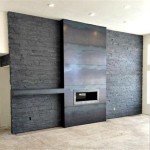
The choice of stone is paramount in achieving the desired aesthetic for the renovated fireplace. A wide variety of stone types, colors, and textures are available, each offering a unique look and feel. The selection process should consider the existing décor of the room, the desired style (e.g., modern, rustic, traditional), and the budget.
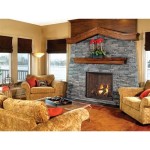
Natural stone options include granite, marble, slate, limestone, and fieldstone. These materials offer natural variations in color and texture, adding character and authenticity. Granite provides durability and a sophisticated look, while slate offers a more rustic and textured appearance. Each type also possesses varying degrees of heat resistance. Consider the specific properties of each stone type in relation to the fireplace environment.
Manufactured stone, also known as faux stone, is a more affordable alternative to natural stone. It is made from a blend of Portland cement, aggregates, and pigments, and is designed to mimic the appearance of natural stone. Manufactured stone is lighter in weight than natural stone, making it easier to install. It is also available in a wider range of colors and styles. However, it may lack the natural variations and unique character of natural stone.
In addition to the type of stone, consider the shape, size, and arrangement of the stones. Options range from large, rectangular stones to smaller, irregular stones. The arrangement can be random or patterned, depending on the desired look. Laying out a sample arrangement before installation can help visualize the final result.
Consider the mortar joint style as well. The color and width of the mortar joint can significantly impact the overall appearance. Common mortar joint styles include flush joints, recessed joints, and overgrouted joints. The choice of mortar joint should complement the chosen stone and the desired aesthetic.
The Installation Process: A Step-by-Step Guide
The installation of stone over brick requires careful preparation and precise execution. It is a labor-intensive process that typically involves the following steps:
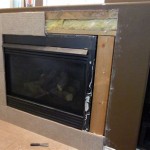
Surface Preparation: The brick surface must be thoroughly cleaned to remove any dirt, dust, or loose debris. A wire brush and a masonry cleaner can be used to prepare the surface. Any loose or crumbling mortar should be removed and replaced. A bonding agent, such as a latex-modified mortar, should be applied to the brick surface to improve adhesion.
Installing a Metal Lath: A metal lath, also known as wire mesh, is typically installed over the brick surface to provide a mechanical key for the mortar. The metal lath is attached to the brick using masonry nails or screws. This layer provides an additional layer of support, preventing the mortar from separating from the original brick surface.
Applying the Mortar Bed: A layer of mortar, typically a type S or type N mortar, is applied over the metal lath. The mortar bed should be thick enough to provide a level surface for the stone and to ensure proper adhesion. The thickness of the mortar bed will depend on the size and shape of the stones being used.
Setting the Stone: The stones are carefully set into the mortar bed, ensuring that they are level and properly aligned. A rubber mallet can be used to gently tap the stones into place. Spacers can be used to maintain consistent joint widths. It is recommended to start at the bottom and work upwards, allowing the mortar to set as you go. Ensure that the stones are firmly embedded in the mortar and that there are no gaps or voids.
Grouting and Finishing: Once the mortar has partially cured, typically after 24-48 hours, the joints are grouted. Grout is applied using a grout bag or a grout float, filling the joints completely. Excess grout is wiped away with a damp sponge. The joints are then tooled to create the desired joint style. This process ensures that the stone is securely anchored and that the finished fireplace has a professional appearance.
Sealing (Optional): Depending on the type of stone and the desired level of protection, a sealer may be applied to the finished surface. Sealing can help protect the stone from staining, water damage, and fading. Consult with a stone supplier or a professional installer to determine if sealing is necessary.
Addressing Potential Challenges
While covering a brick fireplace with stone can be a rewarding project, it is important to be aware of potential challenges and to plan accordingly.
Weight Considerations: Stone, especially natural stone, can be heavy. The existing brick fireplace must be able to support the added weight of the stone and mortar. Consult with a structural engineer if there are any concerns about the fireplace's structural integrity. This is particularly important for older fireplaces or those with pre-existing structural issues. Reinforcing the existing structure may be necessary to ensure safety and stability.
Building Codes and Permits: Ensure that the project complies with all applicable building codes and regulations. A building permit may be required before starting the work. Check with the local building department to determine permit requirements and to ensure that the project meets all safety standards. This is especially relevant when altering the structural elements of a fireplace.
Moisture Issues: If the fireplace is located on an exterior wall or in an area prone to moisture, it is important to take steps to prevent water damage. A vapor barrier can be installed behind the stone to protect the brick from moisture. Proper waterproofing techniques should be used to prevent water from seeping into the structure. Incorrect installation can lead to water damage and structural problems.
Matching Existing Décor: The choice of stone should complement the existing décor of the room. Consider the color scheme, style, and overall aesthetic of the space. Bringing samples of the stone to the room can help visualize the final result. It is important to consider the surrounding elements of the room when selecting materials.
Professional Installation vs. DIY: While it is possible to install stone over brick as a DIY project, it is often best to hire a professional installer. A professional has the experience and expertise to ensure that the project is done correctly and safely. They can also provide guidance on stone selection, design, and installation techniques. The complexity of the project and the individual's skillset should be considered when deciding whether to hire a professional.
The transformation from a brick fireplace to a stone fireplace can dramatically enhance the appearance of a room, but it is essential to approach the project with careful planning and meticulous execution. By understanding the steps involved and addressing potential challenges, homeowners can achieve a beautiful and long-lasting result.

Pin By Tarra Wills Efkarpidis On For The Home Brick Fireplace Remodel Stone

Read This Before Your Stone Fireplace Makeover Understanding Undertones

Chicago Stone Veneer Manufactured Siding By North Star Brick Fireplace Makeover

Reface A Fireplace With The Look Of Stone Or Brick Barron Designs

10 Fireplace Makeover Ideas Before And After Regency

From Megc1010 Love How My Fireplace Make Over Turned Out I Used Romabiopaints C Stone Makeover Mantles Painted Brick Exteriors

Stone Fireplace Before And After Corner Makeover Home

10 Fireplace Makeover Ideas Before And After Regency

Fireplace Design Gallery Showroom Milwaee Installations Badgerland Waesha Wisconsin

How To Update A Brick Fireplace With Chalk Paint Diy Beautify Creating Beauty At Home
Related Posts