Stacked Stone Tile Over Brick Fireplace: A Comprehensive Guide
Renovating a fireplace can dramatically transform a living space, breathing new life into an existing focal point. One popular and visually striking option is installing stacked stone tile over a brick fireplace. This technique combines the rustic charm of natural stone with the existing structure of the brick, creating a sophisticated and textured aesthetic. This guide will provide a detailed overview of the process, from preparation and material selection to installation techniques and necessary precautions.
Before embarking on this project, it's crucial to understand the complexities involved. While seemingly straightforward, proper preparation, adherence to best practices, and a keen eye for detail are essential for achieving a professional and lasting result. Neglecting these aspects can lead to a subpar finish, potential safety hazards, and costly repairs down the line.
Key Considerations Before Installation
Prior to purchasing materials or starting the installation, several key factors must be addressed. These considerations will significantly impact the final outcome and the longevity of the stacked stone installation.
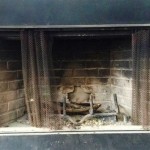
1. Structural Integrity of the Brick Fireplace: The existing brick fireplace must be in sound structural condition. Inspect the brick for cracks, crumbling mortar, or any signs of instability. Address any necessary repairs to the brickwork before proceeding. Applying stacked stone over a compromised brick structure will only exacerbate the underlying issues, leading to further deterioration and potential collapse. This might involve repointing mortar joints, replacing damaged bricks, or consulting a structural engineer for more significant concerns. A stable foundation is paramount for a successful and safe installation.
2. Weight Considerations: Stacked stone, particularly natural stone, can be quite heavy. The brick fireplace must be capable of supporting the added weight without compromising its structural integrity. Consult with a professional to determine the load-bearing capacity of the fireplace and ensure it can safely accommodate the chosen stone type and thickness. Selecting thinner, lighter-weight stacked stone options or using manufactured stone veneer can help mitigate weight concerns. Furthermore, proper adhesion is crucial to distribute the weight evenly and prevent the stone from detaching over time.
3. Building Codes and Regulations: Local building codes often dictate specific requirements for fireplace renovations, particularly regarding clearances to combustible materials and fire safety standards. Research and adhere to all applicable codes and regulations before starting the project. This may involve obtaining necessary permits or inspections. Failure to comply with building codes can result in fines, project delays, and the need for costly rework. Consult with your local building department to ensure compliance and avoid potential legal issues.
Materials and Tools Required
A successful stacked stone installation necessitates the right materials and tools. Gathering everything in advance will streamline the process and minimize interruptions.
1. Stacked Stone Tile: Choose stacked stone tile that complements the desired aesthetic and is suitable for fireplace applications. Options include natural stone (such as slate, quartzite, or travertine) and manufactured stone veneer. Consider the color, texture, size, and thickness of the stone. Ensure you purchase enough stone to cover the entire fireplace surface, accounting for cuts and waste. Ordering a slightly larger quantity than needed is always recommended to allow for potential errors or design changes.
2. Thin-Set Mortar: Select a high-quality thin-set mortar specifically designed for installing stone tile. Polymer-modified thin-set mortars offer superior adhesion and flexibility, which are essential for vertical applications like fireplace surrounds. Choose a mortar that is rated for both interior and exterior use, even if the fireplace is indoors, as it will provide better resistance to temperature fluctuations and moisture.
3. Grout (Optional): While stacked stone installations often feature dry-stacked joints without grout, grout can be used to fill gaps or create a more uniform appearance. If using grout, select a color that complements the stone and is suitable for fireplace applications. Epoxy grout is a more durable and stain-resistant option than conventional cement-based grout, but it is also more expensive and requires more skill to install.
4. Sealer: Applying a stone sealer after installation helps protect the stone from stains, moisture, and discoloration. Choose a sealer specifically designed for the type of stone you are using and follow the manufacturer's instructions carefully. Some sealers can enhance the natural color of the stone, while others provide a matte finish. Sealing the stone is particularly important for fireplaces, as they are exposed to soot and ash.
5. Tools: The necessary tools include a notched trowel (size determined by the stone thickness), a wet saw or angle grinder with a diamond blade for cutting stone, a margin trowel, a grout sponge (if using grout), a level, a measuring tape, a pencil, safety glasses, gloves, and a dust mask. A mortar mixing tub and drill with a mixing paddle are also helpful for preparing the thin-set mortar.
6. Furring Strips (Optional): If the brick surface is uneven or significantly out of plumb, furring strips can be installed to create a level surface for the stacked stone. This involves attaching wood strips to the brick using masonry fasteners and shimming them as needed to create a flat plane. While this adds an extra step, it can significantly improve the final appearance of the installation.
Step-by-Step Installation Process
The installation process requires careful planning and execution. Following these steps will help ensure a successful and aesthetically pleasing outcome.
1. Surface Preparation: Thoroughly clean the brick surface to remove any dirt, dust, grease, or loose particles. Use a wire brush and a masonry cleaner to prepare the surface. If the brick is painted, consider removing the paint for better adhesion. Etching the brick surface with a muriatic acid solution can also improve bonding, but exercise extreme caution when handling acids and follow all safety precautions. Rinse the surface thoroughly with water and allow it to dry completely before proceeding.
2. Applying Scratch Coat (Optional): If the brick surface is particularly smooth or non-porous, applying a scratch coat of thin-set mortar can improve adhesion. Mix a small batch of thin-set mortar to a slurry consistency and apply a thin, even layer to the brick surface using a margin trowel. Use a notched trowel to create ridges in the mortar, allowing it to grip the stacked stone more effectively. Allow the scratch coat to dry for at least 24 hours before proceeding with the stone installation.
3. Dry-Fitting the Stone: Before applying any mortar, dry-fit the stacked stone to plan the layout and determine any necessary cuts. Arrange the stones on the floor or a table to visualize the pattern and ensure a balanced appearance. Use a wet saw or angle grinder with a diamond blade to cut the stones to fit around the firebox opening and any other architectural features. Wear safety glasses and a dust mask when cutting stone, as it generates significant dust.
4. Mixing and Applying Thin-Set Mortar: Mix the thin-set mortar according to the manufacturer's instructions. Use a drill with a mixing paddle to achieve a smooth, consistent consistency. Avoid adding too much water, as this can weaken the mortar. Apply the thin-set mortar to the back of each stone using a notched trowel. The size of the notch will depend on the thickness and size of the stone. Ensure that the entire back of the stone is covered with mortar to provide maximum adhesion.
5. Installing the Stacked Stone: Press each stone firmly onto the brick surface, ensuring good contact with the mortar. Use a level to ensure that the stones are installed plumb and level. Maintain consistent joint spacing between the stones. Use shims or spacers if necessary to achieve uniform spacing. Start at the bottom of the fireplace and work your way up, allowing the weight of each row of stones to help support the row above. Periodically check the alignment of the stones to ensure they are not shifting or settling.
6. Cutting and Fitting Stones: As you progress, you will likely need to cut and fit stones to accommodate corners, edges, and architectural features. Use a wet saw or angle grinder with a diamond blade to make precise cuts. Dry-fit the cut stones before applying mortar to ensure a proper fit. Pay close attention to the alignment and aesthetics of the cuts, as they will be highly visible in the finished installation.
7. Grouting (Optional): If using grout, apply it after the thin-set mortar has fully cured, typically after 24-48 hours. Apply the grout to the joints using a grout float, pressing it firmly into the gaps. Remove excess grout with a damp grout sponge, being careful not to remove too much grout from the joints. Allow the grout to cure according to the manufacturer's instructions. Wipe the stone surface with a clean, dry cloth to remove any remaining grout haze.
8. Sealing the Stone: After the mortar or grout has fully cured, apply a stone sealer to protect the stone from stains and moisture. Follow the manufacturer's instructions carefully, applying the sealer evenly to the entire surface. Allow the sealer to dry completely before using the fireplace.
9. Final Inspection and Cleanup: Once the installation is complete and the sealant has dried, conduct a final inspection to ensure that all stones are securely adhered and that the surface is clean and uniform. Remove any remaining debris or mortar residue. Enjoy the newly renovated fireplace.

First Timer Looking To Put Stacked Slate Over Brick Fireplace Ceramic Tile Advice Forums John Bridge

Diy Stacked Stone Fireplaces On A Budget Msi Blog

How To Diy A Stacked Stone Feature Over Existing Brick

Natural Stacked Stone Veneer Fireplace Ideas

12 Stacked Stone Fireplace Ideas For Optimal Coziness

Stacked Stone Over Brick Fireplace Ceramic Tile Advice Forums John Bridge

Pin On Home

Faux Stone Fireplace Surround Over Old Brick Genstone

Stand Out White Stacked Stone Accent Fireplace

Read This Before Your Stone Fireplace Makeover Understanding Undertones
Related Posts