Stacked Stone Fireplace DIY: A Guide to Building Your Dream Hearth
A stacked stone fireplace is a timeless and elegant addition to any home, offering warmth, beauty, and a focal point for gatherings. Building your own stacked stone fireplace can be a rewarding DIY project, allowing you to personalize your space and save on professional installation costs. With careful planning and execution, you can achieve a stunning result that enhances your home's aesthetic appeal and comfort.
Planning and Design
Before you begin, a well-defined plan is crucial. Consider these factors:
- Fireplace Location: Determine the ideal placement for your fireplace, accounting for structural considerations, existing utilities, and desired visual impact. It's best to consult with a building professional to ensure your chosen location is suitable and complies with local building codes.
- Firebox Size and Style: Choose a firebox size that aligns with the scale of your fireplace and your desired heat output. The firebox style (traditional, modern, or contemporary) will influence the overall aesthetic of the fireplace.
- Stone Type: Explore various stone types and textures to find the perfect match for your home's style. Consider the color scheme, stone size, and weight. Consult with a stone supplier for guidance on material selection and installation techniques.
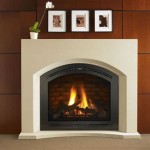
- Fireplace Surround Design: Decide on the shape and size of the fireplace surround, which will frame the firebox and create a cohesive visual element with the stacked stone.
- Budget: Establish a realistic budget for materials, tools, and potential professional assistance. Be sure to factor in costs for permits, inspections, and any unforeseen expenses.
Once you've finalized the design, create detailed drawings or sketches to guide your construction. These visual aids will help you visualize the finished product and ensure proper dimensions and arrangement of the stone.
Building the Fireplace Foundation
A robust foundation is paramount for a safe and stable fireplace. Follow these steps:
- Prepare the Site: Clear the area where the fireplace will be built, removing any debris or obstacles. Ensure the ground is level and compact. If the ground is uneven, level it with gravel or concrete.
- Create the Foundation: Depending on the weight of the fireplace and your local building codes, you might need a poured concrete foundation. To achieve this, construct a formwork with treated lumber, pour concrete, and allow it to cure completely. Consider using a concrete mix designed for exterior applications.
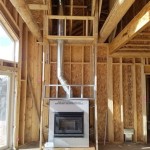
- Install the Firebox: Once the foundation is set, install the firebox according to the manufacturer's instructions. Secure the firebox to the foundation using appropriate fasteners and ensure proper ventilation.
Laying Stacked Stone
Laying stacked stone requires patience and precision. This is the most visually impactful part of the project, so take your time and work meticulously. Consider these tips:
- Prepare the Stone: Before laying the stones, it's crucial to clean them thoroughly to remove dust and debris that could hinder adhesion. You can use a wire brush or a pressure washer to achieve this.
- Apply Mortar: Spread mortar evenly over the foundation and firebox using a trowel. The mortar thickness should be consistent to ensure a smooth and even surface.
- Lay the First Row: Carefully place the first row of stones, ensuring they are level and properly aligned. Use a level and a chalk line to guide your placement. Leave gaps between the stones for mortar joints.
- Continue Laying Rows: Work your way up, carefully placing each stone and aligning it with the row below. Check for levelness and alignment frequently. Use a rubber mallet to gently tap stones into place if needed.
- Create Mortar Joints: As you lay the stones, use a mortar tool to create consistent and neat mortar joints between the stones. This adds visual appeal and helps to hold the stones together.
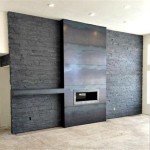
- Stagger the Stones: To create a visually appealing stacked stone pattern, stagger the stones in each row. This adds depth and texture to the fireplace.
- Finish the Surround: Once you have stacked the stones around the firebox, you can complete the surround by adding decorative elements such as stone caps, window surrounds, or hearths.
Finishing Touches
After the stacked stone is laid and the mortar has cured, you can add finishing touches to enhance the fireplace's appearance and functionality. Consider these options:
- Grouting: Apply grout to the mortar joints to fill any gaps and create a clean and professional finish. Choose a grout color that complements the stone.
- Sealing: Seal the stone to protect it from moisture, stains, and weathering. This step is particularly important for outdoor fireplaces or fireplaces exposed to high humidity.
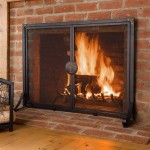
- Decorative Elements: Enhance the fireplace's aesthetic appeal by adding decorative elements such as a mantel, sconces, or a fire screen.
Remember to follow safety precautions throughout the project. Wear protective gear such as gloves, safety glasses, and dust masks. If you are working with a gas fireplace, consult with a qualified technician to ensure safe installation and operation.

Hirondelle Rustique Diy Stacked Stone Fireplace First Remodeling Project Part 2 Fireplaces Brick Makeover Remodel

Diy Stacked Stone Fireplaces On A Budget Msi Blog

Stacked Stone Fireplace How To Diy

Transform Your Space With A Diy Stacked Stone Fireplace

Tips On How To Build A Stone Fireplace Horizon

How To Build An Outdoor Stacked Stone Fireplace

Diy Fireplace Design Using Stacked Stone Genstone

12 Stacked Stone Fireplace Ideas For Optimal Coziness

12 Stacked Stone Fireplace Ideas For Optimal Coziness

Stacked Stone Fireplace Cost Installation Examples Ideas