Replacing a Gas Fireplace Insert: A Comprehensive Guide
A gas fireplace insert offers an efficient and aesthetically pleasing way to heat a room, utilizing existing fireplace infrastructure while providing a more controlled and cleaner burning source of warmth compared to traditional wood-burning fireplaces. Over time, however, these inserts may require replacement due to age, mechanical failures, or a desire for improved efficiency or updated aesthetics. The process of replacing a gas fireplace insert involves careful planning, precise execution, and adherence to safety regulations. This article provides a comprehensive guide to understanding the steps involved in this undertaking.
Before embarking on a gas fireplace insert replacement, it is crucial to understand the different types of inserts available, assess the compatibility of new models with the existing fireplace and gas line, and prioritize safety throughout the entire process. Improper installation can lead to gas leaks, fire hazards, and carbon monoxide poisoning. Therefore, professional installation is often recommended, especially for individuals unfamiliar with gas line connections and safety regulations.
Key Point 1: Assessment and Planning
The initial stage of replacing a gas fireplace insert centers on a thorough assessment of the existing fireplace and a meticulous planning process. This phase is critical for ensuring a smooth and safe installation.
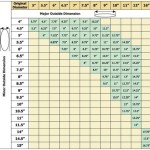
First, the existing fireplace opening must be accurately measured. Height, width, and depth are crucial dimensions for selecting a new insert that will fit correctly. Note any irregularities in the fireplace opening, such as angled fireboxes or protruding bricks, as these may require modifications to the fireplace surround or adjustments to the insert's installation. Take clear photographs of the existing setup. These photos can be valuable for reference during the removal and installation process.
Next, determine the type of gas line currently servicing the fireplace – natural gas or propane. Gas fireplace inserts are typically designed to operate on one fuel source only. Using the wrong fuel can damage the appliance and create a dangerous situation. Verify the gas line pressure and BTU (British Thermal Unit) rating to ensure it matches the requirements of the new insert. The BTU rating represents the amount of heat the insert can produce; a higher BTU rating indicates a more powerful heating capacity. The gas line may need to be adjusted or replaced to accommodate a new insert with different requirements.
Then, examine the existing venting system. Gas fireplace inserts utilize either direct vent or B-vent systems. Direct vent systems draw combustion air from outside and exhaust fumes directly outside, typically through a coaxial vent system. B-vent systems, on the other hand, rely on room air for combustion and exhaust fumes through a chimney. The new insert must be compatible with the existing venting system. Switching between vent types often requires extensive and costly modifications to the fireplace and chimney.
Finally, research and select a new gas fireplace insert that meets heating needs, aesthetic preferences, and budget constraints. Consider factors such as BTU output, efficiency ratings, ignition type (electronic or pilot light), and available features like remote control operation and thermostat settings. Compare different models from reputable manufacturers and read customer reviews to gain insights into their performance and reliability.
Key Point 2: Removal of the Existing Insert
Once the replacement insert has been selected and the assessment is complete, the next step involves removing the old gas fireplace insert. This process requires careful attention to safety protocols to prevent gas leaks and damage to the fireplace.
Begin by turning off the gas supply to the fireplace. Locate the gas shut-off valve, usually located near the fireplace or in the basement. Turn the valve to the "off" position. Double-check that the gas is completely shut off by attempting to light the pilot light on the existing insert. If the pilot light does not ignite, the gas supply is properly shut off.
Disconnect the gas line from the existing insert. Use a wrench to loosen the gas line connection. Have a bucket nearby to catch any residual gas that may be trapped in the line. Seal the open end of the gas line with a gas-tight cap or plug to prevent gas from leaking into the room. This step is crucial for preventing a potentially hazardous situation.
Disconnect the venting system. Carefully detach the vent pipes from the existing insert. Wear gloves and a dust mask to protect from debris and soot. Inspect the vent pipes for any signs of damage or corrosion. If any issues are found, it might be necessary to replace sections of the venting system. Set the removed vent pipes aside for inspection and potential reuse.
Remove any decorative elements or trim surrounding the existing insert. These components may be attached with screws, brackets, or adhesive. Use appropriate tools to carefully detach them without damaging the fireplace surround. Store these elements in a safe place for potential reinstallation with the new insert.
Carefully slide the existing insert out of the fireplace opening. The insert may be heavy, so enlist assistance to avoid injury. Take note of how the insert is secured in place, as this information will be helpful during the installation of the new insert. Once the insert is removed, thoroughly clean the fireplace opening to remove any dust, debris, or soot. This will provide a clean surface for the new insert to sit against.
Key Point 3: Installation of the New Insert and Verification
The final stage involves installing the new gas fireplace insert, connecting the gas line and venting, and verifying the system's safe and efficient operation. Precision and adherence to manufacturer's instructions are critical during this phase.
Position the new gas fireplace insert into the fireplace opening. Ensure that the insert is level and properly aligned. Use shims if necessary to level the insert. Secure the insert in place according to the manufacturer's instructions. This may involve using screws, brackets, or other fasteners.
Reconnect the venting system. Carefully attach the vent pipes to the new insert, ensuring a tight and secure connection. Use sealant or tape specifically designed for gas venting systems to prevent leaks. Follow the manufacturer's instructions for the proper orientation and connection of the vent pipes. Double-check that all connections are tight and secure.
Reconnect the gas line. Carefully remove the cap or plug from the gas line and connect it to the new insert. Use a gas pipe sealant to ensure an airtight connection. Tighten the connection with a wrench. Before proceeding, test the connection for leaks. Apply a solution of soapy water to the connection and look for bubbles. If bubbles appear, tighten the connection further and retest. If leaks persist, consult a qualified gas technician.
Turn the gas supply back on. Slowly open the gas shut-off valve. Allow a few minutes for the gas to fill the line. Attempt to light the pilot light on the new insert according to the manufacturer's instructions. Once the pilot light is lit, observe the flame for stability. If the flame is weak or flickering, adjust the gas pressure or consult a qualified gas technician.
Finally, test the operation of the new gas fireplace insert. Turn on the main burner and observe the flame pattern. Ensure that the flame is burning evenly and efficiently. Check the thermostat and remote control functions. Verify that the insert is heating the room effectively. Allow the insert to run for several hours to burn off any residual oils or manufacturing residue. Monitor the insert for any unusual noises, smells, or malfunctions. If any issues arise, immediately turn off the gas supply and consult a qualified technician.
Following these steps carefully will contribute to a successful gas fireplace insert replacement, providing a safe and efficient heating solution for the home. It is imperative to consult local building codes and regulations and, if unsure about any aspect of the process, to seek professional assistance from a licensed gas technician.

How To Install Gas Fireplace Insert Heat Glo

Convert To Gas Installing Fireplace Inserts Doctor Flue

How To Buy A Gas Fireplace Insert Buyer S Guide From Regency

How To Modernize And Update A Gas Fireplace We Love Fire

Remodel Or Upgrade Your Existing Fireplace The Kernel Burner

Converting A Wood Burning Fireplace Into Gas Heat Glo

Best Fireplace Insert Repair Installs Ton Service

Gas Fireplace Inserts Fireplacesdirect Com

How To Install A Fireplace Insert Diy Save Money

Replacing Your Condo Fireplace Vancouver Gas Fireplaces
Related Posts