Removing an Old Tile Fireplace Surround: A Comprehensive Guide
Removing an old tile fireplace surround can be a daunting but achievable task for homeowners looking to update their living space. This process often involves careful planning, the right tools, and a methodical approach to minimize damage and ensure a smooth transition to a new surround. This article provides a comprehensive guide to safely and effectively removing an old tile fireplace surround, covering essential preparations, removal techniques, and post-removal procedures.
Pre-Removal Assessment and Preparation
Before commencing the removal process, a thorough assessment of the existing tile surround and the surrounding area is crucial. This assessment helps identify potential hazards, determine the construction methods used, and plan the removal strategy. Start by inspecting the type of tile used. Ceramic, porcelain, and natural stone tiles each present unique characteristics that can influence the removal process. Identify the type of adhesive used to secure the tiles. Mastic, thin-set mortar, and epoxy-based adhesives each require different approaches.
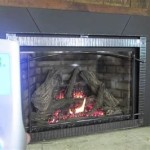
Carefully examine the condition of the surrounding materials, such as the firebox, mantel, flooring, and adjacent walls. Note any existing damage, cracks, or weaknesses that may be exacerbated during the removal process. This information will help you take necessary precautions to prevent further damage. Protect the surrounding area by covering the floor with drop cloths, plastic sheeting, or cardboard. This will shield the flooring from debris, dust, and accidental damage. Cover the firebox opening with plastic sheeting or cardboard to prevent dust and debris from entering the chimney.
Gather the necessary tools and safety equipment. Essential tools include a hammer, chisel, putty knife, pry bar, oscillating multi-tool with a grout removal blade, safety glasses, dust mask, gloves, and a bucket for debris. Consider using a respirator if you're concerned about dust or mold. Safety glasses are essential to protect your eyes from flying debris. A dust mask or respirator is necessary to prevent inhalation of dust particles that may contain harmful substances like asbestos, especially in older homes. Gloves will protect your hands from sharp edges and rough surfaces.
Understanding local building codes and regulations is important, especially if asbestos is suspected. Older homes built before the 1980s may contain asbestos-containing materials in tile adhesives or grout. If asbestos is suspected, do not proceed with the removal yourself. Contact a certified asbestos abatement professional for testing and removal. Disturbing asbestos-containing materials can release harmful fibers into the air, posing serious health risks. Adhering to local regulations regarding asbestos removal is essential to protect yourself and others.
Effective Tile Removal Techniques
The actual removal of the tile surround requires a systematic approach to minimize damage and ensure safety. Start by removing the grout surrounding the tiles. Grout removal can be accomplished using several methods, including a grout saw, an oscillating multi-tool with a grout removal blade, or a utility knife. The oscillating multi-tool is often the most efficient and precise method. Carefully run the blade along the grout lines, being careful not to damage the surrounding tiles or the substrate. Consistent pressure and slow, steady movements are key to achieving a clean grout line removal.
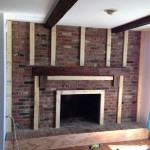
After the grout has been removed, begin removing the tiles one by one. Start with tiles that are loose or already damaged. Use a chisel and hammer to gently tap behind the tile, working your way around the edges. Apply steady, even pressure to release the tile from the adhesive. Avoid using excessive force, which can cause the tile to shatter or damage the substrate. For tiles that are firmly adhered, use a putty knife or thin pry bar to gently pry them away from the wall. Work the tool behind the tile, applying gradual pressure until the adhesive bond breaks. If the tiles are particularly stubborn, consider using a heat gun to soften the adhesive before attempting to remove them. Apply heat evenly to the tile surface for a few seconds, then try prying the tile off again. Exercise caution when using a heat gun to avoid overheating the tile or damaging surrounding materials.
As tiles are removed, immediately place them in a bucket or container for disposal. This will help keep the work area organized and prevent accidents. Be mindful of any sharp edges or broken pieces. Continue the removal process until all of the tiles have been removed from the fireplace surround. Periodically inspect the substrate for any loose or damaged areas. Address these areas before proceeding to the next step. Proper tile removal requires patience and careful execution. Taking your time and using the right tools will help you achieve a successful outcome.
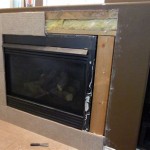
Post-Removal Procedures and Surface Preparation
Once all the tiles have been removed, the next step involves cleaning and preparing the underlying surface for the new surround. This process typically involves removing residual adhesive, repairing any damage to the substrate, and ensuring a smooth, even surface for the new installation. Start by removing any remaining adhesive from the fireplace surround. Several methods can be used, including scraping, sanding, and chemical solvents. A putty knife or scraper can be used to remove loose adhesive. For more stubborn adhesive, a chemical adhesive remover may be necessary. Follow the manufacturer's instructions carefully when using chemical solvents and ensure proper ventilation.
After removing the bulk of the adhesive, use a sanding block or orbital sander to smooth the surface. This will remove any remaining adhesive residue and create a uniform surface for the new surround. Inspect the substrate for any cracks, holes, or other damage. Repair any damage using appropriate patching compounds or fillers. Allow the patching compound to dry completely before proceeding. Depending on the type of substrate and the new surround being installed, it may be necessary to apply a primer or sealant. This will help improve adhesion and protect the substrate from moisture. Follow the manufacturer's instructions for the primer or sealant being used.
Ensure the surface is clean and free from dust and debris before installing the new surround. Use a vacuum cleaner or damp cloth to remove any remaining particles. A clean surface will ensure proper adhesion of the new surround. Consider leveling the surface for a professional finish. Using a self-leveling compound can help create a perfectly flat surface for installing the new tile surround.
Dispose of all debris and materials properly in accordance with local regulations. Tile debris, adhesive, and other materials may not be suitable for regular trash disposal. Contact your local waste management authority for information on proper disposal methods. Store any unused materials in a safe and dry place for future use.
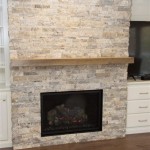
Replacing an old tile fireplace surround can transform the look and feel of a room. By following these steps, homeowners can safely and effectively remove the old tile surround and prepare the surface for a new and updated look. This process requires careful planning, proper tools, and attention to detail, but the rewards of a modernized fireplace are well worth the effort.

How To Remove Fireplace Tiles Chaotically Creative

Fireplace Demolition Day The Handyman S Daughter

How To Remove Fireplace Tiles Chaotically Creative

How To Remove Quarry Tile Level New Tiles

Diy Tiling A Fireplace Surround What We Learned Along The Way

How To Retile A Fireplace Without Removing The Old Tile Surround Diy Remodel

How To Remove Fireplace Tiles Chaotically Creative

Removing A Fireplace Mantel And Tile Surround Architectural Observer

Fireplace Demolition Day The Handyman S Daughter

How To Prep A Fireplace For New Tile House One
Related Posts