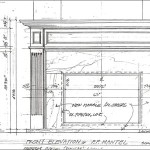
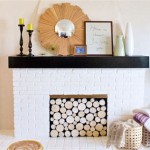
Removing a Wooden Fireplace Surround
A wooden fireplace surround can enhance the aesthetics of a room, adding warmth and character. However, over time, it may become damaged or simply no longer match your desired decor. Removing an existing wooden fireplace surround involves a careful process that requires patience and the right tools. This guide will outline the steps involved in removing a wooden fireplace surround, ensuring a safe and successful outcome.
Assess the Surround and Gather Tools
Before embarking on the removal process, it is crucial to assess the surround's condition and gather the necessary tools. First, inspect the surround for any signs of damage, such as cracks, warping, or loose pieces. This will help you determine the best approach for removal. Next, identify the type of attachment method used. Common methods include nails, screws, or adhesive.
Once you have a clear understanding of the surround's construction, gather the following tools:
- Safety glasses
- Gloves
- Crowbar or pry bar
- Hammer
- Screwdriver or drill with a drill bit
- Putty knife or paint scraper
- Dust mask
- Vacuum cleaner
Disconnecting the Surround
The first step in removing the wooden fireplace surround is to disconnect it from the wall. Begin by carefully removing any decorative trim or molding around the surround. If the surround is attached with nails or screws, use a hammer and screwdriver or drill to remove them.
If the surround is glued in place, apply gentle heat from a hairdryer or heat gun to soften the adhesive. This will make it easier to pry the surround away from the wall. Use a crowbar or pry bar carefully to gently separate the surround from the wall, working your way around the perimeter. Remember to exercise caution to avoid damaging the surrounding walls.
Removing the Surround
Once the surround is disconnected, you can begin removing it from the wall. If the surround is lightweight and consists of individual pieces, you can carefully lift it off the wall. For heavier surrounds, use a crowbar or pry bar to separate the frame from the wall and then carefully lift it away.
Remove any remaining fasteners or adhesive residue from the wall. Use a putty knife or paint scraper to scrape off any stubborn glue or adhesive. Be sure to clean the surrounding area thoroughly to remove any dust or debris.
Preparing for Replacement
Once the surround is removed, you need to prepare the wall for the installation of a new surround or for any necessary repairs. Examine the wall for any damage caused during the removal process. If there are any gaps, cracks, or holes, they should be filled using spackle or patching compound. Allow the patched areas to dry completely before proceeding with any further work.
Next, apply a primer to the wall. This will create a smooth surface for the new surround and improve paint adhesion. If you are planning to install a new surround, ensure the dimensions of the new surround align with the existing wall space.

How To Remove A Fireplace Surround And Mantel Universe

How To Remove A Fireplace Surround And Mantel Universe

How To Fit And Replace A Fire Surround Homebase

Fireplace Demolition Day The Handyman S Daughter

How To Remove A Fireplace Mantel

How To Remove A Builder Grade Fireplace Surround And Mantel

How To Remove An Old Fireplace Surround Merrypad

How Do I Remove The Mantle Of A Fireplace Hometalk

Remove Fireplace Rebuild With Slate Hearth Ready For Electric Fire Cosy Stoves

How To Remove My Too Big Hearth Help Com Forums Home
Related Posts