Removing a Thermocouple from a Gas Fireplace: A Comprehensive Guide
Gas fireplaces offer warmth and ambiance with the convenience of a simple ignition switch. However, like any gas appliance, their safe operation relies on various components, including the thermocouple. The thermocouple is a safety device that senses the pilot flame and allows the main gas valve to remain open. When the pilot light is extinguished, the thermocouple cools and shuts off the gas supply, preventing gas leaks. While generally durable, thermocouples can fail over time, requiring replacement. This process may necessitate removing the old thermocouple. It is crucial to understand the procedure and safety precautions involved.
Before undertaking any repair or removal, safety is paramount. Disconnect the gas supply to the fireplace. This is typically done at the gas shut-off valve located near the fireplace or at the main gas meter. Confirm the gas is off by attempting to light the pilot with the control knob in the "pilot" position. If no gas flows, the supply is successfully shut off. Allow the fireplace to cool completely before proceeding. Ensure adequate ventilation in the room to dissipate any residual gas odors. It is also advisable to have a carbon monoxide detector nearby to monitor for any potential leaks.
Identifying the Thermocouple
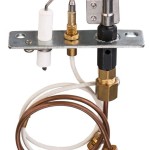
The thermocouple is a slender, copper rod, usually between 2 and 3 inches long. It is typically located near the pilot light assembly. One end of the thermocouple is positioned directly in the pilot flame, while the other end is connected to the gas control valve. Follow the thin copper tubing leading from the pilot light assembly back to the valve. This tubing will often lead directly to the thermocouple.
Examine the connection points of the thermocouple closely. One end is usually screwed into the gas valve. The other end, near the pilot light, may be held in place by a clip or bracket. Take note of the configuration of these connections, as this will be helpful when installing the new thermocouple. It may be beneficial to take photographs of the existing setup before beginning the removal process. This provides a visual reference and minimizes the risk of incorrect reassembly. Refer to the fireplace's owner's manual for a detailed diagram of the pilot light assembly and thermocouple location.
Step-by-Step Removal Procedure
Once the thermocouple is located and the fireplace is safely prepared, the removal process can begin. Begin by loosening the nut or screw that secures the thermocouple to the gas valve. Use the correct size wrench or screwdriver to avoid damaging the fitting. Turn the nut counterclockwise to loosen it. It may be necessary to use penetrating oil if the fitting is corroded or stuck. Allow the oil to soak for a few minutes before attempting to loosen the nut again. Avoid excessive force, as this could damage the gas valve. Once the fitting is loose, carefully unscrew it completely.
Next, detach the thermocouple from the pilot light assembly. If it is held in place by a clip or bracket, gently release the clip or loosen the securing screw. Slide the thermocouple out of its position. Be careful not to bend or damage the thermocouple during removal. Once both ends are detached, the thermocouple can be completely removed from the fireplace.
Inspect the area around the pilot light assembly and gas valve for any signs of corrosion or damage. Clean the area with a soft brush or cloth to remove any debris. This will ensure a good connection when the new thermocouple is installed. It is also a good opportunity to inspect the pilot light orifice for any blockages. A clogged orifice can prevent the pilot light from burning properly, which can affect the thermocouple's performance.
Precautions and Alternatives
Working with gas appliances carries inherent risks. If there is any uncertainty about the removal or replacement process, consult a qualified gas technician. Incorrect installation or repairs can lead to gas leaks, fire hazards, or carbon monoxide poisoning. A professional technician has the training and experience to safely and effectively handle these situations.
Before replacing the thermocouple, consider other possible causes of pilot light failure. A dirty or clogged pilot light orifice, a faulty gas valve, or a problem with the gas supply can also prevent the pilot light from staying lit. Troubleshooting these issues may resolve the problem without requiring thermocouple replacement. Consult the fireplace's owner's manual for troubleshooting tips and diagrams. If, after careful inspection, the thermocouple appears to be the culprit, proceed with the replacement, following the manufacturer's instructions.
When handling the thermocouple, avoid bending or kinking the copper tubing. This can restrict gas flow and affect the thermocouple's performance. If the tubing is damaged, it may need to be replaced along with the thermocouple. Also, ensure that the new thermocouple is the correct type and size for the specific fireplace model. Using the wrong thermocouple can lead to improper operation and safety hazards. Refer to the fireplace's owner's manual or consult a qualified gas technician to determine the correct replacement part.

Gas Fireplace Won T Stay Lit Magic Touch Mechanical

Know How To Replace A Gas Fireplace Thermocouple

How To Replace A Thermocouple The Home Depot

Gas Fireplace Won T Stay Lit Magic Touch Mechanical

Fireplace Won T Stay Lit This Is How You Fix It

Fireplace Pilot Light Not Working Replacing Thermocouple On A Remote Gas Very Easy

Thermopile Removal Gas Fireplace Doityourself Com Community Forums

Know How To Replace A Gas Fireplace Thermocouple

Thermo Thermopiles Friendly Fires

Gas Fireplace Missing Thermopile
Related Posts