Refinishing a Brick Fireplace with Stone: A Comprehensive Guide
A brick fireplace is a classic architectural feature that can add warmth and character to any home. However, over time, brick can become outdated, stained, or simply not fit the desired aesthetic. Refinishing a brick fireplace with stone is a transformative project that can dramatically alter the look and feel of a living space, offering a more modern, rustic, or sophisticated appearance. This article provides a detailed overview of the process, considerations, and techniques involved in refinishing a brick fireplace with stone.
Assessing the Existing Fireplace and Planning the Project
Before embarking on a stone fireplace makeover, a thorough assessment of the existing structure is crucial. The condition of the brick, the fireplace surround, and the hearth must be evaluated. Look for cracks, loose bricks, or any signs of structural damage. Addressing these issues prior to stone installation is paramount to ensuring the longevity and safety of the finished fireplace. Furthermore, consider the architectural style of the home. The new stone should complement the existing design elements, enhancing the overall aesthetic rather than clashing with it. Factors to consider include the stone type, color, texture, and pattern. Natural stone options range from fieldstone and river rock to ledgestone and travertine, each offering a unique look. Manufactured stone veneers provide a lighter and often more cost-effective alternative, mimicking the appearance of natural stone with varying degrees of realism.
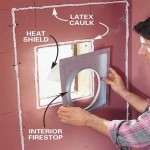
Planning also involves obtaining any necessary permits. Local building codes often regulate fireplace modifications, particularly those involving structural changes or gas line adjustments. Confirming permit requirements before starting the work can prevent costly delays and ensure compliance with safety standards.
Finally, meticulous planning should include a detailed budget. This should encompass the cost of the stone (including ordering extra for cuts and waste), mortar, tools, and any professional assistance required. Obtain quotes from various suppliers to ensure competitive pricing.
Preparing the Brick Surface for Stone Installation
Proper surface preparation is essential for a successful stone installation. The brick must be clean, structurally sound, and provide a suitable bonding surface for the mortar. This generally involves several steps:
First, thoroughly clean the brick. Remove any dust, dirt, soot, or loose debris using a wire brush and a solution of trisodium phosphate (TSP) and water. Rinse the brick thoroughly with clean water and allow it to dry completely. This cleaning process ensures that the mortar will properly adhere to the brick surface.
Next, roughen the brick surface to create a better mechanical bond for the mortar. This can be achieved by scoring the brick with a chisel or by applying a bonding agent specifically designed for masonry work. A bonding agent essentially creates a textured surface that increases the grip between the brick and the mortar.
If the brick surface is particularly uneven or damaged, consider applying a scratch coat of mortar. This provides a level surface for the stone and helps to compensate for any irregularities in the brick. Allow the scratch coat to cure completely before proceeding with the stone installation.
Finally, ensure the work area is properly protected. Cover the surrounding floor with drop cloths and protect any nearby furniture or fixtures from dust and debris. This will minimize cleanup efforts after the project is completed.
Installing the Stone Veneer
The stone installation process requires precision and attention to detail. Begin by dry-fitting the stones to determine the desired arrangement. This allows you to visualize the finished fireplace and make any necessary adjustments to the layout before applying the mortar. Pay close attention to the pattern and spacing of the stones, ensuring a balanced and aesthetically pleasing design.
Next, mix the mortar according to the manufacturer's instructions. Use a mortar specifically designed for stone veneer installation, as it will provide the necessary bonding strength and flexibility. Use a notched trowel to apply a layer of mortar to the back of each stone, ensuring complete coverage. Press the stone firmly onto the brick surface, wiggling it slightly to ensure a good bond. Remove any excess mortar that squeezes out from between the stones. These excess removals should be done swiftly to avoid staining the stone.
Work in small sections, applying only as much mortar as you can comfortably work with in a reasonable amount of time. This prevents the mortar from drying out before the stones are set. Use spacers to maintain consistent joint widths between the stones. This is particularly important when working with manufactured stone veneer, as it ensures a uniform and professional appearance.
Continue the installation process, working your way up the fireplace. Periodically check the level and plumb of the stones to ensure that they are properly aligned. Use a rubber mallet to gently tap the stones into place as needed. Once all the stones are installed, allow the mortar to cure completely according to the manufacturer's instructions. This typically takes at least 24 to 48 hours.
After the mortar has cured, apply grout to the joints between the stones. Use a grout bag or a pointing trowel to fill the joints completely, ensuring that there are no gaps or voids. Allow the grout to dry slightly, then use a damp sponge to clean the excess grout from the surface of the stones. Be careful not to remove too much grout from the joints, as this can weaken the bond and compromise the appearance of the fireplace.
Once the grout is completely dry, apply a sealant to the stone surface. This will help to protect the stone from stains and moisture damage. Choose a sealant that is specifically designed for natural stone or manufactured stone veneer, depending on the type of stone used.
Finally, inspect the finished fireplace for any imperfections. Touch up any areas as needed, and clean the surrounding area thoroughly. With proper planning and execution, refinishing a brick fireplace with stone can transform a dated feature into a stunning focal point of the home.

Read This Before Your Stone Fireplace Makeover Understanding Undertones

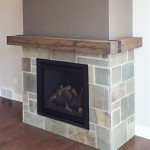
Pin By Tarra Wills Efkarpidis On For The Home Brick Fireplace Remodel Stone

How To Cover A Brick Fireplace With Stone

How To Paint A Red Brick Fireplace Look Like Stone

How To Update A Brick Fireplace With Chalk Paint Diy Beautify Creating Beauty At Home

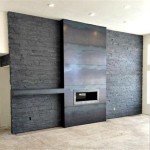
Stone Veneer Over A Brick Fireplace Updates The Look

10 Fireplace Makeover Ideas Before And After Regency

See How I Made Over An Ugly Clunky Stone Veneer Fireplace With Paint

See How I Made Over An Ugly Clunky Stone Veneer Fireplace With Paint

How To Paint A Red Brick Fireplace Look Like Stone
Related Posts