Refacing a Brick Fireplace with Stone: A Comprehensive Guide
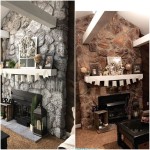
A fireplace serves as a focal point in many homes, offering warmth and aesthetic appeal. Over time, a brick fireplace may appear outdated or damaged, prompting homeowners to consider renovation options. Refacing a brick fireplace with stone provides a way to enhance its visual appeal and integrate it seamlessly with contemporary or rustic interior designs. This process involves applying stone veneer or natural stone directly onto the existing brick surface, offering a cost-effective alternative to complete fireplace reconstruction.
This article will explore the process of refacing a brick fireplace with stone, including preparation, material selection, installation techniques, and essential considerations to ensure a successful and visually pleasing outcome. Understanding these aspects is crucial for both homeowners attempting a do-it-yourself project and those seeking to hire professional contractors.
Key Point 1: Preparation and Assessment
Before commencing the refacing process, a thorough assessment of the existing brick fireplace is necessary. This evaluation aims to identify any structural issues that need addressing before the stone veneer is applied. Cracks, loose bricks, or water damage can compromise the integrity of the new stone facade. Addressing these underlying problems is crucial to prevent future complications and ensure the longevity of the refaced fireplace.
The initial step involves cleaning the brick surface. Use a wire brush to remove any loose mortar, dirt, soot, or efflorescence (the white, powdery substance that can form on brick). This cleaning process provides a clean and stable surface for the mortar to adhere to. Power washing may be considered, but caution should be exercised to avoid excessive moisture penetration.
Next, inspect the mortar joints between the bricks. If the mortar is crumbling or missing in sections, repointing is essential. Repointing involves removing the deteriorated mortar and replacing it with new mortar. This step ensures a solid foundation for the stone veneer and prevents moisture from seeping behind the veneer and causing damage.
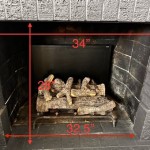
Consider the existing firebox and its compatibility with the planned stone refacing. The firebox is the interior chamber where the fire burns. Ensure adequate clearance between the new stone facade and the firebox opening to comply with safety regulations and prevent overheating. Consult local building codes for specific requirements regarding fireplace clearances.
Finally, assess the hearth dimensions. The hearth is the non-combustible area in front of the fireplace opening. Building codes often dictate the minimum size of the hearth based on the size of the firebox opening. If the existing hearth is inadequate, it may need to be extended or replaced during the refacing process. This aspect is crucial for fire safety and compliance with building regulations.
Key Point 2: Material Selection and Design Considerations
Choosing the right stone material is paramount to achieving the desired aesthetic and functional outcome. Stone veneer is a popular choice for refacing brick fireplaces due to its lightweight nature, ease of installation, and wide range of styles and colors. Natural stone is another option, offering a more authentic and durable appearance, but it is generally heavier and more expensive to install.
Stone veneer is typically manufactured from concrete or a lightweight aggregate, molded to resemble natural stone. It is available in various profiles, including ledgestone, fieldstone, river rock, and brick. The choice of profile depends on the desired aesthetic and the overall architectural style of the home. Concrete-based veneers are often more resistant to weathering and staining than some natural stone types.
Natural stone offers a unique and timeless appeal. Options include granite, limestone, slate, and sandstone. Each type of natural stone possesses distinct characteristics in terms of color, texture, and durability. Natural stone can be more challenging to work with due to its weight and irregular shapes, often requiring specialized cutting and installation techniques.
Beyond the type of stone, consider the color palette and texture. The color should complement the existing interior design and furniture. Texture refers to the surface characteristics of the stone, which can range from smooth and polished to rough and rugged. Sample boards can be helpful to visualize how the selected stone will look in the context of the fireplace and surrounding room.
Design considerations should also include the overall layout and pattern of the stone. Options include a dry-stack look, where stones are tightly fitted together without visible mortar joints, or a traditional mortared look, where the mortar joints are visible. The layout can be random or patterned, depending on the desired aesthetic effect. Sketching a rough design or consulting with a design professional can help refine the layout and ensure a cohesive look.
Key Point 3: Installation Techniques and Best Practices
Proper installation techniques are crucial for ensuring the longevity and visual appeal of the refaced fireplace. The installation process typically involves applying a scratch coat of mortar, attaching a metal lath, and then adhering the stone veneer or natural stone to the lath with mortar. A scratch coat of mortar provides a rough surface that the lath can adhere to and provides added structural integrity.
Begin by applying a scratch coat of polymer-modified mortar to the cleaned brick surface. This scratch coat acts as a bonding agent and provides a level surface for the subsequent installation of the metal lath. Use a notched trowel to create grooves in the scratch coat, enhancing the adhesion of the lath. Allow the scratch coat to cure for at least 24 hours before proceeding.
Next, attach a layer of galvanized metal lath to the cured scratch coat. The metal lath provides a mechanical bond for the mortar and stone, preventing slippage and ensuring long-term stability. Use galvanized nails or screws to secure the lath to the brick substrate, overlapping the seams by at least 2 inches. Ensure the lath is properly tensioned to avoid sagging or bulging.
Mix the mortar according to the manufacturer's instructions. Polymer-modified mortar is recommended for its enhanced bonding strength and flexibility. Apply a thin layer of mortar to the back of each stone veneer or natural stone piece. Press the stone firmly onto the metal lath, ensuring good contact with the mortar. Use spacers to maintain consistent joint widths, if desired.
For natural stone, consider the weight and size of each piece. Larger, heavier stones may require additional support during installation. Work from the bottom up, allowing the lower courses of stone to support the weight of the upper courses. Use shims to temporarily hold the stone in place until the mortar has cured.
Once the mortar has cured, typically after 24 to 48 hours, remove any spacers or shims. If desired, apply grout to the mortar joints using a grout bag or pointing trowel. Clean up any excess mortar or grout with a damp sponge. Allow the grout to cure according to the manufacturer's instructions before sealing or applying any finishing treatments.
During the installation process, pay close attention to details such as corners and edges. Pre-manufactured corner pieces are available for many stone veneer profiles, simplifying the installation process and creating a clean, professional finish. For natural stone, cutting and shaping the stones to fit corners and edges may be necessary. Consider using a wet saw with a diamond blade for precise cuts.
Proper ventilation is crucial during the installation process, particularly when working with mortar and sealants. Ensure adequate airflow to allow the materials to cure properly and prevent the buildup of harmful fumes. Wear appropriate personal protective equipment, including gloves, eye protection, and a dust mask.
Finally, consider sealing the stone surface after installation. Sealing can help protect the stone from staining, water damage, and efflorescence. Choose a sealer that is specifically designed for the type of stone used. Apply the sealer according to the manufacturer's instructions, typically with a brush, roller, or sprayer.

Reface A Fireplace With The Look Of Stone Or Brick Barron Designs

Pin By Tarra Wills Efkarpidis On For The Home Brick Fireplace Remodel Stone

Reface A Fireplace With The Look Of Stone Or Brick Barron Designs

Reface Fireplace Brick Makeover Home Remodel

A Step By Guide To Fireplace Refacing Diy Family Handyman

Transform Your Fireplace With East West Classic Ledge Stone

Refacing A Fireplace With Stone Veneer Horizon

Faux Stone Panels For Fireplaces

Brick Fireplace Makeover Pine And Prospect Home

Stone Fireplace Refacing Reface Brick Selex
Related Posts