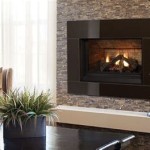
Refacing A Fireplace With Tile: A Comprehensive Guide
Refacing a fireplace with tile is a popular home improvement project that can dramatically enhance the aesthetic appeal of a living space. It offers an opportunity to update an outdated fireplace, personalize its style, and create a focal point that complements the overall decor of the room. This process involves covering the existing fireplace surround with new tile, thereby transforming its look without requiring a complete demolition and rebuild. Careful planning and execution are crucial for achieving a successful and visually stunning result.
Before embarking on a fireplace refacing project, it is essential to assess the existing structure. This involves inspecting the fireplace surround for any signs of damage, such as cracks, loose bricks, or water damage. These issues must be addressed and repaired before the tiling process can begin, as they can compromise the integrity and longevity of the newly installed tile. Furthermore, it is necessary to determine the type of material the existing surround is made of, as this will influence the choice of adhesive and tiling techniques employed.
Selecting the Right Tile and Materials
Choosing the appropriate tile is a crucial step in refacing a fireplace. Various tile materials are available, each offering unique aesthetic qualities and performance characteristics. Some popular options include ceramic tile, porcelain tile, natural stone tile (such as granite, marble, or slate), and glass tile. Ceramic tile is a cost-effective and versatile choice, while porcelain tile is known for its durability and resistance to moisture. Natural stone tiles offer a luxurious and sophisticated look, but they may require more maintenance. Glass tiles provide a modern and stylish aesthetic, but they can be more expensive and challenging to install.
When selecting the tile, consideration should be given to the overall style of the room and the desired aesthetic of the fireplace. The size, shape, color, and texture of the tile should be chosen to complement the existing decor and create a cohesive look. It is also important to ensure that the tile is suitable for fireplace applications, meaning it can withstand high temperatures and thermal expansion and contraction without cracking or deteriorating. Consult with a tile professional or read manufacturer specifications to verify the suitability of the selected tile.
In addition to the tile itself, other essential materials include thin-set mortar (adhesive), grout, tile spacers, and sealant. Thin-set mortar is used to adhere the tile to the existing fireplace surround. The type of thin-set mortar should be chosen based on the type of tile being used and the material of the existing surround. Grout is used to fill the spaces between the tiles, providing a finished look and preventing water from penetrating the tile installation. Tile spacers are used to ensure consistent spacing between the tiles, creating a uniform and aesthetically pleasing appearance. Sealant is applied to the grout lines to protect them from moisture and staining.
Preparing the Surface for Tiling
Proper surface preparation is essential for ensuring a strong and lasting bond between the tile and the existing fireplace surround. This involves cleaning the surface thoroughly to remove any dirt, dust, grease, or loose debris. A wire brush or scraper can be used to remove any flaking paint or loose mortar. If the existing surface is glossy or non-porous, it may be necessary to roughen it up with sandpaper or a grinder to provide a better grip for the thin-set mortar. A primer designed for tile applications can also be applied to improve adhesion.
In some cases, it may be necessary to install a cement backer board over the existing fireplace surround before tiling. This is particularly important if the existing surface is uneven, damaged, or not suitable for direct tiling. Cement backer board provides a smooth, stable, and moisture-resistant surface for tile installation. It is attached to the existing surround using screws or nails, and the seams between the boards are taped and sealed with a thin-set mortar.
Prior to applying the thin-set mortar, it's wise to dry-fit the tiles. This involves laying out the tiles on the floor or a table in the desired pattern and arrangement. This allows for visualizing the final appearance of the fireplace and making any necessary adjustments to the tile placement. It also helps in determining the amount of tile needed and identifying any areas that may require cutting or modifications.
The Tiling Process and Finishing Touches
Once the surface is properly prepared, the tiling process can begin. The thin-set mortar is mixed according to the manufacturer's instructions and applied to the back of the tile using a notched trowel. The tile is then pressed firmly onto the prepared surface, ensuring good contact with the mortar. Tile spacers are inserted between the tiles to maintain consistent spacing. This process is repeated until the entire fireplace surround is covered with tile.
After the thin-set mortar has cured for the recommended time (typically 24-48 hours), the tile spacers are removed, and the grout is applied. The grout is spread over the tile surface using a grout float, ensuring that it fills all the spaces between the tiles. Excess grout is removed with a damp sponge, and the tile surface is cleaned thoroughly. After the grout has cured for the recommended time, a sealant is applied to the grout lines to protect them from moisture and staining.
The final step involves cleaning the tile surface with a tile cleaner and inspecting the installation for any imperfections. Any necessary touch-ups or repairs should be made at this time. The fireplace can then be enjoyed as a beautiful and functional focal point in the room.
Refacing a fireplace with tile is a project that can be undertaken by experienced DIYers, but it may be best left to professionals due to the need for precise measurements, cutting, and application techniques. Regardless of who performs the work, careful planning and attention to detail are essential for achieving a successful and visually appealing result.

Fireplace Refacing With Herringbone Tile

Debbie Travis Update Your Fireplace By Refacing The Surround Victoria Times Colonist

Our 200 Marble Fireplace Makeover Young House Love

Reface Your Fireplace Fresh New Look Hearth Remodeling

Reface A Fireplace With The Look Of Stone Or Brick Barron Designs

How To Reface A Fireplace We Love Fire

Fireplace Reface Contractor Hotline

Refacing Fireplace And Chimney Authority

15 Fabulous Fireplace Refacing Ideas Average But Inspired

Refacing Fireplace And Chimney Authority
Related Posts

