Painting A Fireplace Surround With Chalk Paint
Chalk paint has gained considerable popularity among homeowners and DIY enthusiasts for its versatility and ability to adhere to various surfaces with minimal preparation. One particularly rewarding application of chalk paint is revitalizing a fireplace surround. Whether it's brick, wood, or stone, a fireplace surround can be easily transformed with chalk paint, adding character and a fresh aesthetic to the living space. This article provides a comprehensive guide to painting a fireplace surround with chalk paint, covering preparation, application, and finishing techniques, to ensure a professional and durable result.
Preparation is Paramount
The success of any painting project hinges on thorough preparation. Neglecting this crucial stage can lead to adhesion problems, uneven finishes, and ultimately, a less than desirable outcome. The first step is to assess the existing surface of the fireplace surround. Identify any areas that require repair, such as cracks, chips, or loose mortar. These imperfections should be addressed before any painting commences.
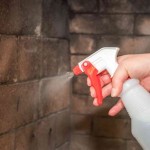
Regardless of the material of the fireplace surround, cleaning is essential. Use a solution of warm water and mild detergent to remove dirt, dust, soot, and grease. For stubborn stains, a stronger cleaning agent specifically designed for the target material may be necessary. Rinse the surface thoroughly with clean water and allow it to dry completely. It is crucial to ensure the surface is completely dry before applying chalk paint, as any moisture can interfere with adhesion.
While chalk paint is known for its adhesive properties, priming the surface, particularly if it is glossy or has a non-porous finish, can enhance adhesion and prevent chipping. A stain-blocking primer is recommended for surfaces like varnished wood, as it will prevent tannins from bleeding through the chalk paint. Apply the primer according to the manufacturer's instructions, ensuring even coverage and allowing it to dry completely before proceeding to the next step.
Masking off the surrounding areas, such as the wall and hearth, is vital to protect them from paint splatters. Use painter’s tape to create clean, crisp lines and prevent unwanted paint from getting onto adjacent surfaces. Drop cloths or plastic sheeting should be laid down to protect the floor and any furniture in the vicinity.
Application Techniques for Chalk Paint
Chalk paint can be applied using a variety of tools, including brushes, rollers, and sprayers. The choice of application method depends on the desired finish and the texture of the surface. Brushes are ideal for creating a textured, rustic look and for getting into intricate details. Rollers provide a smoother, more even finish, particularly on flat surfaces. Sprayers offer the most uniform coverage and are well-suited for larger surfaces or for achieving a flawless finish.
Regardless of the application method, it is imperative to apply chalk paint in thin, even coats. Applying thick coats can lead to drips, runs, and uneven drying. Allow each coat to dry completely before applying the next. Multiple thin coats will always yield a better result than one or two thick coats. Typically, two to three coats of chalk paint are required to achieve full coverage and the desired color intensity.
Between coats, lightly sand the surface with fine-grit sandpaper (220-grit or higher) to remove any imperfections and create a smooth base for the next coat. This step is particularly important if the first coat has raised the grain of the wood or if there are any visible brushstrokes. Wipe the surface clean with a tack cloth after sanding to remove any dust particles before applying the next coat of chalk paint.
For a more distressed or aged look, consider using a dry brushing technique. This involves lightly dipping the tips of the brush into the paint and then wiping off most of the paint onto a paper towel. Then, lightly drag the brush across the surface to create a subtle, textured effect. This technique works particularly well on edges and corners to simulate wear and tear.
Sealing and Protecting the Painted Surface
Once the chalk paint has been applied and allowed to dry completely, it is essential to seal and protect the painted surface. Chalk paint is porous and can be susceptible to stains and damage if left unsealed. There are several options for sealing chalk paint, including wax, polyurethane, and lacquer. The choice of sealant depends on the desired finish and the level of protection required.
Wax is a popular choice for sealing chalk paint, as it provides a soft, matte finish and enhances the texture of the paint. Apply the wax in thin, even coats using a wax brush or lint-free cloth. Work the wax into the paint, ensuring full coverage. After the wax has been applied, buff the surface with a clean, lint-free cloth to remove any excess wax and create a smooth, polished finish. Wax provides a moderate level of protection and requires occasional reapplication.
Polyurethane is a more durable option for sealing chalk paint, providing a harder, more water-resistant finish. It is available in a variety of sheens, from matte to gloss. Apply polyurethane in thin, even coats using a brush or sprayer. Allow each coat to dry completely before applying the next. Lightly sand the surface between coats with fine-grit sandpaper to remove any imperfections and create a smooth finish. Polyurethane provides a high level of protection and is ideal for surfaces that are subject to heavy use or moisture exposure. A water-based polyurethane is recommended to prevent yellowing over time, especially on lighter chalk paint colors.
Lacquer is another durable option for sealing chalk paint, providing a hard, glossy finish. It is typically applied using a sprayer and requires proper ventilation. Lacquer offers excellent protection against scratches, stains, and moisture. However, it can be more difficult to apply than wax or polyurethane and requires specialized equipment. When selecting a sealant, verify its heat resistance rating to ensure it is suitable for use on a fireplace surround, especially near the firebox.

Chalk Paint Fireplace Mantel Vintage Charm Red

Painted Fireplace Surrounds With Chalk Paint By Annie Sloan Silk Sage Design Studio

Painted Marble Fireplace Surround Two Years Later Simply2moms

Chalk Paint Fireplace Mantel Vintage Charm Red

How To Update A Brick Fireplace With Chalk Paint Diy Beautify Creating Beauty At Home

I Chalk Painted Our Mantle

Simple Fireplace Upgrade Annie Sloan Chalk Paint East Coast Creative

Mantel Makeover With Paint

How To Update A Brick Fireplace With Chalk Paint Diy Beautify Creating Beauty At Home

Before And After My White Chalk Painted Fireplace Brick House Fireplaces
Related Posts