Mounting a TV on a Stacked Stone Fireplace: A Comprehensive Guide
Mounting a television above a fireplace has become a popular design choice, seamlessly integrating entertainment with a cozy focal point. However, when the fireplace features a stacked stone facade, the process presents unique challenges. Stacked stone, with its irregular surface and varying density, requires careful planning and execution to ensure the TV is securely mounted and the integrity of the stone is preserved. This article provides a detailed guide to mounting a TV on a stacked stone fireplace, addressing key considerations and offering practical advice.
Understanding the Challenges of Stacked Stone
Stacked stone is a decorative veneer composed of individual stones adhered to a backing. The variations in size, thickness, and composition of the stones create an uneven surface that is inherently difficult to work with. Unlike smooth drywall or brick, stacked stone offers limited points of consistent contact for mounting hardware. Furthermore, the adhesive used to bond the stones to the wall may not be strong enough to support the weight of a television and its mounting bracket. Attempting to simply drill into the stone without proper planning can lead to cracked stones, loose veneer, and an unstable mount.
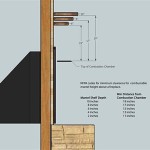
The depth of the stacked stone is another crucial factor. The mounting hardware must be long enough to extend past the stone's outer surface and securely anchor into the underlying wall structure, typically a wall stud or concrete block. If the hardware is too short, it will only engage with the stone itself, resulting in a weak and unreliable connection. Accurately determining the depth of the stone and selecting appropriate mounting hardware is essential for a successful installation.
Finally, aesthetics play a significant role. Care must be taken to minimize visible wiring and to ensure the mounting bracket blends seamlessly with the stone's texture and color. Thoughtful planning can prevent unsightly cables and an obtrusive mounting system, preserving the beauty of the stacked stone fireplace.
Key Considerations Before Installation
Before commencing the installation, several crucial considerations must be addressed. These include assessing the structural integrity of the fireplace, selecting the appropriate mounting hardware, and planning for cable concealment.
Structural Assessment: The first step is to determine the type of wall behind the stacked stone. Is it a wood-framed wall with studs, a concrete block wall, or a brick wall? This will dictate the type of anchors required. Wood studs provide the most straightforward mounting option, allowing for secure attachment with lag bolts. Concrete or brick walls require specialized masonry anchors capable of supporting significant weight. It is also important to assess the overall condition of the stacked stone. Look for any loose or cracked stones that may require repair before proceeding. If there are concerns about the structural integrity of the wall or the stacked stone, consult with a qualified contractor or structural engineer.
Mounting Hardware Selection: Choosing the right mounting bracket is critical for both functionality and aesthetics. A full-motion mount offers the greatest flexibility, allowing the TV to be tilted, swiveled, and extended for optimal viewing angles. However, a full-motion mount will place more stress on the mounting points. A fixed mount provides a simpler and more stable option, especially for larger and heavier TVs. When selecting a mount, ensure it is rated to support the weight of the television and that it is compatible with the TV's VESA mounting pattern. The VESA pattern refers to the standardized hole pattern on the back of the TV used for attaching mounting brackets. It is crucial to verify the VESA pattern and select a mount that matches. In addition to the bracket, appropriate anchors must be selected based on the wall type. For wood studs, use lag bolts with washers. For concrete or brick, use sleeve anchors or wedge anchors that are specifically designed for masonry applications. The length of the anchors must be sufficient to penetrate the stone and securely embed into the underlying wall structure.
Cable Management: A clean and professional installation requires careful planning for cable concealment. Options include running cables through the wall, using cable raceways, or employing cable management solutions that adhere to the surface of the stone. Running cables through the wall is the most aesthetically pleasing option, but it requires careful drilling and knowledge of electrical codes. If drilling through the wall, ensure there are no electrical wires or plumbing pipes in the path. Cable raceways are surface-mounted channels that conceal cables, offering a less invasive alternative to in-wall wiring. Choose raceways that complement the color and texture of the stacked stone for a seamless appearance. Cable management solutions such as cable ties and clips can also be used to organize and conceal cables behind the TV. Regardless of the chosen method, proper cable management is essential for safety and visual appeal.
Step-by-Step Installation Guide
Following a structured approach is essential for a successful TV mounting project on a stacked stone fireplace. The following steps outline the process, emphasizing safety and precision.
Step 1: Gather Tools and Materials: Before starting, assemble all the necessary tools and materials. This includes: a stud finder (for wood-framed walls), a drill with various drill bits (including masonry bits for concrete or brick), a level, a measuring tape, a pencil, safety glasses, a stud finder, appropriate mounting hardware (lag bolts or masonry anchors), a socket wrench, a screwdriver, cable management solutions, and a helper (especially for larger TVs).
Step 2: Locate Studs or Determine Anchor Points: If the wall is wood-framed, use a stud finder to locate the studs. Mark the location of the studs with a pencil. If the wall is concrete or brick, determine the desired location for the TV and mark the anchor points. Consider the viewing angle and desired height when determining the location. Use a level to ensure the marks are aligned horizontally.
Step 3: Drill Pilot Holes: Using the appropriate drill bit (wood or masonry), drill pilot holes at the marked locations. For wood studs, the pilot hole should be slightly smaller than the diameter of the lag bolt. For concrete or brick, the pilot hole should match the diameter of the masonry anchor. Drill through the stacked stone and into the underlying wall structure. Ensure the pilot holes are deep enough to accommodate the length of the anchors.
Step 4: Attach the Mounting Bracket to the Wall: Position the mounting bracket over the pilot holes and align the holes in the bracket with the pilot holes in the wall. Insert the lag bolts or masonry anchors through the bracket and into the pilot holes. Use a socket wrench to tighten the anchors until the bracket is securely attached to the wall. Ensure the bracket is level before fully tightening the anchors.
Step 5: Attach the Mounting Arms to the TV: Locate the VESA mounting holes on the back of the TV. Attach the mounting arms to the TV using the screws provided with the mounting bracket. Ensure the arms are securely attached to the TV.
Step 6: Mount the TV to the Bracket: With the help of a second person, carefully lift the TV and align the mounting arms with the bracket on the wall. Secure the TV to the bracket according to the manufacturer's instructions. Ensure the TV is securely locked into place.
Step 7: Connect Cables and Manage Wiring: Connect all necessary cables to the TV, such as HDMI cables, power cords, and antenna cables. Use cable ties or other cable management solutions to organize and conceal the cables behind the TV. Run the cables through the wall, using cable raceways, or other cable management solutions to ensure a clean and professional appearance.
Step 8: Test the Installation: Turn on the TV and verify that it is functioning properly. Check the viewing angle and adjust the TV as needed. Ensure all cables are securely connected and the TV is stable and secure on the wall.
Drilling Techniques for Stacked Stone
Drilling into stacked stone requires a specific approach to avoid damaging the stone. The primary goal is to create clean, precise holes without causing cracks or chipping. This involves using the correct drill bits, applying appropriate pressure, and drilling at the correct speed.
Choosing the Right Drill Bit: For drilling through stacked stone, a high-quality masonry drill bit is essential. Carbide-tipped drill bits are generally recommended for their durability and ability to cut through hard materials like stone. Avoid using standard twist drill bits, as they will quickly dull and may cause the stone to crack. Select a drill bit size that matches the diameter of the anchors being used. It is also advisable to start with a smaller pilot hole and gradually increase the size as needed.
Drilling Technique: When drilling into stacked stone, use a slow and steady drilling speed. Avoid applying excessive pressure, as this can cause the stone to crack or chip. Let the drill bit do the work. Use a hammer drill function sparingly, only if necessary to penetrate particularly hard stones. Frequently clear the hole of debris to prevent the drill bit from binding. Apply water to the drill bit and the stone to keep the bit cool and reduce dust. This also helps to lubricate the drilling process and prevent overheating.
Dealing with Variations in Stone: Stacked stone is inherently uneven, with variations in thickness and density. When drilling, be prepared to encounter different levels of resistance. Some stones may be softer and easier to drill through than others. If encountering a particularly hard stone, try adjusting the drilling speed and pressure. If the drill bit starts to slip or wander, use a center punch to create a small indentation to guide the drill bit. It is also important to inspect the stone regularly for cracks or chips. If any damage is observed, stop drilling immediately and assess the situation. Minor chips can often be repaired with epoxy or stone filler. However, if the stone is severely cracked, it may need to be replaced before proceeding with the installation.

Made How To Mount A Flat Screen Tv On Stone Fireplace Diy Stacked Fireplaces

Mounting A Tv Above Fireplace With Full Tutorial Fixthisbuildthat

Stacked Stone Fireplace With Tv Mount Fireplaces

Installing A Tv On Stacked Stone Wall

Mounting A Tv Above Fireplace With Full Tutorial Fixthisbuildthat

How To Mount Tv On Stone Fireplace Installation Guide

Installing A Tv On Stacked Stone Wall

Matt S Fireplace Design With The Tv Mounted Above Genstone

Mantelmount How To Mount Your Tv Above A Fireplace Infarrantly Creative

Installing A Tv Wall Mount On Stone Fireplace Lhp
Related Posts