LP Gas Outdoor Fireplace Won't Stay Lit: Troubleshooting Guide
An LP (Liquid Propane) gas outdoor fireplace provides warmth, ambiance, and a focal point for outdoor gatherings. However, a common frustration is when the fireplace fails to stay lit. This issue can stem from a variety of factors, ranging from simple user error to more complex mechanical problems. A systematic approach to troubleshooting is essential to diagnose and rectify the problem effectively, ensuring safe and reliable operation of the appliance.
Before undertaking any troubleshooting steps, it is imperative to ensure that all gas connections are tight and leak-free. Using a solution of soapy water, apply it to all connections, including the propane tank regulator and valve connections within the fireplace unit. If bubbles appear, it indicates a gas leak, and the gas supply should be immediately shut off. Addressing any gas leaks is paramount before proceeding further, and professional assistance may be required.
Gas Supply Issues
The most frequent cause of an LP gas fireplace failing to remain lit is an inadequate gas supply. Several issues can contribute to this problem. First, the propane tank itself may be low or empty. A simple check of the tank's propane level using a gauge or by lifting the tank (a full tank will feel significantly heavier than an empty one) is a good starting point. If the tank is low, refilling or replacing it is the obvious solution.
Even with a full tank, the tank's valve may not be fully open. Ensure that the valve is turned fully counter-clockwise to allow maximum gas flow. Additionally, a faulty or improperly installed propane tank regulator can restrict gas flow. The regulator reduces the high pressure of the propane in the tank to a lower, more manageable pressure for the fireplace. A damaged or malfunctioning regulator may not provide sufficient gas pressure to sustain the flame. Check the regulator for any signs of damage, such as cracks or corrosion. If the regulator is suspect, replacing it with a new one is recommended.
Furthermore, the position of the propane tank can affect its ability to deliver gas efficiently, particularly in colder temperatures. Liquid propane needs to vaporize into a gas for the fireplace to operate. In cold weather, the vaporization process can slow down, especially if the tank is nearly empty. Positioning the tank in direct sunlight (if possible and safe) or insulating it can help maintain a sufficient vaporization rate. Avoid tilting the tank excessively, as this can draw liquid propane into the gas line, causing the fireplace to sputter or fail to light.
Another potential issue related to the gas supply is a blocked or kinked gas line. Inspect the gas line running from the propane tank to the fireplace for any visible kinks, crimps, or obstructions. A kinked line will severely restrict gas flow. If a kink is present, carefully straighten the line, being mindful not to damage it further. If the line is severely damaged, replacement is necessary. Blockages within the gas line can also occur, often due to debris or corrosion. Disconnecting the gas line and blowing compressed air through it can help clear any obstructions. If unsure about how to perform this task safely, consult a qualified gas technician.
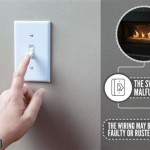
Pilot Light and Igniter Problems
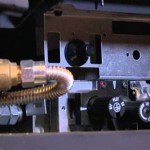
Many LP gas fireplaces rely on a pilot light to initiate and maintain the main burner flame. A malfunctioning pilot light is a common reason for the fireplace failing to stay lit. The pilot light consists of a small flame that continuously burns, providing a heat source to a thermocouple or thermopile. The thermocouple/thermopile generates a small electrical current that keeps the gas valve open, allowing gas to flow to the main burner. If the pilot light is extinguished, or if the thermocouple/thermopile is faulty, the gas valve will close, shutting off the gas supply to the main burner.
The first step in troubleshooting a pilot light issue is to ensure that the pilot light orifice is clean. The orifice is a small opening that allows gas to flow to the pilot light. Over time, this orifice can become clogged with dust, debris, or carbon buildup, restricting gas flow. Use a small wire or a specialized pilot light cleaning tool to carefully clean the orifice. Avoid enlarging the orifice, as this can affect the pilot light's performance. Once cleaned, attempt to relight the pilot light according to the manufacturer's instructions.
If the pilot light lights but fails to stay lit, the thermocouple/thermopile is likely the culprit. A thermocouple is a two-wire device, while a thermopile has multiple wires. Both generate electricity when heated by the pilot flame. To test a thermocouple, use a multimeter set to measure millivolts (mV). With the pilot light lit and heating the thermocouple, the multimeter should read within the manufacturer's specified range (typically 20-30 mV). A reading significantly below this range indicates a faulty thermocouple that needs replacement. Testing a thermopile requires a similar procedure, but the expected voltage range will be higher (typically 600-750 mV).
The igniter is responsible for initially lighting the pilot light. Many fireplaces use a piezo igniter, which creates a spark when a button is pressed. If the igniter fails to produce a spark, the pilot light cannot be lit. Check the igniter wire to ensure that it is securely connected to both the igniter button and the pilot light assembly. If the wire is loose or corroded, clean or replace it. If the wire is intact, the igniter itself may be faulty and require replacement. Some fireplaces use electronic igniters powered by batteries. Ensure that the batteries are fresh and properly installed.
Airflow and Venting Problems
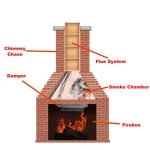
Proper airflow and venting are crucial for the efficient and safe operation of an LP gas outdoor fireplace. Insufficient airflow can lead to incomplete combustion, causing the flame to extinguish prematurely. Obstructed vents can also result in a buildup of carbon monoxide, a dangerous and odorless gas. Regularly inspect the fireplace's vents and surrounding area for any obstructions, such as leaves, debris, or animal nests.
Outdoor fireplaces are designed with specific vent configurations to ensure adequate ventilation. Altering or obstructing these vents can disrupt the airflow and negatively impact the fireplace's performance. Ensure that the vent openings are clear and free from any restrictions. If the fireplace is installed in a confined space, such as a covered patio with limited ventilation, the lack of fresh air can contribute to the problem. Consider relocating the fireplace to a more open area or improving the ventilation of the existing space.
Excessive wind can also cause the flame to extinguish, particularly in outdoor settings. Strong gusts of wind can blow the pilot light out or disrupt the gas flow to the main burner. Consider installing a windbreak or shield around the fireplace to protect it from the elements. However, ensure that any windbreak does not obstruct the fireplace's vents or create a fire hazard. A properly designed windbreak should deflect the wind without trapping heat or restricting airflow.
Another factor to consider is the air-to-gas mixture. The fireplace's burner is designed to operate with a specific ratio of air to gas. If this ratio is incorrect, the flame may be unstable or difficult to maintain. Most fireplaces have an adjustable air shutter near the burner that controls the amount of air mixed with the gas. Adjusting this shutter can sometimes resolve issues with flame instability. Consult the manufacturer's instructions for guidance on adjusting the air shutter. If unsure, a qualified gas technician can properly adjust the air-to-gas mixture to ensure optimal performance.
Dust and debris accumulating on the burner and surrounding components can also interfere with proper combustion. Regularly clean the burner using a soft brush or vacuum cleaner to remove any buildup. Pay particular attention to the burner ports, which are small holes that allow gas to flow and ignite. Clogged burner ports can impede gas flow and cause the flame to extinguish prematurely. After cleaning, ensure that all burner components are properly reassembled.
Addressing the issue of an LP gas outdoor fireplace that won't stay lit requires a methodical and comprehensive approach. Start with the simplest potential causes, such as checking the gas supply and pilot light, before moving on to more complex issues, such as airflow and venting. If unsure about any troubleshooting steps, consult a qualified gas technician for professional assistance. By following these guidelines, the issue can be diagnosed effectively, and the fireplace can be restored to safe and reliable operation.

Gas Fireplace Won T Stay Lit Magic Touch Mechanical

Gas Fireplace Won T Stay Lit Magic Touch Mechanical

Why Won T My Gas Fireplace Stay Lit R Services

Gas Fire Pit Problem Wont Stay Lit Solved Endless Summer

Troubleshooting Your Gas Fire Pit Outdoor Elements

Fire Pit Won T Stay Lit Here S What You Need To Do Worst Room

My Gas Fireplace Won T Stay Lit Here S The Fix

Why Your Gas Fireplace Won T Light And Potential Solutions

How To Fix A Gas Fireplace That Keeps Turning Off Vertical Chimney Care

Troubleshooting Your Gas Fire Pit When Something Goes Wrong Appliances Connection
Related Posts