Laying a Brick Fireplace Surround: A Comprehensive Guide
A brick fireplace surround enhances the aesthetic appeal of a living space, providing a focal point and adding a touch of rustic charm or classic elegance. Constructing a brick surround is a project that requires meticulous planning, careful execution, and a foundational understanding of bricklaying techniques. This article provides a comprehensive guide to laying a brick fireplace surround, covering essential steps from preparation to the final finishing touches.
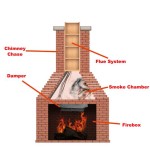
Before embarking on the construction process, it is crucial to verify local building codes and regulations. A fireplace is a significant structural element, and adherence to safety standards is paramount. This may involve obtaining the necessary permits and inspections to ensure that the project meets all applicable requirements. Failure to comply with these regulations can result in costly rework or legal complications. Furthermore, if the existing fireplace has not been recently inspected, it is advisable to have it professionally assessed. A qualified chimney sweep or fireplace specialist can identify any potential hazards or structural issues that need to be addressed before proceeding with the surround installation.
Planning and Design Considerations
The design phase is a critical determinant of the project's success. Carefully considering the aesthetic goals and functional requirements is essential. The desired style, size, and brick pattern will influence the material selection and construction techniques. Common brick patterns include running bond, stack bond, and herringbone, each offering a distinct visual appeal. Running bond, the most common pattern, provides structural stability and a traditional look. Stack bond offers a modern, minimalist aesthetic, while herringbone presents a more intricate and visually striking design.
The dimensions of the fireplace surround should be proportional to the size of the fireplace opening and the overall room dimensions. A surround that is too large can overwhelm the space, while one that is too small may appear insignificant. It's advisable to create a detailed sketch or a 3D model to visualize the finished product and ensure that it complements the existing décor. This visual representation can also help in calculating the amount of materials needed, reducing the risk of material shortages or wastage.
Brick selection plays a significant role in the aesthetic outcome. Bricks are available in a wide range of colors, textures, and sizes. Consider the existing architectural style of the house and choose bricks that complement the overall design. Salvaged bricks can add character and authenticity to the fireplace surround, while new bricks offer greater uniformity and consistency. Ensure that the bricks are suitable for fireplace applications, as they will be exposed to high temperatures. Refractory bricks, also known as fire bricks, are specifically designed to withstand extreme heat and are typically used for the firebox lining. Using standard bricks in the firebox can lead to cracking and spalling over time.
Material Procurement and Tool Preparation
Accurate material estimation is essential for cost-effective project management. Calculate the number of bricks required based on the surround's dimensions and the chosen brick pattern. Add a buffer of approximately 10% to account for cuts and breakage. Mortar is another essential material, and its composition and mixing ratio are critical for achieving strong and durable joints. Type N mortar is generally recommended for fireplace surrounds, as it offers a good balance of strength and flexibility. Premixed mortar is convenient, but mixing mortar from scratch allows for greater control over the consistency and workability. Consider purchasing additional materials such as flashing and fireproof sealant based on particular project requirements.
The success of a bricklaying project hinges on having the right tools. A brick trowel is indispensable for applying mortar, while a brick hammer is used for cutting and shaping bricks. A level and a plumb bob are essential for ensuring that the surround is straight and vertical. A mortar mixing tub or wheelbarrow is required for preparing the mortar, and a margin trowel is useful for cleaning up excess mortar. A brick saw is valuable for making precise cuts, particularly for intricate patterns or tight spaces. Safety glasses and gloves are necessary to protect the eyes and hands from mortar and brick dust. Additionally, consider investing in knee pads to enhance comfort during prolonged periods of kneeling.
Construction Process: Laying the Brick
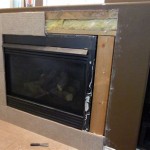
Adequate foundation preparation is crucial for a stable and long-lasting brick fireplace surround. The foundation should be level, solid, and capable of supporting the weight of the brickwork. If the existing fireplace has a concrete hearth, ensure that it is in good condition and free of cracks or damage. If the hearth is inadequate, it may need to be reinforced or replaced. Consider incorporating a layer of waterproofing membrane between the hearth and the brick surround to prevent moisture damage. This membrane will act as a barrier, protecting the underlying structure from water penetration.
Start laying the first course of bricks along the base of the surround. Apply a generous layer of mortar to the hearth and carefully position each brick, ensuring that it is level and aligned with the design. Use a level to check the horizontal alignment and a plumb bob to verify the vertical alignment. The mortar joints should be consistent in width, typically around 3/8 inch. Excess mortar should be removed with a margin trowel to prevent staining. A consistent joint size will enhance the aesthetic appeal and structural integrity of the surround.
As each subsequent course of bricks is laid, ensure that the mortar joints are properly staggered to create a strong and stable structure. The overlap between bricks in adjacent courses helps to distribute the load and prevent cracking. Regularly check the level and plumb of the surround to ensure that it remains straight and vertical. Use a brick hammer and a chisel to cut bricks as needed to fit around openings or corners. When cutting bricks, always wear safety glasses to protect the eyes from flying debris. Clean up any excess mortar immediately to prevent it from hardening on the brick surface.
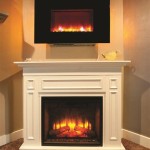
Incorporate any decorative features or elements into the design as the bricklaying progresses. This may include adding a brick mantel, corbels, or other ornamental details. Pay close attention to the alignment and spacing of these features to ensure that they are visually appealing and structurally sound. For complex designs, it may be helpful to create a template or a guide to ensure that the bricks are positioned correctly. A well-executed decorative element can significantly enhance the overall aesthetic of the fireplace surround.
Finishing Touches and Curing
Once the bricklaying is complete, allow the mortar to cure for at least 24 to 48 hours before proceeding to the finishing touches. Curing time may vary depending on weather conditions and the type of mortar used. During this period, keep the surround protected from rain or extreme temperatures to prevent cracking or damage. A slow and gradual curing process will result in a stronger and more durable mortar joint.
After the mortar has cured, use a jointing tool to smooth and compress the mortar joints. This process, known as tooling, enhances the aesthetic appeal of the surround and helps to seal the joints against moisture penetration. There are several different jointing styles to choose from, including concave, V-shaped, and flush joints. Select a jointing style that complements the overall design and architectural style of the house. Consistent tooling ensures a uniform appearance and contributes to the surround's longevity.
Clean the brick surface thoroughly to remove any remaining mortar residue or stains. Use a mild detergent and a soft brush to gently scrub the brick surface. Avoid using harsh chemicals or abrasive cleaners, as they can damage the brick or alter its color. Rinse the surface with clean water and allow it to dry completely. A clean and well-maintained brick fireplace surround will enhance the beauty and value of the home for years to come.

How To Install A Mantel On Brick Fireplace 1905 Farmhouse

How To Build A Brick Hearth Ehow

How To Build A Fireplace Surround Beneath My Heart

How To Install A Mantel On Brick Fireplace 1905 Farmhouse

Easy Fireplace Mantel Diy

22 Brick Fireplace Ideas To Elevate Your Home Hearth Remodel

Easy Fireplace Mantel Diy

Crisp Brick Takes Fireplace From Dull To Dazzling Heat Glo
.jpg?strip=all "Brick Fireplace Design Installation Scarlett Fireplaces")
Brick Fireplace Design Installation Scarlett Fireplaces

How To Cover A Brick Fireplace With Wood Stone Nina Hendrick Home