Installing Ventless Gas Fireplace Logs: A Comprehensive Guide
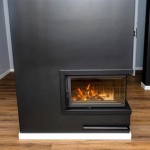
Ventless gas fireplace logs offer an attractive and efficient heating solution for many homes, providing the ambiance of a traditional fireplace without the need for a chimney or complicated venting system. However, proper installation is crucial for safe and optimal performance. This article provides a detailed guide to installing ventless gas fireplace logs, covering essential considerations, preparation steps, and the installation process itself.
Before beginning the installation procedure, it is imperative to understand the regulatory framework surrounding ventless appliances. Local building codes and regulations often dictate specific requirements for installation, including minimum room size, ventilation standards, and permissible BTU output. Failure to comply with these regulations can result in fines or the inability to legally operate the fireplace. Consult with local building inspectors or fire marshals to ascertain the relevant ordinances prior to commencing the installation.
Furthermore, it is essential to select ventless gas fireplace logs that are appropriately sized for the existing firebox. Overly large logs can lead to incomplete combustion and potentially hazardous levels of carbon monoxide, while undersized logs may not provide adequate heat output. Measure the firebox dimensions carefully and consult the manufacturer's specifications for recommended log set sizes.
The type of gas supply also matters. Ventless gas fireplaces typically operate on either natural gas or propane. Ensure that the chosen log set is compatible with the available gas type. Conversion kits are sometimes available, but they must be installed by a qualified technician and fully comply with safety standards.
Finally, ensure the gas line has a shut off valve installed. This may be a requirement by your local municipality. Always turn off the gas line and confirm before any installation.
Key Point 1: Safety Precautions and Preparation
Safety is paramount when working with gas appliances. Prior to any installation work, ensure the gas supply to the fireplace is completely shut off at the main gas valve. Confirm this by testing another gas appliance on the same line. Never rely solely on the smell of gas to determine if the supply is off; use a gas leak detector or a soap and water solution to check for leaks at all connections during and after installation. Furthermore, ensure the work area is well-ventilated and free from flammable materials.
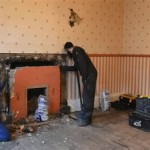
Prior to installing the new log set, the existing fireplace must be thoroughly cleaned. Remove all ashes, soot, and debris from the firebox. Inspect the firebox for any signs of damage, such as cracks or deteriorated mortar. Repair any damage before proceeding, as these issues can compromise the safety and efficiency of the fireplace. A professional mason should be consulted for significant structural repairs.
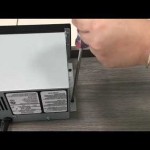
Carefully inspect the gas supply line and valve. Ensure the valve is in good working order and that the connections are tight and free from corrosion. Replace any damaged or worn components. Applying pipe joint compound sparingly to the threads during reassembly is crucial for ensuring a gas-tight seal. Over application should be avoided, as this can lead to future issues.
Gather all the necessary tools and materials before beginning the installation. Essential tools include a pipe wrench, adjustable wrench, screwdriver set, gas leak detector, level, measuring tape, and safety glasses. Having all the required materials on hand minimizes interruptions and ensures a smooth installation process. These materials should include pipe joint compound, log set positioning materials, and any required connection adaptors.
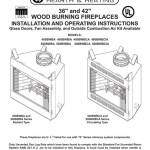
Read the manufacturer's instructions thoroughly before commencing the installation. The instructions provide specific guidance for the particular log set model, including proper log placement, gas connection procedures, and troubleshooting tips. Failure to follow the manufacturer's instructions can void the warranty and potentially create a safety hazard. Understanding the instructions is important to ensuring safe and effective operation of the gas log set.
Key Point 2: Installing the Gas Line and Burner Assembly
The gas line connection is a critical step in the installation process. Ensure the correct fittings are used to connect the gas supply line to the burner assembly. Using the incorrect fittings can lead to gas leaks and potentially dangerous situations. Always use pipe joint compound specifically designed for gas lines on all threaded connections.
Follow these steps:
- Apply pipe joint compound sparingly to the male threads of the gas line fitting.
- Carefully tighten the fitting onto the burner assembly, ensuring a secure and gas-tight connection.
- Use two wrenches–one to hold the burner assembly steady and the other to tighten the fitting–to prevent stress on the gas line and valve.
Once the gas line is connected, carefully position the burner assembly inside the firebox according to the manufacturer's instructions. Ensure the burner is level and stable. Use shims or leveling wedges if necessary to achieve a level surface. A level burner ensures even flame distribution and optimal combustion.
Many ventless gas fireplace logs utilize an oxygen depletion sensor (ODS) pilot light system. The ODS system monitors the oxygen levels in the room and automatically shuts off the gas supply if the oxygen level drops below a safe threshold. Ensure the ODS pilot light is properly positioned and unobstructed. Clean the pilot light assembly if necessary to ensure proper function. Improper ODS function can lead to carbon monoxide build up.
After the burner assembly is in place, carefully check all gas connections for leaks using a gas leak detector or a soap and water solution. Apply the solution to all connections and look for bubbles, which indicate a leak. If a leak is detected, immediately shut off the gas supply and tighten the connection or replace the fitting as needed. Repeat the leak test until all connections are leak-free. Never attempt to ignite the fireplace until all leaks are resolved.
Consider incorporating a flexible gas line connector. These flexible connectors allow easier installation and maintenance procedures. These should be approved and rated for gas connections.
Key Point 3: Positioning the Logs and Testing the Fireplace
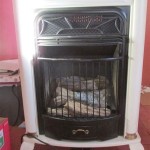
Proper log placement is crucial for both the aesthetic appeal and the safe operation of the ventless gas fireplace. Follow the manufacturer's instructions carefully when positioning the logs. Most log sets have specific placement guidelines to ensure proper flame distribution and prevent carbon monoxide buildup. Incorrect log placement can obstruct the burner assembly, leading to incomplete combustion and potential safety hazards.
The logs should be arranged in a manner that allows for adequate airflow around the burner. Avoid overcrowding the burner with logs, as this can restrict oxygen supply and cause incomplete combustion. Maintain a minimum clearance between the logs and the burner assembly. If unsure, consult the manufacturer's instructions further.
After the logs are positioned, double-check all connections and ensure the gas supply is still shut off. Perform another gas leak test to confirm that no leaks have developed during the log placement process. Once all checks are satisfactory, carefully turn on the gas supply at the main gas valve.
Follow the manufacturer's instructions for lighting the pilot light. The pilot light is typically ignited using a piezoelectric igniter or a match. Hold the control knob in the pilot position until the pilot light is established and remains lit. If the pilot light does not stay lit, check the thermocouple or thermopile and ensure it is properly positioned and functioning. A faulty thermocouple or thermopile can prevent the gas valve from staying open. Also, ensure the venting of the pilot is clear.
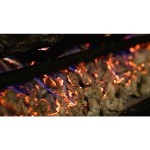
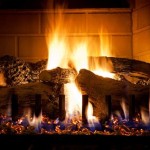
Once the pilot light is lit, gradually turn the control knob to the on position to ignite the main burner. Observe the flame pattern and ensure it is even and stable. Adjust the gas valve as needed to achieve the desired flame height and heat output. If the flames are flickering excessively or are emitting a strong odor, immediately shut off the gas supply and troubleshoot the issue. The odor may be from materials burning off the new logs and should dissipate after the initial startup.
Allow the fireplace to burn for a period of time, typically 30 minutes to an hour, to allow the logs to fully heat up and cure. Monitor the room for any signs of carbon monoxide buildup, such as headaches, dizziness, or nausea. If any of these symptoms occur, immediately shut off the gas supply, ventilate the room, and consult a qualified technician. Always use a carbon monoxide detector in the vicinity of the fireplace to monitor for potential hazards.
Carefully inspect the logs for any signs of discoloration or damage during the burn-in period. If any issues are observed, consult the manufacturer's instructions or contact a qualified technician for assistance. Regularly inspect and maintain the ventless gas fireplace logs to ensure safe and efficient operation.
Remember to keep the area around the fireplace clear of combustible materials such as curtains, furniture, and paper. A safety barrier may be required to prevent accidental contact with the hot surfaces of the fireplace. Regularly clean the fireplace and burner assembly to remove dust and debris, which can affect its performance.

How To Select And Install A Gas Fireplace Log Set Fireplaces Direct Learning Center

How To Select And Install A Gas Fireplace Log Set Fireplaces Direct Learning Center

Installing Vent Free Gas Log Set

Vent Free Gas Log Sets A List Of Do S And Don Ts

Installing Vent Free Gas Log Set

Vent Free Unvented Gas Logs Greenville Sc Blue Sky Chimney

How To Put In A Gas Log Set For Fireplace

How To Light The Pilot On A Vent Free Gas Log Fireplace And Other Helpful Tips

What Is A Ventless Gas Fireplace Experts In Gaithersbutg Md

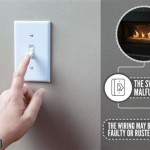
A Ventless Gas Fireplace Doesn T Belong In Your Home Greenbuildingadvisor
Related Posts