Here is an article about installing a tile fireplace hearth.
Installing a Tile Fireplace Hearth: A Comprehensive Guide
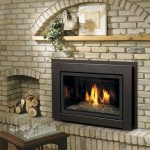
A fireplace hearth serves as a critical component of any fireplace installation, providing a non-combustible surface extending outward from the firebox. This surface protects the surrounding flooring and structure from sparks, embers, and radiant heat. Installing a tile fireplace hearth offers a durable, aesthetically pleasing, and fire-resistant solution. This article provides a detailed guide to the process of installing a tile fireplace hearth, covering preparation, material selection, and installation techniques.
Before embarking on the installation, it is imperative to consult local building codes and regulations regarding fireplace hearth requirements. Codes often specify minimum dimensions, materials, and installation methods. Compliance with these codes is crucial for safety and legal reasons. Failure to adhere to regulations can result in failed inspections and potential safety hazards.
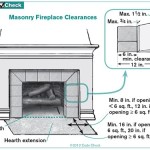
Accurate measurement of the available space is the first step in planning the hearth installation. Determine the desired dimensions of the hearth, considering the size of the fireplace opening and the surrounding room. Ensure the hearth extends sufficiently to provide adequate protection, typically a minimum of 16 inches in front of the fireplace opening and 8 inches on either side. Carefully mark the intended boundaries of the hearth on the floor using a pencil or chalk line.
The existing flooring within the marked area must be removed to prepare the subfloor for tile installation. The type of flooring material will dictate the removal method. Carpet can be easily cut and removed, while hardwood or laminate flooring may require the use of a pry bar or other specialized tools. Ceramic or stone tile flooring can be particularly challenging to remove and may necessitate the use of a hammer drill and chisel. Ensure the removal process is thorough, leaving a clean and even subfloor surface.
Once the existing flooring has been removed, inspect the subfloor for any damage or imperfections. Repair any cracks, holes, or unevenness using a suitable patching compound. Ensure the subfloor is level and structurally sound to provide a stable base for the tile installation. If the subfloor is significantly uneven, a self-leveling compound may be required to create a perfectly flat surface.
Selecting the appropriate tile for a fireplace hearth is crucial for both aesthetic appeal and fire resistance. Common tile choices include ceramic, porcelain, and natural stone tiles such as slate, granite, and travertine. Porcelain tile is generally considered an excellent choice due to its durability, low water absorption, and resistance to heat and staining. Natural stone tiles offer a unique and elegant look but may require sealing to protect them from moisture and staining. Ensure the selected tile is rated for high-temperature applications.
In addition to the tile itself, several other essential materials are required for the installation. These include thin-set mortar, grout, tile spacers, and a sealant. Thin-set mortar is used to adhere the tile to the subfloor. Choose a high-quality, polymer-modified thin-set mortar specifically designed for use with the selected tile type. Grout fills the joints between the tiles and provides a finished look. Select a grout color that complements the tile and is resistant to staining and mildew. Tile spacers ensure consistent spacing between the tiles, resulting in a professional-looking installation. A sealant is applied to the grout lines to protect them from moisture and staining.
Key Preparations Before Tiling
The subfloor preparation is paramount. A thoroughly cleaned, level, and stable subfloor is crucial for a successful tile installation. Any residual debris or imperfections can compromise the adhesion of the thin-set mortar and lead to tile cracking or lifting over time. Use a shop vacuum to remove any dust or debris from the subfloor surface. Addressing any structural issues in the subfloor before proceeding with the tile installation is non-negotiable.
Before applying the thin-set mortar, dry-fit the tiles to determine the optimal layout and spacing. This step allows for adjustments to be made before the mortar is applied, minimizing waste and ensuring a visually pleasing result. Begin by laying out a row of tiles along the longest edge of the hearth area, using tile spacers to maintain consistent spacing. If necessary, adjust the layout to avoid small slivers of tile at the edges. Mark the tile layout on the subfloor with a pencil.
Mix the thin-set mortar according to the manufacturer’s instructions. Use a clean mixing bucket and a mixing paddle attached to a drill. Add water gradually to the dry mortar mix until a smooth, creamy consistency is achieved. Allow the mortar to slake for the recommended time before mixing it again briefly. Avoid adding too much water, as this can weaken the mortar and compromise its adhesion.
Using a notched trowel, apply a thin, even layer of thin-set mortar to the subfloor within the marked-out area. The notch size of the trowel will depend on the size and type of tile being used. Generally, a ¼-inch notched trowel is suitable for small to medium-sized tiles, while larger tiles may require a larger notch size. Hold the trowel at a 45-degree angle and apply the mortar in a sweeping motion, creating ridges in the mortar bed.
Carefully place the tiles onto the mortar bed, aligning them with the layout marks and using tile spacers to maintain consistent spacing. Press each tile firmly into the mortar, ensuring good contact between the tile and the mortar bed. Use a rubber mallet to gently tap the tiles into place, ensuring they are level and flush with the surrounding tiles. Work in small sections, applying mortar and setting tiles one section at a time.
As you set the tiles, periodically check their levelness using a level. Adjust the tiles as needed by adding or removing mortar underneath them. Pay particular attention to the alignment of the tiles, ensuring that the grout lines are straight and consistent. Use a damp sponge to wipe away any excess mortar from the tile surfaces.
Cutting tiles to fit around corners or edges may be necessary. A tile cutter or wet saw can be used to make precise cuts. When using a tile cutter, score the tile along the desired cut line and then snap the tile along the score. A wet saw uses a diamond blade and water to cut tiles cleanly and accurately. Always wear safety glasses when cutting tiles.
Ensuring Proper Adhesion and Alignment
Maintaining consistent thin-set mortar thickness is crucial for ensuring proper tile adhesion and a level surface. Using the correct notched trowel size and applying even pressure is essential. Regularly check the level of the tiles and make adjustments as needed before the mortar sets. Avoid walking on the newly laid tiles until the mortar has completely cured.
After all the tiles have been set, allow the thin-set mortar to cure for at least 24 to 48 hours, or according to the manufacturer’s instructions. Avoid walking on the tiles during the curing process, as this can disrupt the bond between the tile and the mortar. Once the mortar has cured, remove the tile spacers.
Prepare the grout according to the manufacturer’s instructions. Use a clean mixing bucket and a mixing paddle. Add water gradually to the dry grout mix until a smooth, creamy consistency is achieved. Allow the grout to slake for the recommended time before mixing it again briefly.
Using a grout float, apply the grout to the tile joints, working it into all the spaces between the tiles. Hold the grout float at a 45-degree angle and apply the grout in a sweeping motion, ensuring that the grout is packed tightly into the joints. Remove any excess grout from the tile surfaces with the grout float.
After the grout has been applied, allow it to set for approximately 15 to 30 minutes, or according to the manufacturer’s instructions. Then, use a damp sponge to wipe away the excess grout from the tile surfaces. Rinse the sponge frequently in clean water. Be careful not to remove too much grout from the joints, as this can weaken the grout and make it susceptible to cracking.
After the initial sponging, allow the grout to dry for several hours, or according to the manufacturer’s instructions. Then, use a clean, dry cloth to buff the tile surfaces, removing any remaining grout haze. Repeat this process as needed until the tile surfaces are clean and free of haze.
Finishing And Protection
Applying a sealant to the grout lines provides added protection against moisture and staining. Choose a high-quality grout sealant and apply it according to the manufacturer’s instructions. Allow the sealant to dry completely before using the fireplace. Regularly clean the tile hearth with a mild detergent and water to maintain its appearance.
Inspect the finished hearth for any imperfections, such as cracked or chipped tiles, or uneven grout lines. Repair any imperfections as needed. Consider adding a decorative border around the hearth to enhance its appearance. This can be achieved by using accent tiles, trim pieces, or a contrasting grout color.
Following these steps will contribute to successful installation of a tile fireplace hearth that is both functional and aesthetically pleasing. Remember to prioritize safety, adhere to building codes, and take the time to do the job right. A properly installed tile fireplace hearth will provide years of reliable service and enhance the beauty of your home.
:strip_icc()/SCT_140_05-95f6abca65c6450db3dc3b621f899bfb.jpg?strip=all "How To Tile A Fireplace Hearth")
How To Tile A Fireplace Hearth
:strip_icc()/101343186-8909e34a95d74e0087ce39e27577ca41.jpg?strip=all "How To Tile A Fireplace Hearth")
How To Tile A Fireplace Hearth

How To Tile Over A Brick Hearth Shine Your Light

How To Prep A Fireplace For New Tile House One

How To Tile A Fireplace My Uncommon Slice Of Suburbia

How To Tile Over A Brick Hearth Shine Your Light

How To Tile A Fireplace Surround And Hearth Build Basic
/102661017-6a23c040b71843379188b96b21ac1a08.jpg?strip=all "How To Tile A Fireplace")
How To Tile A Fireplace

How To Tile A Fireplace House One

How To Tile Over A Brick Hearth Shine Your Light