Installing Your Fireplace Mantel Shelf: A Comprehensive Guide
A fireplace mantel shelf serves as both a functional and aesthetic addition to any room. It provides a surface for displaying decorative items, photographs, and seasonal decorations, while also contributing to the overall architectural style and ambiance of the fireplace area. Installing a mantel shelf, while potentially a DIY project, requires careful planning and execution to ensure both structural integrity and visual appeal. This article provides a detailed guide to the installation process, covering necessary tools, materials, and step-by-step instructions.
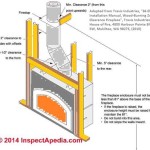
Before commencing the installation, a thorough assessment of the existing fireplace structure is crucial. The type of fireplace surround (brick, stone, drywall, etc.) will significantly influence the mounting method and hardware required. Consider the weight of the mantel shelf itself, as well as the anticipated weight of any items that will be placed upon it. This information will determine the appropriate load-bearing capacity of the chosen mounting system. Furthermore, local building codes may specify certain requirements for fireplace mantel installations, particularly regarding proximity to the firebox opening and the use of non-combustible materials. Researching these codes is essential to ensure compliance and safety.
Choosing the right mantel shelf is an equally important aspect of the project. Mantel shelves are available in a wide range of materials, styles, and sizes. Common materials include wood (various types of hardwood and softwood), manufactured wood (MDF, particleboard), and composite materials. The choice of material will depend on the desired aesthetic, budget, and environmental conditions. For example, solid wood mantels offer a classic and durable option, while manufactured wood provides a more affordable alternative. The style of the mantel shelf should complement the existing décor of the room and the architectural elements of the fireplace. Consider factors such as the mantel shelf's profile, finish, and any decorative details. Finally, accurately measure the width of the fireplace opening or the desired span of the mantel. The mantel shelf should be proportionally sized to the fireplace and the surrounding wall space.
Key Point 1: Gathering Necessary Tools and Materials
Successful mantel installation requires having the right tools and materials readily available. This minimizes interruptions during the process and ensures a professional-looking result. A comprehensive list includes:
1. Mantel Shelf: The chosen mantel shelf, sized and styled according to your preferences and the fireplace dimensions.
2. Mounting Hardware: This is the most crucial element. The correct mounting hardware depends on the wall construction. Common options include:
- Heavy-Duty Screws: For attaching to wood framing studs. Ensure the screws are long enough to penetrate the studs deeply.
- Masonry Anchors: For attaching to brick or stone fireplaces. Choose anchors specifically designed for the type of masonry material. Options include sleeve anchors, wedge anchors, and lead anchors.
- Drywall Anchors (Toggle Bolts): For attaching to drywall, these provide support where studs are unavailable. Toggle bolts are generally preferred for heavier mantels.
3. Drill: A power drill is essential for pre-drilling pilot holes and driving screws or bolts.
4. Drill Bits: A variety of drill bits, including those suitable for wood, masonry, and metal, depending on the wall type and mounting hardware.
5. Level: A level is critical for ensuring the mantel shelf is perfectly horizontal.
6. Stud Finder: This tool helps locate wood framing studs behind drywall.
7. Measuring Tape: For accurate measurements of the fireplace, mantel shelf, and wall.
8. Pencil: For marking drilling locations and reference lines.
9. Safety Glasses: To protect your eyes from debris during drilling and cutting.
10. Dust Mask: To protect your lungs from dust, especially when working with masonry or drywall.
11. Hammer: For tapping in masonry anchors or other fasteners.
12. Wrench: For tightening bolts and nuts, particularly when using masonry anchors.
13. Construction Adhesive (Optional): Can provide additional bonding strength, particularly for heavier mantels. Ensure the adhesive is compatible with the mantel material and the wall surface.
14. Wood Shims (Optional): For leveling the mantel shelf if the wall surface is uneven.
Key Point 2: Step-by-Step Installation Process
Once all the necessary tools and materials are gathered, the installation process can begin. The following steps provide a general guideline, but specific instructions may vary depending on the chosen mounting method and the type of fireplace surround.
Step 1: Marking the Mantel Shelf Location: Using a measuring tape and level, determine the desired height of the mantel shelf above the fireplace opening. Mark the location on the wall with a pencil. This line will serve as a reference for aligning the top edge of the mantel shelf. It is important to ensure the height complies with local building codes regarding clearances from the firebox.
Step 2: Locating Studs (If Applicable): If installing on a drywall wall, use a stud finder to locate the wood framing studs behind the drywall. Mark the location of the studs with a pencil. If no studs are available at the desired mantel height, drywall anchors will be required. For brick or stone walls, this step is not applicable.
Step 3: Pre-Drilling Pilot Holes: Pre-drilling pilot holes is crucial for preventing the wood from splitting and for ensuring that screws or bolts are properly aligned. For wood studs, pre-drill pilot holes slightly smaller than the diameter of the screws being used. For masonry walls, use a masonry drill bit to pre-drill holes according to the specifications of the chosen masonry anchors. Ensure the drill depth is sufficient to accommodate the length of the anchors.
Step 4: Attaching Mounting Brackets (If Applicable): Some mantel shelves utilize mounting brackets that are attached to the wall first, and then the mantel shelf is slid onto the brackets. Attach the brackets to the wall using the appropriate screws or anchors, ensuring they are securely fastened and level. Refer to the manufacturer's instructions for specific bracket placement and attachment methods.
Step 5: Installing the Mantel Shelf: Carefully position the mantel shelf against the wall, aligning it with the reference line and the pre-drilled pilot holes (or mounting brackets). If using screws, drive the screws through the mantel shelf and into the studs or anchors. If using mounting brackets, slide the mantel shelf onto the brackets until it is securely in place. If using construction adhesive, apply a bead of adhesive to the back of the mantel shelf before positioning it against the wall. Secure the mantel shelf in place with screws or brackets, and allow the adhesive to cure according to the manufacturer's instructions.
Step 6: Leveling and Shimming (If Necessary): Use a level to check the mantel shelf is perfectly horizontal. If the wall surface is uneven, use wood shims to level the shelf. Insert the shims between the mantel shelf and the wall, and then trim off any excess shim material. If a gap remains between the mantel and the wall, caulk can be used to fill the gap and provide a cleaner finish.
Step 7: Final Inspection and Adjustments: Once the mantel shelf is installed, thoroughly inspect the installation to ensure it is secure, level, and aesthetically pleasing. Make any necessary adjustments to the screws or shims to achieve a perfect fit. Clean up any dust or debris from the installation process.
Key Point 3: Safety Considerations and Best Practices
Safety should be a paramount concern throughout the mantel shelf installation process. Adhering to the following safety considerations and best practices will minimize the risk of accidents and ensure a successful outcome.
1. Wear Safety Gear: Always wear safety glasses and a dust mask when drilling or cutting materials. This will protect your eyes and lungs from harmful debris.
2. Use Proper Tools: Use the correct tools for the job and ensure they are in good working condition. Using damaged or inappropriate tools can lead to injury.
3. Handle Materials Carefully: Be mindful of the weight and size of the mantel shelf. Seek assistance when lifting or moving heavy objects to avoid strains or injuries.
4. Disconnect Power: If working near electrical outlets or wiring, disconnect the power supply to the circuit breaker to prevent electric shock.
5. Follow Manufacturer's Instructions: Always refer to the manufacturer's instructions for the mantel shelf and mounting hardware. These instructions provide specific guidance on installation procedures and safety precautions.
6. Inspect the Fireplace Surround: Before installing the mantel, carefully inspect the fireplace surround for any signs of damage or instability. Repair any issues before proceeding with the installation.
7. Ensure Proper Clearances: Maintain adequate clearances between the mantel shelf and the firebox opening to prevent overheating or fire hazards. Consult local building codes for specific clearance requirements.
8. Secure Mounting: Ensure the mantel shelf is securely mounted to the wall using appropriate hardware and techniques. A poorly mounted mantel shelf can be a safety hazard.
9. Consider Professional Installation: If you are not comfortable with any aspect of the installation process, consider hiring a qualified professional to install the mantel shelf.
By following these guidelines, homeowners can confidently install a fireplace mantel shelf that enhances the beauty and functionality of their living space while ensuring safety and structural integrity. Remember to prioritize safety, plan meticulously, and choose appropriate materials and installation methods for a lasting and visually appealing result.

How To Install A Floating Mantle The Easy Way In Just One Afternoon

Guide Mantel Installation On A Stone Fireplace

How To Install And Decorate A Wooden Fireplace Mantel Vintage Wood Forged Iron

How To Install A Fireplace Mantel Howstuffworks

Fireplace Mantel Installation Before And After

Fireplace Mantel Installation Tips How To Antique Woodworks

How To Install A Fireplace Mantel

How To Install A Fireplace Mantel

Adding Grace And Charm With Fireplace Mantels Inviting Home

Farmhouse Mantel Real Wood Dogberry Collections
Related Posts

