Installing a Faux Stone Fireplace Surround: A Comprehensive Guide
Achieving the look of a natural stone fireplace without the complexities and expenses associated with traditional masonry is now readily attainable through the use of faux stone veneers. These manufactured options, crafted from lightweight materials like concrete mixes or polyurethane, offer a convincing aesthetic replication of natural stone, brick, or even wood. Installing a faux stone fireplace surround is a manageable DIY project for those with basic carpentry skills and a willingness to follow instructions carefully. This article provides a comprehensive guide to the process, outlining the necessary steps for a successful installation.
Planning and Preparation: Laying the Foundation for Success
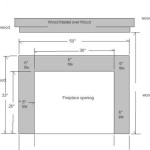
Before commencing the installation, meticulous planning is crucial. This stage involves accurately measuring the existing fireplace surround and determining the desired dimensions of the new faux stone surround. The measurements will dictate the quantity of faux stone panels or individual stones required. It is advisable to purchase a surplus of approximately 10% to account for cuts, waste, and potential errors during installation. Furthermore, a detailed plan should include the desired layout and pattern of the faux stone. This involves considering the visual appeal of the arrangement, ensuring a balanced and aesthetically pleasing design. Sketching the design on paper or utilising software can assist in visualizing the final outcome.
Beyond the visual aspects, the underlying surface preparation is equally important. The existing fireplace surround must be thoroughly inspected for any structural weaknesses or damages. Any loose or crumbling materials must be repaired or removed to ensure a solid foundation for the faux stone. Depending on the existing surface, the application of a scratch coat or the installation of a backer board might be necessary. A scratch coat, typically a thin layer of mortar, provides a textured surface that enhances adhesion. Backer boards, such as cement board or gypsum board designed for wet areas, offer a stable and water-resistant substrate. The selection of the appropriate backer board will depend on the specific faux stone product and the manufacturer's recommendations. Thorough cleaning of the surface is essential to remove dust, dirt, and grease, ensuring optimal bonding of the adhesive.
The Installation Process: A Step-by-Step Approach
The installation process begins with the application of the appropriate adhesive. The type of adhesive will depend on the material of both the faux stone and the substrate. Consult the faux stone manufacturer's recommendations to select a suitable adhesive specifically formulated for their product. Apply the adhesive evenly to the back of the faux stone panel or individual stone, using a notched trowel to create ridges that promote optimal bonding. The trowel size and notch pattern should also align with the manufacturer's guidelines.
Carefully position the first faux stone element, typically starting from the bottom corners of the fireplace surround and working upwards. Press the stone firmly against the prepared surface, ensuring proper alignment and adherence. Use a level to verify that the stone is perfectly plumb and level. Continue installing subsequent stones, maintaining consistent spacing between each element. Spacers, thin pieces of wood or plastic, can be used to ensure uniform grout lines. Regularly check the alignment and level of the stones as the installation progresses. For larger stones or panels, it may be necessary to provide temporary support using shims or braces until the adhesive cures completely. Adhere strictly to the adhesive manufacturer's recommended curing time before proceeding to the next stage.
Cutting faux stone to fit specific areas of the surround is sometimes necessary. This can be achieved using a wet saw equipped with a diamond blade or a masonry chisel and hammer. A wet saw provides cleaner and more precise cuts, minimizing chipping and breakage. When using a chisel and hammer, score the stone along the desired cut line and then gently tap along the score until the stone breaks cleanly. Always wear appropriate safety glasses and gloves when cutting faux stone to protect against flying debris and sharp edges. After cutting, ensure that all edges are smooth and free of sharp points.
Grouting and Finishing: Achieving a Polished Aesthetic
After the adhesive has fully cured, the next step is to apply grout to fill the spaces between the faux stones. The choice of grout color and type can significantly impact the overall appearance of the fireplace surround. Select a grout color that complements the faux stone and enhances its natural characteristics. Pre-mixed grout is a convenient option for smaller projects, while powdered grout offers greater flexibility in terms of color customization and adjusting the consistency. Apply the grout generously to the spaces between the stones, using a grout float to force the grout into the joints and remove excess material. Work in small sections at a time to prevent the grout from drying prematurely.
Once the grout has partially dried, typically after 15-30 minutes, use a damp sponge to wipe away the excess grout from the surface of the faux stone. Avoid excessive wiping, as this can remove grout from the joints. Rinse the sponge frequently and use a light touch to achieve a clean and even finish. After the initial wiping, allow the grout to dry completely, typically for 24-48 hours, before performing a final cleaning with a dry cloth to remove any remaining grout haze. Inspect the grout lines for any imperfections or voids, and touch up as necessary. Some faux stone products may benefit from the application of a sealant to protect against staining and moisture damage. Consult the manufacturer's recommendations regarding the use of sealants and choose a product specifically designed for faux stone.
The final step involves tidying up the surrounding area and removing any debris or waste materials. Inspect the installed faux stone surround for any imperfections or areas that require additional attention. A properly installed faux stone fireplace surround will significantly enhance the aesthetic appeal of the living space and provide a durable and attractive focal point for years to come.

Diy Faux Stone Fireplace Chimney H2obungalow

Diy Faux Cast Stone Fireplace Part 1 Demo And Tiling The Hearth Top Shelf

Diy Stone Wall Fireplace Entertainment Center By Scott Genstone

Jerre S Faux Stone Fireplace Surround Genstone

How To Install A Stone Veneer Fireplace Shoe Makes New

Diy Faux Plaster Fireplace Surround Chelsey Freng

Hirondelle Rustique Diy Stacked Stone Fireplace First Remodeling Project Part 2 Fireplaces Brick Makeover Remodel

How To Build And Hang A Mantel On Stone Fireplace Shanty 2 Chic

How To Install Faux Stone Veneer Lowe S

Diy Faux Cast Stone Fireplace Part 2 Building The Mantel Top Shelf
Related Posts