Installing a Natural Gas Fireplace Insert: A Comprehensive Guide
A natural gas fireplace insert offers a convenient and efficient way to upgrade an existing masonry or prefabricated fireplace. These inserts provide supplemental heat, enhance the aesthetic appeal of a living space, and eliminate the mess and hassle associated with traditional wood-burning fireplaces. However, the installation of a natural gas fireplace insert requires meticulous planning, adherence to safety regulations, and a thorough understanding of the required components and procedures. This article provides a comprehensive guide to the installation process, covering essential considerations, step-by-step instructions, and safety precautions.
Before embarking on the installation process, it is crucial to determine the suitability of the existing fireplace for a gas insert. A thorough inspection should be conducted to assess the structural integrity of the fireplace, chimney, and surrounding area. Any existing damage, such as cracks, crumbling mortar, or water damage, should be addressed before proceeding with the installation. The fireplace opening must also be measured to ensure compatibility with the selected insert model. It is advisable to consult with a qualified professional to conduct this assessment and determine the appropriateness of the project for the existing structure.
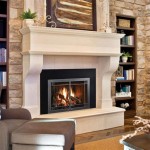
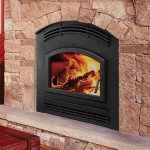
The selection of a natural gas fireplace insert involves considering factors such as heating capacity, venting requirements, aesthetic preferences, and budget. Inserts are rated in British Thermal Units (BTUs) per hour, which indicates their heating output. The appropriate BTU rating will depend on the size of the room being heated and the climate in which the home is located. Venting requirements vary depending on the insert model and can include direct vent, B-vent, or chimney liner systems. Aesthetic considerations include the style of the insert, the type of log set, and the finish options available. It is essential to research and compare different models to find an insert that meets the specific needs and preferences of the homeowner.
Safety is paramount throughout the installation process. Natural gas is a flammable and potentially hazardous substance, and any leaks or improper connections can pose a serious risk. It is essential to adhere to all applicable building codes, manufacturer's instructions, and safety regulations. If the homeowner lacks experience working with natural gas, it is strongly recommended to hire a qualified and licensed professional to perform the installation. This will ensure that the work is done correctly and safely, minimizing the risk of accidents or malfunctions.
Preparing the Fireplace for Installation
The first step in the installation process is to prepare the fireplace opening. This involves removing any existing fireplace accessories, such as grates, screens, and andirons. The fireplace should then be thoroughly cleaned to remove any soot, ash, and debris. This can be accomplished using a vacuum cleaner, brush, and mild detergent. It is important to wear appropriate protective gear, such as gloves and a dust mask, during this process.
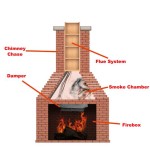
If the existing fireplace has a damper, it should be either removed or permanently locked in the open position. The damper serves to regulate airflow in a traditional wood-burning fireplace, but it is not needed for a gas insert. Leaving the damper closed can restrict airflow and cause the insert to overheat. If the damper cannot be easily removed, it can be secured in the open position using a metal rod or other suitable device.
Next, the chimney should be inspected and cleaned. A chimney sweep can remove any creosote buildup, which is a flammable substance that can accumulate in chimneys used for wood-burning fireplaces. Even if the fireplace has not been used for wood burning, it is still advisable to have the chimney inspected to ensure that it is free of obstructions and in good condition. Depending on the type of venting system required for the insert, a chimney liner may need to be installed. This involves inserting a flexible metal liner into the existing chimney to provide a dedicated venting pathway for the gas insert.
Finally, prepare the gas line. The gas line should be shut off at the main shutoff valve before any work is performed on the gas connection. A qualified plumber or gas fitter should run a new gas line to the fireplace opening, if one does not exist. The gas line should be sized appropriately for the BTU rating of the insert and should be installed according to local building codes. A shutoff valve should be installed near the fireplace opening to allow for easy disconnection of the gas supply if needed.
Installing the Venting System
The type of venting system required for a natural gas fireplace insert depends on the insert model and the existing fireplace configuration. Direct vent inserts utilize a two-pipe system that draws combustion air from outside the home and exhausts combustion gases directly outdoors. These inserts can be vented horizontally through a wall or vertically through the roof. B-vent inserts rely on natural draft to vent combustion gases and require a dedicated B-vent chimney. Chimney-lined inserts utilize the existing chimney to vent combustion gases, but require a metal liner to be installed to ensure proper venting and prevent corrosion.
For direct vent inserts, the vent pipes should be installed according to the manufacturer's instructions. The pipes should be properly supported and sealed to prevent leaks. The termination point of the vent should be located away from windows, doors, and other openings to prevent combustion gases from entering the home. For B-vent inserts, the vent pipe should be connected to the existing B-vent chimney using approved fittings and fasteners. The vent pipe should be properly supported and sealed to prevent leaks.
When installing a chimney liner, it is important to select a liner that is compatible with the gas insert and the existing chimney. The liner should be sized appropriately for the insert and should be installed according to the manufacturer's instructions. The liner should be connected to the insert using approved fittings and fasteners, and the top of the liner should be sealed to prevent rain and debris from entering the chimney. In many jurisdictions, a professional chimney sweep or certified installer is required to install chimney liners.
All venting connections must be meticulously inspected for leaks after the installation is complete. Soap and water can be applied to the connections, and any bubbles that form indicate a leak. Any leaks should be corrected immediately by tightening the connections or replacing the fittings.
Connecting the Gas Supply and Completing the Installation
With the venting system in place, the next step is to connect the gas supply to the insert. This should be done by a qualified plumber or gas fitter, ensuring all connections are tight and leak-free. The gas line should be connected to the insert using a flexible gas connector or rigid pipe. A union should be installed in the gas line to allow for easy disconnection of the insert if needed.
Once the gas connection is complete, the insert can be carefully positioned inside the fireplace opening. Ensure that the insert is level and securely in place. Some inserts may require shims to be installed to achieve proper alignment. The faceplate or surround can then be attached to the insert, concealing the edges of the fireplace opening. The faceplate should be securely fastened to the insert according to the manufacturer's instructions.
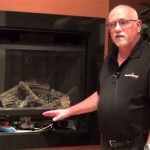
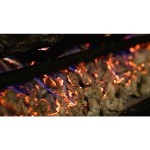
After the insert is installed, the log set can be placed inside the firebox. The logs should be arranged according to the manufacturer's instructions to ensure proper flame distribution and prevent overheating. The glass door can then be installed, if applicable. The glass door should be securely fastened to the insert, and the gasket should be in good condition to prevent leaks.
Before igniting the insert, perform a final inspection to ensure that all connections are tight and leak-free. Turn on the gas supply at the main shutoff valve and at the valve near the fireplace. Light the insert according to the manufacturer's instructions. Observe the flame pattern to ensure that it is even and consistent. If the flame pattern is irregular, the gas pressure may need to be adjusted. A qualified gas technician can perform this adjustment.
Finally, test all of the insert's features, such as the thermostat, remote control, and blower fan. Ensure that all features are functioning properly before completing the installation. The manufacturer's instructions should be consulted for troubleshooting any issues that may arise. A carbon monoxide detector should be installed in the room to provide an early warning of any potential carbon monoxide leaks. Regular maintenance, including cleaning the burner and venting system, will ensure the safe and efficient operation of the natural gas fireplace insert for years to come.

Ventless Gas Fireplace Insert Installation Framing Wall For

How To Install A Fireplace Insert Diy Save Money

Convert To Gas Installing Fireplace Inserts Doctor Flue

How To Select And Install A Gas Fireplace Log Set Fireplaces Direct Learning Center

How To Install A New Gas Fireplace Insert This Old House

Installing A Gas Fireplace

How To Install A Ventless Natural Gas Fireplace

Convert From Wood To Gas With A Insert The Kernel Burner

Installing A Gas Fireplace

How To Put In A Gas Log Set For Fireplace