Installing a Stacked Stone Fireplace: A Comprehensive Guide
A stacked stone fireplace can transform a living space, adding a touch of rustic elegance and warmth. The process of installing a stacked stone fireplace is a rewarding project for DIY enthusiasts, but it requires careful planning and execution. This guide will provide a comprehensive overview of the essential steps involved in installing a stacked stone fireplace, ensuring a successful and aesthetically pleasing outcome.
1. Planning and Preparation
Before embarking on the installation process, meticulous planning is crucial. This includes determining the fireplace's location, size, and desired stone style. Consider the surrounding décor and the overall aesthetic of the room. Additionally, ensure that the installation complies with local building codes and fire safety regulations.
The following steps are essential for preparation:
- Obtain necessary permits: Contact your local building department to acquire any required permits for fireplace construction.
- Clear the installation area: Remove furniture and other obstructions to provide adequate workspace.
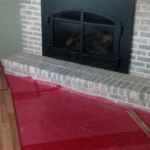
- Prepare the foundation: Construct a solid foundation for the fireplace. This may involve pouring concrete or using a pre-existing hearth.
- Lay out the fireplace: Use a chalk line to mark the outline of the fireplace on the foundation.
- Gather materials: Acquire the necessary materials for the fireplace, including stacked stone veneer, mortar, firebrick, and a heat-resistant sealant.
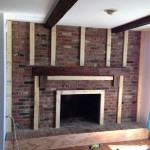
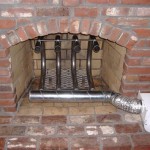
2. Installing the Firebox and Framing
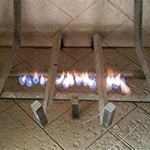
The firebox is the heart of the fireplace, housing the fire. The firebox should be built with firebrick, ensuring a safe and durable structure. Framing is essential for supporting the stone veneer and creating the desired shape of the fireplace.
The following steps are involved in installing the firebox and framing:
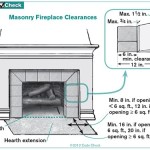
- Install the firebox: Carefully position the firebox within the marked outline, ensuring proper clearance from surrounding combustibles. Secure it firmly in place using mortar or heat-resistant adhesive.
- Build the firebox frame: Construct a frame around the firebox using metal studs and fire-rated drywall. This frame will provide support for the stone veneer and create a clean-burning environment.
- Install the hearth: Place a heat-resistant hearth in front of the firebox, providing a safe and decorative surface for placing logs and other fireplace accessories.
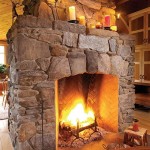
3. Installing the Stacked Stone Veneer
The stacked stone veneer adds the distinctive charm of a natural stone fireplace. Installing the veneer requires patience and attention to detail. Start by creating a strong bond between the mortar and the stone using a proper mix and application technique.
These steps are essential for installing the stone veneer:
- Apply mortar: Spread a consistent layer of mortar onto the framing, starting from the bottom and working upwards. The thickness of the mortar layer will determine the size of the joints between the stones.
- Position the stones: Press the stones firmly into the mortar, carefully aligning them and ensuring a staggered pattern for stability and visual appeal. Use a level to ensure alignment throughout the installation process.
- Grout the joints: Once the mortar has dried, fill the joints between the stones with grout, creating a smooth and polished finish. Carefully clean any excess grout for a professional look.
4. Finishing Touches and Safety Considerations
After the stone veneer is installed, complete the fireplace by adding finishing touches and ensuring safety measures are in place.
These steps are important for finishing the fireplace:
- Seal the fireplace: Apply a heat-resistant sealant to the stone veneer, protecting it from stains and moisture. This will enhance the durability and longevity of the fireplace.
- Install a fireplace screen: A fireplace screen provides a safety barrier, preventing sparks and embers from escaping the firebox and potentially causing damage. Choose a screen that complements the fireplace's design.
- Add decorative touches: Enhance the fireplace's aesthetic appeal with decorative elements such as a mantel, accessories, and lighting. These elements can personalize the fireplace and create a welcoming atmosphere.
Installing a stacked stone fireplace requires meticulous planning, attention to detail, and adherence to safety regulations. By following these steps and using the right materials and techniques, you can create a beautiful and functional centerpiece for your home.
.jpg?strip=all "Tips And Tools For Professional Stacked Stone Fireplaces")
Tips And Tools For Professional Stacked Stone Fireplaces

How To Install Stack Stone Tile On Fireplace Cement Board Installation

Stacked Stone Fireplace How To Diy

How To Install A Stacked Stone Fireplace Practical Whimsy Designs

How To Install A Stacked Stone Fireplace Practical Whimsy Designs

How To Build An Outdoor Stacked Stone Fireplace

12 Stacked Stone Fireplace Ideas For Optimal Coziness

How To Install Stacked Stone Tile On A Fireplace Thrifty Decor Diy And Organizing

Hirondelle Rustique Diy Stacked Stone Fireplace First Remodeling Project Part 2 Fireplaces Brick Makeover Remodel

Tips And Tools For Professional Stacked Stone Fireplaces