How To Tile Around a Fireplace Insert
Installing a fireplace insert can significantly enhance the efficiency and aesthetic appeal of a fireplace. However, the surrounding area often requires updating to complement the new insert. Tiling around a fireplace insert is a common and effective way to achieve a finished, professional look. This process involves careful planning, precise execution, and the use of appropriate materials to ensure both safety and visual appeal. The following guide provides a detailed explanation of how to tile around a fireplace insert, covering essential steps from preparation to finishing touches.
Before commencing any tiling project, a thorough assessment of the existing fireplace and surrounding area is crucial. This involves identifying the materials currently present, evaluating their structural integrity, and determining the scope of the tiling project. Understanding the existing conditions will inform the selection of appropriate tiling materials and installation techniques.
Preparing the Surface for Tiling
Preparing the surface is a foundational step that directly impacts the longevity and aesthetic quality of the tiled surround. A clean, level, and stable surface is essential for proper tile adhesion and a professional-looking finish. This process typically involves several key steps.
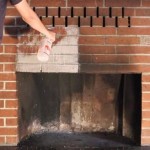
First, the existing surface must be thoroughly cleaned. Remove any loose debris, dust, dirt, and grease. A wire brush can be used to scrub away stubborn residue. For greasy surfaces, a degreasing cleaner followed by a thorough rinse is recommended. It is imperative to remove all contaminants that could interfere with the bonding of the mortar.
Next, inspect the surface for any imperfections, such as cracks, holes, or uneven areas. Small cracks can be filled with a cement-based patching compound. Larger cracks or significant unevenness may necessitate more extensive repairs, potentially involving the application of a skim coat or a concrete repair mortar. Allow the patching compound or mortar to fully cure according to the manufacturer's instructions before proceeding.
Following repairs, the surface should be leveled. A self-leveling compound can be used to create a perfectly flat and even surface. This is particularly important if the existing fireplace surround is significantly uneven. Apply the self-leveling compound according to the manufacturer’s directions and allow it to dry completely.
Finally, consider applying a primer to the prepared surface. Primer enhances the adhesion of the mortar to the substrate. Select a primer that is suitable for the specific type of surface material (e.g., concrete, brick, cement board) and the type of mortar to be used. Apply the primer evenly and allow it to dry thoroughly before moving on to the next step.
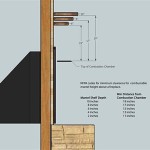
In the context of a fireplace, ensuring a fire-resistant substrate is paramount. If the existing surround is not fire-resistant, installing a layer of cement board is essential. Cement board provides a stable, heat-resistant surface ideal for tiling around a fireplace insert. Attach the cement board to the existing surround using cement board screws, ensuring that the seams are properly taped and mudded with cement board joint compound.
Selecting the Right Tiles and Materials
Choosing the appropriate tiles and materials is critical for both aesthetic appeal and functional performance. The selection process should consider factors such as heat resistance, durability, design compatibility, and ease of maintenance. Selecting the correct mortar, grout, and sealant is equally vital.
For fireplace surrounds, tiles made from materials such as porcelain, ceramic, stone (e.g., granite, marble, slate), and even some types of glass are suitable. Porcelain tiles are a common choice due to their durability, water resistance, and wide range of styles. Ceramic tiles are also a viable option, but they tend to be less durable than porcelain. Natural stone tiles offer a unique and luxurious aesthetic, but they often require sealing and more frequent maintenance. Glass tiles can add a contemporary touch, but they must be carefully selected to ensure they are heat-resistant and suitable for fireplace applications.
The size and shape of the tiles should be chosen to complement the fireplace insert and the overall design of the room. Larger tiles can create a more modern and seamless look, while smaller tiles or mosaics can add intricate detail and visual interest. Consider the grout lines; wider grout lines can create a more rustic or traditional aesthetic, while narrower grout lines offer a cleaner, more contemporary appearance.
Choosing the right mortar is crucial for a successful tiling project. A modified thin-set mortar is generally recommended for tiling around a fireplace insert. This type of mortar provides excellent adhesion and flexibility, which is important for accommodating the expansion and contraction caused by temperature fluctuations. Ensure that the mortar is specifically designed for use with the chosen tile material and the substrate.
Grout fills the spaces between the tiles and provides a watertight seal. Selecting a grout that is resistant to staining, cracking, and mildew is essential. Epoxy grout is a durable and water-resistant option, but it can be more difficult to work with than cement-based grout. Cement-based grout is easier to install but may require sealing to prevent staining and water damage. Choose a grout color that complements the tile and the overall design. Consider the visual impact of contrasting grout colors versus matching grout colors.
Sealant is used to protect the grout lines and to create a watertight seal along the edges of the tiled surround. Choose a high-quality sealant that is designed for use in wet areas and is resistant to mildew. Apply the sealant carefully, following the manufacturer’s instructions, and allow it to cure completely before using the fireplace.
Finally, ensure that all materials are rated for high-temperature applications. Specifically check for the American Society for Testing and Materials (ASTM) rating for fire-resistance. This will help prevent cracking, warping, or other heat-related damage.
The Tiling Process: From Layout to Grouting
The tiling process requires meticulous attention to detail to achieve a professional and aesthetically pleasing result. This involves several key steps, including planning the layout, applying the mortar, setting the tiles, and grouting the finished surface.
Begin by planning the tile layout. Dry-lay the tiles on the floor or a large surface to determine the most visually appealing arrangement. Consider the placement of full tiles and cut tiles to minimize awkward cuts and create a balanced design. Mark the center point of the fireplace surround and use this as a reference point for laying out the tiles. Use a tile spacer to maintain consistent grout lines and to ensure that the tiles are evenly spaced.
Once the layout is finalized, mix the mortar according to the manufacturer’s instructions. Use a notched trowel to apply the mortar to the substrate, spreading it evenly and creating ridges that will help the tiles adhere properly. Apply the mortar in small sections, working one area at a time to prevent the mortar from drying out before the tiles are set.
Carefully set the tiles into the mortar, pressing them firmly into place. Use tile spacers to maintain consistent grout lines. Periodically check the tiles with a level to ensure that they are even and plumb. If necessary, gently tap the tiles with a rubber mallet to adjust their position. Remove any excess mortar from the tile surfaces with a damp sponge.
Allow the mortar to cure completely, usually for 24 to 48 hours, before proceeding to the grouting phase. Remove the tile spacers and clean the grout lines with a grout saw or a utility knife to remove any excess mortar. Mix the grout according to the manufacturer’s instructions. Use a grout float to apply the grout to the tile surface, pressing it into the grout lines and removing any excess grout with the float. Work in small sections, cleaning the tile surface with a damp sponge as you go. Be sure to use a clean sponge and bucket of water to avoid smearing the grout.
After the grout has had time to set, usually 15 to 30 minutes, use a grout sponge to clean the tile surface thoroughly. Rinse the sponge frequently and use clean water to remove any remaining grout residue. Use a soft cloth to buff the tile surface and remove any remaining haze.
Finally, apply a sealant to the grout lines to protect them from staining and water damage. Allow the sealant to cure completely before using the fireplace. Inspect the tiled surround for any imperfections and make any necessary repairs. Enjoy the newly tiled fireplace surround.

How To Tile A Fireplace My Uncommon Slice Of Suburbia

How To Install A Gas Fireplace With Tile Surround And Wood Mantel Sima Spaces

How To Tile Over A Brick Fireplace The Handyman S Daughter

Diy Tile Fireplace Makeover The Home Depot

Mosaic Tile Fireplace Surround Art Renovation

How To Install A Marble Herringbone Fireplace Surround And Hearth

How To Tile A Fireplace South Georgia Style

Diy Fireplace Makeover With Vinyl Tiles Sew Much Ado

Painting Fireplace Tile The Ultimate Guide Jessica Welling Interiors

How To Tile A Brick Fireplace Jenna Kate At Home
Related Posts