How to Tile Around a Fireplace
Adding tile around a fireplace can significantly enhance the aesthetic appeal and functionality of your living space. Tiles offer durability, heat resistance, and a wide range of design options to complement any décor. This guide provides a step-by-step process for successfully tiling a fireplace surround, ensuring a professional finish.
1. Preparation: Essential Before You Begin
Thorough preparation is crucial for a successful tiling project. Before starting, ensure you have the necessary tools and materials, and prepare the fireplace surround for tiling.
Tools and Materials:
- Tile cutter or wet saw
- Mortar trowel
- Notched trowel
- Level
- Tape measure
- Pencil
- Bucket
- Sponge
- Grout float
- Grout
- Grout sealant
- Tile spacers
- Safety glasses
- Gloves
- Thinset mortar
- Backer board
- Masonry screws
- Safety gear (mask, gloves, eye protection)
Surface Preparation:
- Remove existing materials: Remove any existing tiles, paint, or wallpaper from the fireplace surround. Carefully detach or pry off old tiles using a chisel and hammer.
- Clean the surface: Thoroughly clean the fireplace surface with a brush or vacuum cleaner to remove dust, debris, and loose materials. Ensure a clean and smooth surface for optimal tiling.
- Inspect for damage: Check for any cracks or damage to the fireplace surround. Repair any damage with patching compound or mortar before proceeding.
- Install backer board: Apply backer board onto the fireplace surround for a stable and moisture-resistant surface for the tile. Secure the backer board using masonry screws.
2. Laying the Tile
With the fireplace surround prepared, you can start laying the tiles.
Steps:
- Measure and mark: Measure the area to be tiled and mark the layout for the tiles. Ensure the tiles are arranged symmetrically and visually appealing. Consider using a chalk line to create straight lines for precise placement.
- Apply thinset mortar: Using a notched trowel, spread a thin layer of thinset mortar onto the backer board following the marked layout. The notches create grooves for optimal adhesion and prevent air pockets.
- Place the tiles: Gently press the tiles into the thinset mortar, ensuring they are level and flush with each other. Use tile spacers to maintain consistent gaps between tiles.
- Clean excess mortar: Immediately clean excess mortar from the tile surface and grout lines using a damp sponge. Ensure all exposed mortar is removed to prevent discoloration after the tile dries.
- Let the mortar dry: Allow the thinset mortar to dry completely according to the manufacturer's instructions. This drying time can range from 24 to 48 hours.
Additional Tip: For intricate corners or curved areas, it’s ideal to pre-cut tiles using a tile cutter or wet saw. These tools allow for precise cuts and maintain the desired shape and size.
3. Grouting and Finishing Touches
Once the thinset mortar has dried, the final stages involve grouting and sealing the tiles.
Steps:
- Apply grout: Using a grout float, apply grout to the gaps between the tiles. Apply even pressure and fill the grout lines completely. Ensure the grout is evenly distributed and free from any air bubbles.
- Clean excess grout: After applying the grout, wipe off excess grout from the tile surface using a damp sponge. Work quickly to remove the grout before it dries.
- Let the grout dry: Allow the grout to dry completely according to the manufacturer's instructions. This drying time varies depending on the type of grout used.
- Apply grout sealant: Apply a grout sealant to the grout lines to protect against staining and moisture. Apply the sealant using a clean cloth or brush and allow it to dry completely.
- Enjoy your new fireplace surround: Once the sealant has dried, carefully clean the surface with a damp cloth and your new tiled fireplace surround is ready to be enjoyed.
Tiling around a fireplace is a rewarding project that can transform the look of your living space. By following these steps and using high-quality materials, you can achieve a professional finish and enhance the beauty and functionality of your fireplace surround.

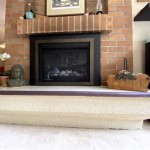
How To Tile A Fireplace My Uncommon Slice Of Suburbia
/102661017-6a23c040b71843379188b96b21ac1a08.jpg?strip=all "How To Tile A Fireplace")
How To Tile A Fireplace

How To Tile A Fireplace Even If It S Brick The Handyman Daughter

How To Tile A Fireplace South Georgia Style

Diy Projects Tiling A Fireplace Like Pro Rubi Blog Usa

Diy Tiling A Fireplace Surround What We Learned Along The Way

110 Diy Fireplace Makeover How To Paint Tile Jessica Welling Interiors

Diy Tiling A Fireplace Surround What We Learned Along The Way

Diy Projects Tiling A Fireplace Like Pro Rubi Blog Usa

How To Tile A Fireplace Surround And Hearth Build Basic
Related Posts