How To Tile a Fireplace with Stacked Stone
Tiling a fireplace with stacked stone veneer is a project that can significantly enhance the aesthetic appeal of a living space. Stacked stone provides a natural, textured look that can complement various interior design styles, from rustic to modern. This process, while achievable for a competent DIY enthusiast, requires careful planning, preparation, and execution to ensure a professional and long-lasting result.
Prior to commencing any work, it is crucial to understand the scope of the project and the materials involved. Stacked stone veneer comprises individual pieces of stone adhered together to form larger, easier-to-install panels or individual stones. These are typically made from natural stone, manufactured stone, or a combination of both. Natural stone offers inherent variations in color and texture, whereas manufactured stone provides consistency and often, a lighter weight. Considerations should be given to the overall weight of the chosen material, as this will impact the need for additional structural support.
Safety is paramount throughout the tiling process. Appropriate personal protective equipment (PPE), including safety glasses, gloves, and a dust mask, are essential. When cutting stone, especially natural stone, dust particles can be harmful if inhaled. Proper ventilation is also crucial, particularly when using adhesives or sealants. Adhering to manufacturer guidelines for all materials used is imperative for both safety and optimal performance.
Preparing the Fireplace Surface
The preparation of the fireplace surface is arguably the most critical step in ensuring a successful stacked stone installation. The surface must be clean, structurally sound, and properly prepared to accept the mortar adhesion of the stone. This typically involves several stages.
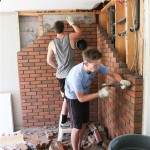
Firstly, any existing materials, such as old tile, paint, or wallpaper, must be completely removed. A scraper, chisel, or power tools may be necessary for this task. Take care not to damage the underlying structure during this process.
Next, the exposed surface should be thoroughly cleaned to remove any dust, dirt, or grease. A wire brush or a cleaning solution may be used for this purpose. Allow the surface to dry completely before proceeding.
If the existing surface is uneven or damaged, it may be necessary to apply a scratch coat of mortar. This thin layer of mortar provides a level and properly textured surface for the stacked stone to adhere to. The scratch coat should be allowed to cure completely before the next stage.
Finally, a layer of cement backer board should be installed over the prepared surface. Cement backer board provides a stable, water-resistant substrate that is ideal for tiling with heavy materials like stacked stone. The backer board should be screwed securely to the underlying structure, using corrosion-resistant screws. The seams between the backer boards should be taped and sealed with thin-set mortar.
Installing the Stacked Stone
With the surface properly prepared, the installation of the stacked stone can commence. This process requires careful planning and attention to detail to achieve a visually appealing and structurally sound result.
Before applying any mortar, it is recommended to dry-fit the stacked stone pieces to determine the desired layout and pattern. This allows for adjustments to be made and ensures that the final arrangement is aesthetically pleasing. Consider the size and shape of the fireplace and how the stone will wrap around corners or edges.
Using a notched trowel, apply a generous layer of thin-set mortar to the back of each stone piece. Ensure that the entire surface is covered with mortar, paying particular attention to the edges.
Press the stone firmly onto the prepared surface, using a slight twisting motion to ensure good adhesion. Maintain consistent spacing between the stone pieces, using spacers if necessary. For stacked stone panels, simply align the panel edges and press firmly into the mortar.
Work in small sections, applying mortar and setting the stone before the mortar begins to dry. Regularly check the level and alignment of the stone pieces, making adjustments as needed. Clean any excess mortar from the surface of the stone with a damp sponge.
For corners and edges, it may be necessary to cut the stone pieces to fit. A wet saw with a diamond blade is the recommended tool for this purpose. Always wear safety glasses and a dust mask when cutting stone.
Grouting and Sealing
While some stacked stone installations are designed to be grout-free, grouting can enhance the aesthetic appeal and provide additional protection against moisture. If grouting is desired, it should be done after the mortar has fully cured.
Select a grout color that complements the color of the stone. Apply the grout to the joints between the stone pieces, using a grout float. Work the grout into the joints, ensuring that they are completely filled.
Remove any excess grout from the surface of the stone with a damp sponge. Take care not to remove too much grout from the joints. Allow the grout to dry completely before proceeding to the next step.
Once the grout has dried, seal the entire surface with a stone sealer. This will protect the stone from staining and moisture damage. Apply the sealer according to the manufacturer's instructions.
Allow the sealer to dry completely before using the fireplace. Regularly inspect the stacked stone for any signs of damage or wear. Repair any cracks or loose stones promptly to prevent further damage.

How To Install Stacked Stone Tile On A Fireplace Thrifty Decor Diy And Organizing

How To Install Stack Stone Tile On Fireplace Cement Board Installation

How To Install Stacked Stone Tile On A Fireplace Thrifty Decor Diy And Organizing

Stacked Stone Fireplace How To Diy

Tiling A Stacked Stone Fireplace Surround Bower Power

Tiling A Stacked Stone Fireplace Surround Bower Power

How To Install Stacked Stone Tile On A Fireplace Thrifty Decor Diy And Organizing

How To Install Stacked Stone Tile On A Fireplace Thrifty Decor Diy And Organizing

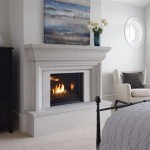
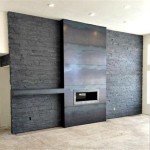
12 Stacked Stone Fireplace Ideas For Optimal Coziness

12 Stacked Stone Fireplace Ideas For Optimal Coziness
Related Posts