How to Tile a Brick Fireplace
Transforming a plain brick fireplace into a visually stunning focal point can be achieved through the art of tiling. Whether you are aiming for a sleek contemporary look or a rustic charm, tiling offers endless possibilities to personalize your fireplace. This guide will walk you through the essential steps of tiling a brick fireplace, providing you with the knowledge and confidence to embark on this rewarding DIY project.
Preparing the Fireplace
Before delving into the tiling process, it is crucial to prepare the fireplace surface for optimal adhesion and a smooth finish. This involves thoroughly cleaning the brick and removing any loose mortar, paint, or debris. You can employ a wire brush, a scraper, or a combination of both to ensure a clean and even surface.
Once the brick is clean, inspect for any cracks or uneven areas. If you encounter any, use mortar to fill them in and let it dry completely. This step ensures a smooth surface for tiling and prevents any potential future problems.
Choosing the Right Tiles
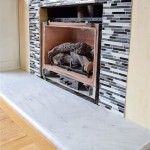
The selection of tiles plays a pivotal role in achieving the desired aesthetic for your fireplace. Consider your personal style, the existing décor of the room, and the size of the fireplace. Popular options include ceramic, porcelain, and natural stone tiles, each offering unique characteristics and benefits.
Ceramic tiles are known for their durability, affordability, and wide range of colors and patterns. Porcelain tiles, a type of ceramic tile, are denser and more resistant to water and stains. Natural stone tiles such as granite, marble, or slate offer a timeless elegance and a unique rustic charm. However, they are generally more expensive than ceramic tiles.
Installing the Tiles
With the fireplace prepared and tiles chosen, you can begin the installation process. Start by applying a thin layer of mortar onto the brick surface using a notched trowel. Use a level to ensure the mortar is applied evenly, creating a solid base for the tiles.
Carefully place the tiles onto the mortar bed, pressing them firmly into place. Maintain a consistent spacing between the tiles, using tile spacers to achieve a balanced and symmetrical pattern. Use a rubber mallet to gently tap the tiles, ensuring they are flush with the surrounding surface.
After installing the tiles, allow the mortar to cure for the recommended time specified by the manufacturer. Once cured, grout the joints between the tiles using a grout float. Wipe away any excess grout and let it dry completely.
For a final touch, apply a sealant to the grouting to protect it from stains and moisture. This step will enhance the longevity of your tiles and maintain their pristine appearance.
Safety Considerations
Safety is paramount when working with tools and materials. Wear appropriate safety gear, including gloves, eye protection, and a dust mask, to protect yourself from potential hazards.
Follow the manufacturer's instructions for handling and applying mortar, grout, and sealant. Maintain a clean and organized workspace, and be aware of potential slips and falls.
Finishing Touches
Once the tiling is complete, you can add finishing touches to enhance the overall look of your fireplace. Consider installing a tile hearth to create a decorative and functional platform.
If you wish to incorporate a mantel, ensure it complements the style of the tiling. You can also add decorative accents such as tile trim, mosaic patterns, or fireplace accents to personalize the space.

How To Tile A Fireplace Even If It S Brick The Handyman Daughter

How To Tile A Fireplace Even If It S Brick The Handyman Daughter

How To Tile A Brick Fireplace Jenna Kate At Home

How To Tile A Fireplace Even If It S Brick The Handyman Daughter

How To Tile Over A Brick Fireplace Curbly

Tile Near Fireplace Instructions Hearth Tiles Red Brick Fireplaces

Renovating With A Tile Over Brick Fireplace Design

Renovating With A Tile Over Brick Fireplace Design

Mark S Tile Over Brick Fireplace Project Ceramic Advice Forums John Bridge

How To Tile Over A Brick Hearth Shine Your Light
Related Posts