How To Stack Stone A Fireplace: A Comprehensive Guide
Stacking stone for a fireplace is a rewarding project that can significantly enhance a room's aesthetic appeal. Successfully executing this project requires careful planning, meticulous preparation, and precise execution. This article provides a comprehensive guide to stacking stone for a fireplace, covering critical aspects such as material selection, surface preparation, mortar application, and stone placement techniques.
Planning and Preparation: Laying the Foundation for Success
Before commencing any physical work, a thorough planning phase is paramount. This involves assessing the existing fireplace structure, selecting appropriate stones, and gathering all necessary tools and materials.
The initial step is to inspect the existing fireplace surface. If the existing surface is brick, concrete, or another porous material, it will generally provide a good bonding surface. However, if the surface is painted, glossy, or otherwise non-porous, it must be properly prepared to ensure adequate adhesion of the mortar. This may involve sandblasting, applying a bonding agent, or mechanically roughening the surface. Any loose or crumbling material should be removed to create a stable base.
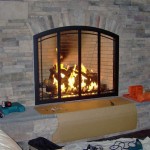
Stone selection is a crucial decision. The type of stone chosen will greatly influence the final appearance of the fireplace. Options range from natural stones like fieldstone, river rock, and slate to manufactured stone veneers. Natural stones offer a unique, rustic look, while manufactured stones provide greater consistency in size, shape, and color, often at a lower cost. Consider the architectural style of the room and the desired aesthetic when selecting the stone. Determine the quantity of stone needed by measuring the surface area of the fireplace that will be covered and adding a waste factor of approximately 10-15% to account for cuts and unusable pieces.
Gather the necessary tools and materials. Essential tools include a mortar mixer or mixing bucket and drill with a mixing paddle, a trowel (preferably a pointed trowel for applying mortar), a masonry saw or angle grinder with a diamond blade for cutting stones, a level, a rubber mallet, safety glasses, gloves, and a sponge. Essential materials include the selected stones, mortar (specifically designed for stone veneer or masonry work), bonding agent (if required), and cleaning solution.
Mortar Application Techniques for Optimal Adhesion
Proper mortar application is critical for ensuring the stability and longevity of the stacked stone fireplace. Selecting the right type of mortar and applying it correctly are key factors in achieving a strong and durable bond between the stones and the substrate.
Choose a mortar specifically formulated for stone veneer or masonry applications. These mortars are designed to provide the necessary adhesion and flexibility to withstand the stresses associated with temperature fluctuations and settling. Follow the manufacturer's instructions for mixing the mortar. The consistency should be similar to that of peanut butter – workable but not too runny. Avoid adding too much water, as this can weaken the mortar's strength. It is advisable to mix small batches of mortar at a time to prevent it from drying out before it can be used.
Before applying the mortar, pre-wet the back of each stone with clean water. This helps to prevent the stone from drawing moisture out of the mortar too quickly, which can weaken the bond. Apply a generous layer of mortar to the back of the stone, ensuring that the entire surface is covered. The thickness of the mortar layer will depend on the size and shape of the stone, but it should generally be around 1/2 to 3/4 inch. Use the trowel to create ridges in the mortar, which will help to improve adhesion.
For the wall itself, the buttering technique can be used. Buttering involves applying a thin layer of mortar directly to the wall where the stone will be placed. This adds an extra layer of adhesion, helping solidify the stone once it is pressed against the wall. This is particularly critical when working with heavier stones, or when the fireplace structure presents bonding challenges.
Stone Placement and Pattern Considerations
The artistic aspect of stacking stone lies in the placement and arrangement of the stones. Careful consideration of the pattern, spacing, and alignment will significantly impact the final aesthetic appeal of the fireplace. A well-executed stone placement strategy creates a visually appealing and structurally sound surface.
Begin stacking the stones from the bottom and work upwards. This provides a stable base for subsequent layers. Press each stone firmly into the mortar, using a slight twisting motion to ensure good contact. Use a level to ensure that each stone is properly aligned. Adjust the mortar thickness as needed to maintain a consistent level across the surface. If necessary, use shims to hold stones in place until the mortar sets.
Consider the pattern and spacing of the stones. There are several different patterns that can be used, such as a random pattern, a stacked pattern, or a running bond pattern. A random pattern is generally the easiest to create, as it involves placing the stones in a haphazard fashion. A stacked pattern involves aligning the stones vertically and horizontally, creating a more formal look. A running bond pattern involves staggering the stones, similar to the way bricks are laid. The desired aesthetic will dictate the correct pattern.
Maintain consistent spacing between the stones. The mortar joints should typically be between 1/2 and 1 inch wide. Use spacers to ensure consistent spacing. These can be small pieces of wood, plastic, or even cardboard. The spacing can be adjusted slightly to accommodate variations in stone size and shape. Once the mortar has partially set, use a tool to rake out the joints, creating a recessed look. This enhances the visual texture of the stone and helps to prevent water from pooling on the surface.
Cutting and Shaping Stones for a Seamless Fit
Achieving a professional-looking stone fireplace often involves cutting and shaping stones to fit specific areas or create desired patterns. This requires using appropriate tools and techniques to ensure accurate cuts and clean edges.
A masonry saw or angle grinder with a diamond blade is essential for cutting stones. A masonry saw is ideal for making straight cuts, while an angle grinder is more versatile for making curved or angled cuts. Always wear safety glasses and gloves when cutting stones to protect yourself from flying debris.
Before cutting a stone, carefully measure the area where it will be placed and mark the cutting line on the stone. Use a pencil or marker designed for marking stone. When cutting with a masonry saw, use a steady, even pressure and avoid forcing the blade. For angle grinders, make multiple shallow passes rather than trying to cut through the stone in one pass. This will help to prevent chipping and cracking.
For shaping stones, a hammer and chisel can be used. This technique is particularly useful for creating irregular shapes or for removing small pieces of stone. Hold the chisel at a slight angle to the stone and strike it with the hammer. Use gentle taps rather than forceful blows to avoid damaging the stone. If necessary, use a file or rasp to smooth out any rough edges.
Cleaning and Sealing the Finished Fireplace
Once the stone stacking is complete and the mortar has cured, cleaning and sealing the fireplace will protect the stone and enhance its appearance. This involves removing excess mortar, cleaning the stone surface, and applying a sealant to prevent staining and water damage.
After the mortar has cured for at least 24 hours, use a stiff brush and a mild cleaning solution to remove any excess mortar from the stone surface. Avoid using harsh chemicals or abrasive cleaners, as these can damage the stone. Rinse the surface thoroughly with clean water and allow it to dry completely.
Inspect the mortar joints for any cracks or voids. If any are found, fill them with fresh mortar. Allow the mortar to cure completely before proceeding. Once the surface is clean and dry, apply a sealant specifically designed for stone. This will help to protect the stone from staining and water damage. Follow the manufacturer's instructions for application. Apply the sealant evenly and allow it to dry completely before using the fireplace.
Regular maintenance will help to keep the stone fireplace looking its best for years to come. This includes cleaning the surface regularly with a mild cleaning solution and inspecting the mortar joints for any signs of damage. If any damage is found, repair it promptly to prevent further deterioration. Properly stacking a stone fireplace demands a commitment to detail, precision, and an understanding of the materials involved. By adhering to these guidelines, even a novice can create a focal point that adds beauty and value to their home.

12 Stacked Stone Fireplace Ideas For Optimal Coziness

12 Stacked Stone Fireplace Ideas For Optimal Coziness

Stacked Stone Fireplace 10 Luxurious Design Ideas Stoneyard

How To Build An Outdoor Stacked Stone Fireplace

54 Inspiring Stacked Stone Fireplace Ideas For Your Home Ledger Fireplaces White

Stacked Stone Fireplace 10 Luxurious Design Ideas Stoneyard

5 Stacked Stone Surrounds Travertine Quartzite Or Marble

Stone Fireplace Design And Remodel
:max_bytes(150000):strip_icc()/InteriorImpressions_2-261d8f7128f24652882c67a2252a5f0b.png?strip=all "20 Stacked Stone Fireplace Ideas To Warm Up Your Space")
20 Stacked Stone Fireplace Ideas To Warm Up Your Space

54 Inspiring Stacked Stone Fireplace Ideas For Your Home Makeover Fireplaces Remodel
Related Posts