```html
How to Replace Tile Around Gas Fireplace Wall Sticker
Replacing tile around a gas fireplace that has a wall sticker applied presents unique challenges. The presence of a wall sticker impacts both the removal of the old tile and the installation of the new. Careful planning and execution are necessary to achieve a professional finish without damaging the wall behind the sticker. This guide provides a comprehensive overview of the process, outlining the necessary tools, safety precautions, and step-by-step instructions for a successful tile replacement.
Preparing for the Tile Replacement
Prior to commencing any work, a thorough assessment of the area is crucial. Examine the existing tile layout, the condition of the grout, and the integrity of the wall sticker. Identify any loose tiles or areas where the grout is crumbling. Take detailed measurements of the area to be tiled to calculate the amount of new tile required. It is also important to determine the type of adhesive used for the original tiles, as this may influence the removal process.
Safety is paramount when working around a gas fireplace. Ensure the gas supply to the fireplace is shut off completely. This can typically be accomplished by turning off the gas valve located near the fireplace or at the main gas meter. If unsure, consult a qualified gas technician. Provide adequate ventilation in the work area by opening windows and doors. Wear appropriate personal protective equipment, including safety glasses, a dust mask or respirator, and work gloves. This protection is essential to prevent injury from flying debris and exposure to dust.
Gather all the necessary tools and materials before starting the project. A comprehensive list includes: new tiles, thin-set mortar, grout, a tile saw (wet saw recommended for precise cuts), a grout removal tool (manual or electric), a chisel, a hammer, a putty knife, a notched trowel, a sponge, buckets, measuring tape, a level, spacers, painter's tape, and a sealant suitable for use around fireplaces.
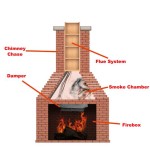
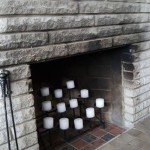
Removing the Existing Tile
The tile removal process requires patience and precision, especially near the wall sticker. The goal is to remove the tile without causing significant damage to the underlying wall or the sticker itself. Begin by removing the grout surrounding the tiles. Utilize a grout removal tool, working carefully along the grout lines. An oscillating multi-tool with a grout removal attachment can expedite this process, but exercise caution to avoid damaging the surrounding tiles or the wall.
Once the grout is removed, use a chisel and hammer to gently pry the tiles away from the wall. Position the chisel at the edge of the tile and tap it lightly with the hammer. Avoid applying excessive force, as this can cause the tile to shatter or damage the wall behind it. Work systematically, removing one tile at a time. If a tile is particularly stubborn, use a heat gun to soften the adhesive before attempting to remove it.
When approaching tiles near the wall sticker, take extra precautions. Use a putty knife to carefully separate the tile from the adhesive. Avoid using excessive force that could tear or peel the sticker. If the adhesive is strongly bonded to the sticker, consider using a specialized adhesive remover formulated for use on sensitive surfaces. Test the remover in an inconspicuous area of the sticker first to ensure it does not cause discoloration or damage. If the tile is difficult to remove without damaging the sticker, it may be prudent to cut the tile with a tile saw close to the sticker's edge, leaving a small section of the original tile adhered to the wall. This section can then be carefully sanded smooth and covered with thin-set mortar.
After removing all the tiles, thoroughly clean the surface of the wall. Use a scraper to remove any remaining adhesive or grout. A solvent-based cleaner can be used to dissolve stubborn adhesive residue. Ensure the wall is clean, dry, and free of debris before proceeding to the next step. Inspect the underlying wall for any damage, such as cracks or holes. If damage is present, repair it with patching compound before installing the new tiles.
Installing the New Tile and Addressing the Wall Sticker
Before installing the new tiles, dry-fit them in place to ensure a proper fit and aesthetic appeal. This allows for adjustments to the layout and identifies any tiles that need to be cut. Use a tile saw to make necessary cuts, ensuring precise measurements and clean edges. When cutting tiles that will be adjacent to the wall sticker, take extra care to ensure a clean and precise cut. It may be helpful to create a template of the sticker's edge to guide the cutting process.
Once the dry-fit is satisfactory, prepare the thin-set mortar according to the manufacturer's instructions. Use a notched trowel to apply the mortar evenly to the wall, spreading it over a small area at a time. Position the tiles onto the mortar, pressing them firmly into place. Use tile spacers to maintain consistent spacing between the tiles. Ensure the tiles are level and aligned correctly using a level and straightedge.
When installing tiles near the wall sticker, several approaches can be considered. One option is to carefully cut the tiles to fit around the sticker, leaving a small gap between the tile and the sticker. This gap can then be filled with a flexible sealant that matches the color of the grout or the sticker. Another option is to carefully overlap the tile slightly onto the edge of the sticker. This provides a seamless transition between the tile and the sticker, but it requires precise cutting and careful application to avoid damaging the sticker. In situations where the wall sticker is particularly delicate, it may be necessary to apply a protective layer of clear film over the sticker before tiling. This film can be removed after the tile installation is complete, preventing the sticker from being damaged by the mortar or grout.
Allow the thin-set mortar to cure completely according to the manufacturer's instructions. This typically takes 24 to 48 hours. Once the mortar is cured, remove the tile spacers and proceed to grout the tiles.
Grouting and Finishing the Tile Installation
Mix the grout according to the manufacturer's instructions. Apply the grout to the tile joints using a grout float, working it into the gaps between the tiles. Ensure the grout is evenly distributed and that all the joints are completely filled. Remove excess grout from the tile surfaces using a damp sponge. Rinse the sponge frequently to avoid smearing the grout.
Pay particular attention to the grout lines near the wall sticker. If necessary, use a small, pointed tool to carefully remove any grout that has gotten onto the sticker. Allow the grout to dry slightly, then use a clean, dry cloth to buff the tile surfaces. This will remove any remaining grout haze and reveal the finished tile surface.
Apply a sealant to the grout lines to protect them from moisture and stains. Use a sealant that is specifically formulated for use on grout and that is compatible with the type of tile and grout that was used. Allow the sealant to dry completely according to the manufacturer's instructions. Inspect the finished tile installation for any imperfections. Touch up any areas that need attention, such as uneven grout lines or loose tiles.
Finally, clean the entire area thoroughly. Remove any debris and dispose of it properly. Inspect the gas fireplace to ensure it is functioning correctly. Turn the gas supply back on and test the fireplace to ensure it is operating safely. If any issues are detected, consult a qualified gas technician. The successful replacement of tile around a gas fireplace wall sticker requires careful planning, meticulous execution, and a commitment to safety. By following these steps, a professional and aesthetically pleasing result can be achieved.
```
Easy L And Stick Tile Fireplace Makeover Hana S Happy Home

Er Friendly Fireplace Makeover With L Stick Tiles The Homes I Have Made

Easy L And Stick Tile Fireplace Makeover Hana S Happy Home

How To Tile A Fireplace Surround Thrifty Decor Diy And Organizing

110 Diy Fireplace Makeover How To Paint Tile Jessica Welling Interiors

Diy Fireplace Makeover With Vinyl Tiles Sew Much Ado

110 Diy Fireplace Makeover How To Paint Tile Jessica Welling Interiors

Diy Fireplace Makeover With High Heat Paint Jessica Welling Interiors

Painting Fireplace Tile The Ultimate Guide Jessica Welling Interiors

10 Fireplace Makeover Ideas Before And After Regency
Related Posts