How to Replace Tile Around Gas Fireplace Walls
Gas fireplaces offer a convenient and aesthetically pleasing heat source, often integrated into living spaces. Over time, the tile surrounding a gas fireplace can become damaged, outdated, or simply not align with evolving design preferences. Replacing the tile is a manageable project for many homeowners with basic DIY skills and the right tools. This article provides a comprehensive guide to safely and effectively replacing tile around a gas fireplace.
Before commencing any work, it is imperative to ensure the gas fireplace is completely turned off and that the gas supply is shut off to prevent any potential hazards. Allowing the fireplace to cool down completely is also essential to avoid burns. It is also advisable to consult the fireplace manufacturer's manual for any specific recommendations or warnings related to maintenance or repair. Ignoring these crucial safety precautions could lead to serious injury or damage.
Preparing the Work Area and Gathering Materials
The first step involves adequately preparing the surrounding area. This includes covering the floor and nearby furniture with drop cloths or plastic sheeting to protect them from dust, debris, and potential damage during the tile removal and installation process. Securing the coverings with painter's tape will prevent them from shifting and exposing surfaces.
Next, gather all the necessary tools and materials. A comprehensive list should include:
*Safety glasses: Essential for protecting eyes from flying debris during demolition.
*Gloves: Protect hands from sharp edges and potential irritants.
*Dust mask or respirator: Prevents inhalation of dust and particulate matter.
*Grout removal tool: Specifically designed for removing grout without damaging surrounding tiles (if retaining some tiles).
*Hammer: For use with a chisel to break up tiles.
*Chisel: Used to pry tiles away from the wall.
*Scraper: For removing leftover mortar or adhesive.
*Shop vacuum: For cleaning up dust and debris.
*Notched trowel: For applying mortar evenly.
*Mortar: Specifically formulated for tile installation. Choose according to tile type (e.g., porcelain, ceramic, natural stone).
*Grout: Select a color that complements the tile.
*Grout float: For applying grout into the tile joints.
*Grout sponge: For cleaning excess grout.
*Tile saw (wet saw): For cutting tiles to the required size and shape.
*Measuring tape: For accurate measurements.
*Pencil: For marking tiles for cutting.
*Level: To ensure tiles are installed straight and even.
*Spacers: To maintain consistent grout lines.
*New tiles: Choose tiles that are heat-resistant and appropriate for fireplace surrounds.
*Caulk: For sealing gaps around the edges of the tile installation.
Having all the necessary tools and materials readily available will streamline the project and minimize interruptions.
Removing the Existing Tile
The tile removal process requires patience and care to avoid damaging the wall behind the tile. Begin by removing the grout surrounding the existing tiles. A grout removal tool is the best option for this task, as it is designed to minimize the risk of damaging adjacent tiles, especially important if only replacing a section of the tiling. Work along the grout lines, applying consistent pressure and carefully removing the grout material.
Once the grout is removed, use a hammer and chisel to gently pry the tiles away from the wall. Position the chisel at an angle behind the tile and tap it gently with the hammer. Work around the edges of the tile to loosen it gradually. Avoid using excessive force, as this can damage the wall behind the tile. If a tile is particularly stubborn, try scoring it with a utility knife and then using the chisel to break it into smaller pieces for easier removal.
After removing all the tiles, use a scraper to remove any remaining mortar or adhesive from the wall. A clean, smooth surface is essential for proper adhesion of the new tiles. Use a shop vacuum to thoroughly clean the work area, removing all dust, debris, and loose mortar particles. This step is crucial for ensuring a strong bond between the new mortar and the wall.
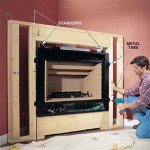
Inspect the wall for any damage, such as cracks or holes. Repair any imperfections with patching compound before proceeding with the tile installation. Allow the patching compound to dry completely according to the manufacturer's instructions. Priming the wall’s surface after repairing helps to ensure proper mortar adhesion. Select a primer recommended for tile projects.
Installing the New Tile
Before installing the new tiles, dry-fit them to ensure they fit properly and create the desired pattern. This step allows for adjustments and prevents potential errors during the mortar application. Arrange the tiles on the floor in the layout you intend to use on the wall, and make any necessary adjustments to the tile spacing or layout. Consider the placement of the grout lines and how they will align with the fireplace opening and surrounding elements. Trim pieces can be added to the edges to provide a clean finished look.
Mix the mortar according to the manufacturer's instructions. Add water gradually to the dry mortar, mixing thoroughly until you achieve a smooth, creamy consistency. Allow the mortar to slake for the recommended time before using it. Slaking allows the mortar to fully hydrate and develop its bonding properties.
Using a notched trowel, apply a layer of mortar to the wall, covering a small area at a time. The size of the notch on the trowel will depend on the size and type of tile being used. Consult the tile manufacturer's recommendations for the appropriate notch size. Hold the trowel at a 45-degree angle and spread the mortar evenly, creating ridges that will help the tiles adhere to the wall. Back-buttering the tiles, applying a thin coat of mortar to the back of each tile, prior to setting them, can improve adhesion. This is particularly helpful with larger tiles.
Press each tile firmly into the mortar, using a slight twisting motion to ensure good contact. Use spacers between the tiles to maintain consistent grout lines. Use a level to ensure the tiles are installed straight and even. Tap the tiles gently with a rubber mallet to set them in place and eliminate any air pockets. Periodically check the alignment of the tiles to ensure they are level and plumb.
If any tiles need to be cut to fit around the fireplace opening or other obstacles, use a wet saw. This tool allows for precise cuts and minimizes the risk of chipping or cracking the tiles. Measure the area to be covered carefully and mark the tile with a pencil. Use the wet saw to cut the tile along the marked line. Wear safety glasses when using a wet saw to protect your eyes from water spray and debris.
Allow the mortar to dry completely according to the manufacturer's instructions before proceeding with the grouting process. This typically takes 24 to 48 hours. Prematurely grouting the tiles can disrupt their placement and compromise the bond between the tile and the wall.
Grouting and Sealing the Tile
Once the mortar has dried, remove the spacers and prepare the grout. Mix the grout according to the manufacturer's instructions, adding water gradually until you achieve a smooth, consistent paste. Avoid adding too much water, as this can weaken the grout and make it more susceptible to cracking and crumbling.
Apply the grout to the tile joints using a grout float. Hold the float at a 45-degree angle and spread the grout diagonally across the tile surface, forcing it into the joints. Work in small sections, ensuring that all the joints are completely filled with grout. Remove excess grout from the tile surface with the edge of the float.
After the grout has had a chance to set for the recommended time (usually 15-30 minutes), use a damp grout sponge to clean the excess grout from the tile surface. Rinse the sponge frequently in clean water and wring it out thoroughly. Wipe the tile surface in a circular motion, removing any remaining grout residue. Take care not to remove too much grout from the joints.
Allow the grout to dry completely according to the manufacturer's instructions. This typically takes 24 to 72 hours. Once the grout is dry, use a clean, dry cloth to buff the tile surface and remove any remaining haze. This will help to restore the tile's shine and enhance its appearance.
Finally, apply a bead of caulk around the edges of the tile installation, where it meets the fireplace opening and surrounding walls. This will help to seal the gaps and prevent moisture from penetrating behind the tile. Choose a caulk that matches the color of the grout. Apply the caulk smoothly and evenly, using a caulking gun. Use a wet finger or a caulk smoothing tool to create a clean, professional finish. Allow the caulk to dry completely according to the manufacturer's instructions before using the fireplace.
Consider applying a tile and grout sealer to protect the tiles and grout from stains and damage. This is especially important in areas that are exposed to moisture or spills. Choose a sealer that is specifically designed for the type of tile and grout being used. Apply the sealer according to the manufacturer's instructions. Reapply the sealer periodically to maintain its effectiveness.

How To Prep A Fireplace For New Tile House One

How To Install A Gas Fireplace With Tile Surround And Wood Mantel Sima Spaces

How To Install A Gas Fireplace With Tile Surround And Wood Mantel Sima Spaces

How To Install A Gas Fireplace With Tile Surround And Wood Mantel Sima Spaces

How To Tile Over A Brick Fireplace The Handyman S Daughter

How To Install A Gas Fireplace With Tile Surround And Wood Mantel Sima Spaces

110 Diy Fireplace Makeover How To Paint Tile Jessica Welling Interiors

How To Paint Tile Easy Fireplace Makeover Setting For Four Interiors

Fireplace Makeover Painting The Tile In My 120 Year Old Home

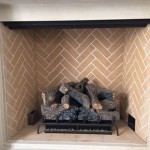
How To Install A Marble Herringbone Fireplace Surround And Hearth