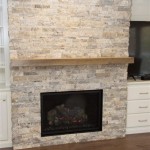
How to Replace Tile Around Gas Fireplace Surrounds
Replacing tile around a gas fireplace surround can significantly enhance the aesthetic appeal of a living space. Over time, tiles can become damaged, outdated, or simply no longer fit the overall design scheme of a room. While the process involves several steps, a methodical approach and the right tools can lead to a professional-looking result. This article provides a comprehensive guide on how to remove old tiles and install new ones around a gas fireplace surround.
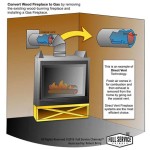
Before undertaking this project, it is crucial to prioritize safety. Gas fireplaces involve flammable substances and high temperatures, so ensuring the gas supply is shut off is paramount. The primary gas shut-off valve is typically located near the gas meter or the fireplace itself. Consulting a qualified gas technician is highly recommended if there is any uncertainty about the gas supply or the fireplace's operation.
Preparation and Safety Measures
The initial step involves preparing the workspace. Laying down drop cloths or plastic sheeting around the fireplace will protect the surrounding floor and furniture from dust and debris. Wear safety glasses and work gloves to protect eyes and hands from potential hazards during tile removal and installation. A dust mask or respirator is also advisable to prevent inhalation of dust and particles released during the process.
A thorough inspection of the existing tile and grout is necessary to determine the extent of the replacement work. Note any cracked, loose, or missing tiles. Identify the type of grout used, as this will influence the grout removal method. Check for any underlying damage to the fireplace surround itself, such as cracks or water damage, which must be addressed before proceeding with tile installation.
Gather the necessary tools and materials. These typically include a grout removal tool (manual or electric), a hammer, a chisel, a putty knife, a sponge, a bucket, a measuring tape, a level, thin-set mortar, new tiles, tile spacers, grout, sealant, and a trowel. Choosing the appropriate thin-set mortar and grout is essential for ensuring a strong and durable bond between the tiles and the fireplace surround. The selection should be based on the type of tile being used and the specific requirements of the installation, such as heat resistance.
Acquire all the necessary permits and check local building codes. Some jurisdictions may require permits for fireplace modifications, and compliance with building codes is essential for safety and regulatory compliance. Contacting the local building department can provide clarity on permit requirements and applicable codes.
Removing the Existing Tile
The first step in removing the existing tile is to remove the grout. This can be done using a manual grout saw, an electric grout removal tool, or a rotary tool with a grout removal attachment. Exercise caution when using power tools to avoid damaging the surrounding surfaces. Work slowly and methodically to remove all the grout around each tile.
Once the grout has been removed, begin removing the tiles. Use a hammer and chisel to gently tap behind each tile, working along the edges to loosen the adhesive. A putty knife can also be used to pry the tiles loose. Be careful not to damage the underlying fireplace surround. If the tiles are particularly difficult to remove, a heat gun can be used to soften the adhesive.
After removing the tiles, thoroughly clean the surface of the fireplace surround. Remove any remaining adhesive, grout, or debris using a putty knife or scraper. A solvent or adhesive remover may be necessary to remove stubborn residue. Ensure the surface is clean, dry, and free of any loose particles before proceeding with tile installation. Patch any cracks or imperfections in the surround with a suitable patching compound and allow it to dry completely.
Ensure the surface the tile is going to be adhered to is level. Use a level and straight edge to ensure the area is flat. If there are imperfections, use patching compound to make the tile installation smooth. After the compound is set, sand the compound smooth so the tile has a prepared surface.
Installing the New Tile
Before applying the thin-set mortar, dry-fit the new tiles to ensure proper spacing and alignment. This allows for any necessary adjustments to be made before the adhesive is applied. Use tile spacers to maintain consistent spacing between the tiles. Plan the layout of the tiles to minimize cuts and ensure a balanced appearance.
Prepare the thin-set mortar according to the manufacturer's instructions. Mix the mortar to a smooth, consistent consistency. Apply the thin-set mortar to the fireplace surround using a notched trowel. The size of the notches on the trowel will depend on the size and type of tile being used. Apply the mortar in a thin, even layer, covering only a small area at a time to prevent it from drying out.
Press each tile firmly into the thin-set mortar, ensuring it is properly aligned and level. Use tile spacers to maintain consistent spacing between the tiles. Periodically check the level of the tiles using a level to ensure they are even. Remove any excess thin-set mortar from the surface of the tiles with a damp sponge.
Allow the thin-set mortar to dry completely according to the manufacturer's instructions. This typically takes 24-48 hours. Avoid disturbing the tiles during this time to allow the adhesive to cure properly. Once the mortar is dry, remove the tile spacers.
After the thin-set has cured for the proper amount of time, remove tile spacers. A putty knife works well to remove the spacers between tiles. Next, remove any excess thin-set that squeezed out between the tiles. Before installing the grout, ensure that the thin-set is set completely. It is better to wait too long than to rush the project.
Grouting and Sealing
Prepare the grout according to the manufacturer's instructions. Mix the grout to a smooth, consistent consistency. Apply the grout to the tile joints using a grout float. Work the grout into the joints, ensuring they are completely filled. Remove any excess grout from the surface of the tiles with the grout float.
Allow the grout to set for the recommended time, typically 15-30 minutes. Use a damp sponge to wipe away the excess grout from the surface of the tiles. Rinse the sponge frequently in a bucket of clean water. Be careful not to remove too much grout from the joints.
Allow the grout to cure completely according to the manufacturer's instructions. This typically takes 24-72 hours. Apply a grout sealant to protect the grout from stains and moisture. The sealant should be applied according to the manufacturer's instructions.
Inspect the finished tile surface for any imperfections or areas that need further attention. Touch up any spots where the grout is missing or uneven. Clean the entire area thoroughly to remove any remaining grout haze or residue.
Apply a bead of sealant where the tile meets other surfaces, such as the fireplace surround or wall. This helps to prevent water from seeping behind the tiles and causing damage. Choose a sealant that is appropriate for the materials being joined and that is resistant to heat.
Turn the gas back on to the fireplace and test the functionality. Observe for any abnormalities, such as gas leaks. Call a professional technician to assist if there are is gas detected during the test. Ensure any gas detectors are in place and fully operational after replacing the tile work.
Once the sealant has dried, the tile replacement project is complete. Enjoy the newly tiled fireplace surround and the enhanced aesthetic appeal it brings to the living space. Proper maintenance, including regular cleaning and inspection, will help to ensure the longevity and beauty of the tile installation.

How To Prep A Fireplace For New Tile House One

How To Tile A Fireplace Surround Thrifty Decor Diy And Organizing

How To Install A Gas Fireplace With Tile Surround And Wood Mantel Sima Spaces

Fireplace Makeover Painting The Tile In My 120 Year Old Home

How To Install A Marble Herringbone Fireplace Surround And Hearth

110 Diy Fireplace Makeover How To Paint Tile Jessica Welling Interiors

How To Paint Tile Easy Fireplace Makeover Setting For Four Interiors

How To Install A Gas Fireplace With Tile Surround And Wood Mantel Sima Spaces

Easy L And Stick Tile Fireplace Makeover Hana S Happy Home

How To Tile Over A Brick Fireplace The Handyman S Daughter