```html
How To Replace Tile Around Gas Fireplace Surround
Replacing tile around a gas fireplace surround is a home improvement project that can revitalize the aesthetic appeal of a living space. This undertaking requires careful planning, preparation, and execution to ensure a safe and visually pleasing result. The following article details the process involved in replacing tile around a gas fireplace surround.
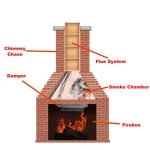
Before commencing any work, it is crucial to understand the specific construction and safety regulations pertaining to gas fireplaces. Consultation with a qualified professional is highly recommended, especially if there are uncertainties regarding the fireplace's gas line or venting system. Additionally, local building codes may require permits or inspections for certain types of fireplace modifications.
Key Point 1: Safety Precautions and Preparation
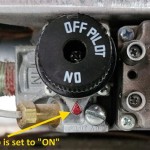
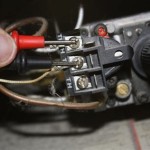
Prior to any work on or around a gas fireplace, the gas supply must be shut off. The gas shut-off valve is typically located near the fireplace itself or at the main gas meter. After shutting off the gas supply, it is essential to test the connection to ensure that no gas is leaking. A simple solution of soapy water applied to the gas line joints can be used to identify leaks; bubbles will form if gas is escaping.
Adequate personal protective equipment (PPE) is necessary throughout the project. Safety glasses are crucial to protect eyes from dust and debris generated during tile removal and installation. Work gloves will safeguard hands from sharp edges and potential irritants in the tile adhesive and grout. A dust mask or respirator is also advisable, particularly when removing old tile, as this process can release harmful particles into the air.
Protecting the surrounding area is another critical step in the preparation process. Drop cloths or plastic sheeting should be used to cover the floor and any nearby furniture to prevent damage from falling debris, dust, and adhesive. Painter's tape can be used to protect the edges of the fireplace surround and any adjacent walls from scratches or adhesive residue.
A thorough assessment of the existing tile and its condition is necessary to determine the appropriate removal method. Examine the grout lines for cracks or crumbling, and check for loose or damaged tiles. This evaluation will inform the choice of tools and techniques for removing the old tile.
Gathering the necessary tools and materials before starting the project will streamline the process and minimize disruptions. Essential tools include a chisel, hammer, grout saw or removal tool, putty knife, notched trowel, sponge, bucket, level, tape measure, tile cutter or wet saw, appropriate thin-set mortar, grout, and sealant. The type of thin-set mortar and grout selected should be appropriate for the type of tile being installed and the specific application around a fireplace, considering heat resistance and adhesion properties.
Key Point 2: Removing the Existing Tile
The removal of existing tile should be approached systematically to minimize damage to the fireplace surround. The first step is typically to remove the grout. A grout saw or grout removal tool can be used to carefully scrape away the grout along the edges of each tile. This process weakens the bond between the tile and the underlying surface, making removal easier.
Once the grout has been removed, a chisel and hammer can be used to gently pry the tiles away from the surround. Begin by placing the chisel at an angle along the edge of a tile and tapping it with the hammer. Apply steady, even pressure to avoid cracking or breaking the surrounding surface. Work your way around the tile, gradually loosening it from the adhesive.
If the tiles are particularly difficult to remove, a heat gun can be used to soften the adhesive. Apply heat to the tile surface for a short period of time, being careful not to overheat the surrounding materials. This can help to loosen the bond and make removal easier. Alternative, specialized demolition tools can be rented from tool rental shops.
After removing the tiles, thoroughly clean the underlying surface to remove any remaining adhesive or debris. A putty knife can be used to scrape away stubborn adhesive residue. For more persistent residue, a solvent-based adhesive remover may be necessary, but ensure it is compatible with the fireplace surround material and follow the manufacturer's instructions carefully. Allow the surface to dry completely before proceeding to the next step.
Inspect the substrate for any damages. If the fireplace surround is made of concrete board, check for crumbling or weakness. If the underlying surface is significantly damaged, the damaged sections may need to be repaired or replaced prior to the installation of new tiles. Applying a level to the substrate is important to ensure that the new tiles are installed evenly.
Key Point 3: Installing New Tile and Finishing
Before installing the new tiles, dry-fitting them is advisable. This involves laying out the tiles on the floor in the desired pattern and spacing to ensure that they fit correctly around the fireplace surround. This allows for adjustments to be made before applying the adhesive, minimizing waste and ensuring a visually appealing result. During the dry fit, tile spacers can be positioned to ensure equal gap for grout lines.
Once the dry-fit is satisfactory, prepare the thin-set mortar according to the manufacturer's instructions. The consistency of the mortar should be similar to that of peanut butter. Apply the mortar to the back of each tile using a notched trowel, ensuring that the entire surface is covered with ridges. The size of the notches on the trowel will depend on the size and type of tile being installed. The notches provide even coverage of the mortar and help to create a strong bond between the tile and the substrate.
Carefully position each tile onto the fireplace surround, pressing it firmly into the mortar. Use tile spacers to maintain consistent grout lines between the tiles. A level can be used to ensure that the tiles are aligned correctly. If necessary, gently tap the tiles with a rubber mallet to ensure that they are fully seated in the mortar.
Allow the thin-set mortar to cure completely according to the manufacturer's instructions, typically 24 to 48 hours. Avoid disturbing the tiles during this time. After the mortar has cured, remove the tile spacers and prepare the grout according to the manufacturer's instructions. Apply the grout to the grout lines using a grout float, pushing it into the spaces between the tiles. Remove any excess grout from the tile surfaces with a damp sponge.
After the grout has dried slightly, typically 15 to 30 minutes, clean the tile surfaces thoroughly with a clean, damp sponge. Rinse the sponge frequently in clean water to remove any grout residue. Allow the grout to cure completely according to the manufacturer's instructions. A grout sealant can be applied to the grout lines to protect them from moisture and stains. This is particularly important in areas that are exposed to water or spills.
Finally, apply a bead of sealant around the perimeter of the tiled area where it meets the fireplace surround and any adjacent surfaces. This will prevent water from seeping behind the tiles and causing damage. The sealant should be applied smoothly and evenly for a professional finish. Once the sealant has cured, the gas supply can be turned back on, and the fireplace can be used. Always verify no gas leakage is present using soapy water testing.
Regular maintenance, such as cleaning with appropriate tile and grout cleaners, will help to preserve the appearance and longevity of the newly installed tile. Avoid using harsh chemicals or abrasive cleaners that could damage the tile or grout. Following these steps will contribute to a successful tile replacement project around a gas fireplace surround.
```
How To Prep A Fireplace For New Tile House One

How To Tile A Fireplace Surround Thrifty Decor Diy And Organizing

Fireplace Makeover Painting The Tile In My 120 Year Old Home

How To Install A Gas Fireplace With Tile Surround And Wood Mantel Sima Spaces

How To Install A Marble Herringbone Fireplace Surround And Hearth

How To Install A Gas Fireplace With Tile Surround And Wood Mantel Sima Spaces

How To Paint Tile Easy Fireplace Makeover Setting For Four Interiors

How To Tile Over A Brick Fireplace The Handyman S Daughter

110 Diy Fireplace Makeover How To Paint Tile Jessica Welling Interiors

Diy Fireplace Makeover With Vinyl Tiles Sew Much Ado
Related Posts