How To Replace Tile Around Gas Fireplace Inserts In Singapore
Replacing the tile around a gas fireplace insert in Singapore can be a challenging task, but it's achievable with the right tools and knowledge. This process involves removing the existing tile, preparing the surface, and installing new tile. This article will guide you through each step, providing detailed instructions and helpful tips to ensure a successful tile replacement.
Step 1: Preparing for Tile Removal
Before embarking on the tile removal process, it's crucial to take necessary safety precautions. Wear safety glasses and gloves to protect your eyes and hands from debris. Turn off the gas supply to the fireplace and allow it to cool completely. Disconnect any electrical wiring connected to the fireplace. Additionally, clear the surrounding area of any furniture or objects that could obstruct your work.
Next, inspect the existing tile and identify the type of adhesive used. If the tiles are glued with mortar, a hammer and chisel can be used for removal. However, if the tiles are attached with adhesive, a tile removal tool or a utility knife may be suitable. For stubborn tiles, you can use a heat gun to soften the adhesive, making removal easier.
Step 2: Removing the Old Tile
With the necessary tools and safety measures in place, you can begin removing the old tile. Start from the edges and work your way inwards, using a hammer and chisel or a tile removal tool to pry the tiles off the wall. Be careful not to damage the surrounding walls or the fireplace insert. Utilize a utility knife to cut through any grout lines that may be obstructing removal.
As you remove tiles, ensure to collect any debris in a container for disposal. Once all the tiles are removed, thoroughly clean the surface with a damp cloth and allow it to dry completely.
Step 3: Preparing the Surface
After removing the old tile, it's essential to prepare the surface for the new tiles. This involves assessing the existing wall and addressing any imperfections or unevenness. If there are cracks, holes, or loose mortar, these should be repaired using appropriate patching compounds.
Once the surface is smooth and even, apply a layer of thin-set mortar to create a strong bond for the new tiles. Ensure the mortar is evenly spread and adheres to the wall surface. Allow the thin-set mortar to cure according to the manufacturer's instructions before proceeding to tile installation.
Step 4: Installing New Tile
With the surface prepared, you can proceed with installing the new tile. Begin by laying out the tiles on the floor to determine the best arrangement and ensure a balanced look. It's advisable to use a spacer to maintain uniform grout lines. Start laying the tiles from the bottom, working your way up. Press the tiles firmly into the thin-set mortar, ensuring they are level and aligned.
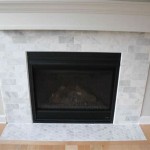
After installing all the tiles, allow them to cure according to the mortar manufacturer's instructions. Once cured, you can grout the spaces between the tiles using a grout float. Apply grout evenly, wiping away excess with a damp sponge. Allow the grout to set and dry before cleaning the tiles with a damp cloth.
Step 5: Finishing Touches
Once the grout has dried, you can apply a sealant to the newly installed tiles. This will help protect the tiles from stains and make them easier to clean. Allow the sealant to dry completely before reconnecting any electrical wiring or turning on the gas supply.
Finally, admire your handiwork. With the new tile installed, your gas fireplace insert will have a fresh and updated look. Remember to follow the manufacturer's instructions for operating and maintaining your fireplace insert.

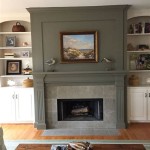
Fireplace Ottawa Gas Electric Stoves Inserts More

How To Update A Stone Fireplace Rambling Renovators

Fireplace Tiles Best 253 Ideas Designs 2024 Ramirro

How To Properly Frame Out For A Gas Fireplace Insert

Fireplace Ottawa Gas Electric Stoves Inserts More

Fireplace Tiles Best 253 Ideas Designs 2024 Ramirro

Oakville X4 Gdix4n 1 Napoleon

How To Tile Your Fireplace For The Perfect Retro 80s Look

Gas Propane Fireplace Inserts

Custom Fireplace Design Ottawa Millwork Mantels
Related Posts