How to Replace a Thermopile in a Gas Fireplace
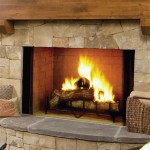
A gas fireplace offers the ambiance of a traditional fireplace without the mess of wood. A key component in many standing pilot gas fireplaces is the thermopile. This thermoelectric generator produces a small electrical current that’s essential for keeping the gas valve open and allowing the fireplace to function. When a thermopile fails, the fireplace will not stay lit, even with the pilot light ignited. Replacement of the thermopile is a common repair, often a task that can be accomplished by a homeowner with basic mechanical skills and a methodical approach.
This article provides a comprehensive guide on how to safely and effectively replace a thermopile in a gas fireplace. It outlines the necessary tools, safety precautions, step-by-step instructions, and troubleshooting tips to ensure a successful replacement. Prior to undertaking any work, understand the importance of safety and the potential risks associated with gas appliances.
Safety Precautions
Working with gas requires strict adherence to safety protocols. Natural gas and propane are flammable and can be explosive under certain conditions. Before commencing any work on a gas fireplace, the following safety precautions must be observed:
Shut Off the Gas Supply: Locate the gas shut-off valve for the fireplace. This is typically located on the gas supply line near the fireplace itself. Turn the valve to the OFF position. This will cut off the gas supply to the fireplace, preventing gas leaks during the thermopile replacement procedure.
Allow the Fireplace to Cool: Do not attempt to replace the thermopile immediately after the fireplace has been in use. Allow ample time for the fireplace components, including the pilot assembly and burner, to cool down completely. Hot components can cause burns.
Ventilation: Ensure adequate ventilation in the work area. Open windows and doors to prevent the accumulation of gas in the event of a leak. Proper ventilation minimizes the risk of fire or explosion.
Carbon Monoxide Detector: Verify that a functioning carbon monoxide detector is installed in the vicinity of the gas fireplace. Carbon monoxide is a colorless, odorless, and poisonous gas that can be produced by malfunctioning gas appliances. A functioning detector will alert occupants to the presence of dangerous levels of the gas.
Check Local Codes: Familiarize yourself with local building codes and regulations regarding gas appliance repair. Some jurisdictions may require that a licensed professional perform the work. Failure to comply with local codes can result in fines or other penalties.
Have a Fire Extinguisher Nearby: Keep a fire extinguisher rated for Class B fires (flammable liquids and gases) readily accessible in the work area. Knowing how to use the extinguisher can be crucial in the event of a fire.
Use Approved Leak Detection Solution: Use a commercially available leak detection solution specifically designed for gas lines to check for leaks after the thermopile replacement. Never use soap and water, as this can corrode the gas line.
If in Doubt, Call a Professional: If there's any uncertainty or discomfort regarding any aspect of the thermopile replacement process, it is always best to consult with a qualified gas appliance technician.
Tools and Materials Required
Having the right tools and materials on hand before starting the thermopile replacement will ensure a smooth and efficient process. The following items are typically required:
New Thermopile: Obtain a replacement thermopile that is compatible with the specific make and model of the gas fireplace. The incorrect thermopile will not function correctly. Consult the fireplace owner's manual or contact the manufacturer for the correct part number.
Screwdrivers: A variety of screwdrivers, including both Phillips head and flathead screwdrivers, may be needed to remove the fireplace's access panels and secure the thermopile.
Wrench Set: Wrenches, typically adjustable or a set of open-end wrenches, may be required to loosen and tighten gas line fittings or the thermopile connection.
Multimeter: A multimeter is an essential tool for testing the voltage output of the old and new thermopiles. It helps determine if the old thermopile is indeed faulty and verifies that the new thermopile is producing the required voltage.
Pliers: Pliers can be useful for gripping or manipulating small parts or wires.
Wire Brush: A wire brush can be used to clean the pilot assembly area and any corroded connections.
Leak Detection Solution: A commercially available leak detection solution, specifically designed for gas lines, is essential for checking for leaks after the thermopile replacement.
Work Gloves: Wearing work gloves protects hands from sharp edges and potential contaminants.
Safety Glasses: Safety glasses protect eyes from debris or splashes of leak detection solution.
Flashlight or Headlamp: A flashlight or headlamp provides adequate lighting to see inside the fireplace and work efficiently.
Step-by-Step Thermopile Replacement Procedure
The following steps provide a detailed guide to replacing a thermopile in a gas fireplace. It's essential to proceed carefully and methodically, following safety precautions at each step.
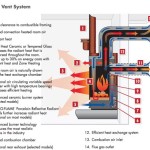
1. Access the Pilot Assembly: The thermopile is typically located near the pilot assembly. This may require removing an access panel or the fireplace's front facade. Consult the fireplace owner's manual for specific instructions on accessing the pilot assembly.
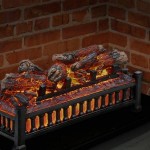
2. Locate the Thermopile: The thermopile is a cylindrical device, usually made of brass or a similar metal. It has two wires extending from it that connect to the gas valve (millivolt valve). It is positioned in the pilot flame, where the heat generates the electrical current.
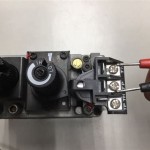
3. Disconnect the Wires: Carefully disconnect the wires from the thermopile to the gas valve. Note the orientation of the wires, as it may be necessary to reconnect them in the same way. Most systems are not polarity-sensitive, but noting the original configuration is still good practice. Loose or corroded connections should be cleaned with a wire brush and properly secured when reconnected.
4. Remove the Old Thermopile: The thermopile is typically held in place by a bracket or clip. Loosen or remove the bracket or clip to release the thermopile. Gently remove the old thermopile from its mounting position.
5. Install the New Thermopile: Insert the new thermopile into the same mounting position as the old one. Secure it in place with the bracket or clip. Ensure the thermopile is properly positioned in the pilot flame; it should be engulfed by the flame.
6. Reconnect the Wires: Reconnect the wires from the new thermopile to the gas valve, ensuring they are securely attached. Refer to the notes taken during the disconnection process to ensure the correct wire orientation, if applicable. Ensure the wire connections are clean and free of corrosion.
7. Test the Thermopile Output: Use a multimeter to test the voltage output of the new thermopile. With the pilot light lit, the thermopile should produce a voltage reading within the range specified by the fireplace manufacturer. Typically, this range is between 600 and 750 millivolts DC. If the voltage is significantly lower than the specified range, there may be an issue with the thermopile or the pilot flame.
8. Reassemble the Fireplace: Replace the access panel or front facade of the fireplace, ensuring all screws or fasteners are securely tightened.
9. Turn On the Gas Supply: Slowly turn the gas shut-off valve to the ON position. Listen for any hissing sounds or the smell of gas, which could indicate a leak.
10. Check for Gas Leaks: Apply leak detection solution to all gas line connections, including the thermopile connection, the gas valve connection, and any other fittings that were disturbed during the replacement process. Look for bubbles forming in the solution, which indicates a gas leak. If a leak is detected, immediately shut off the gas supply and tighten the fitting. If the leak persists, consult a qualified gas appliance technician.
11. Light the Pilot Light: Follow the lighting instructions provided in the fireplace owner's manual to light the pilot light. Observe the pilot flame to ensure it is clean, blue, and steady. A yellow or erratic flame may indicate a problem with the gas supply or the pilot assembly.
12. Test the Fireplace Operation: Once the pilot light is lit and stable, attempt to turn on the main burner. Observe the burner flame to ensure it is burning correctly. Verify that the fireplace stays lit and operates as intended.
Troubleshooting Tips
Despite careful execution, some issues may arise during or after the thermopile replacement. The following troubleshooting tips can help resolve common problems:
Low Thermopile Voltage: If the thermopile voltage is low, even with a new thermopile, check the following: the pilot flame is properly positioned on the thermopile; the gas pressure is within the specified range; the thermopile connections are clean and secure; the gas valve is functioning correctly. A weak pilot flame or a faulty gas valve can prevent the thermopile from generating sufficient voltage.
Pilot Light Won’t Stay Lit: If the pilot light ignites but does not stay lit, the following should check: the thermopile voltage is sufficient to hold the gas valve open; the thermocouple (if present) is functioning correctly; the gas valve (millivolt valve) is not sticking or malfunctioning. A thermocouple is sometimes used in conjunction with a thermopile. If it fails, the pilot light will not stay lit.
Gas Leak: If a gas leak is detected, immediately shut off the gas supply and tighten the affected fitting. If the leak persists or cannot be resolved with tightening, consult a qualified gas appliance technician. Never attempt to repair a gas leak by using tape or sealant, as this is a temporary fix and can be dangerous.
Incorrect Thermopile: Ensure the replacement thermopile is the correct model. Consult the fireplace owner's manual or the manufacturer's website for the correct part number. Using an incompatible thermopile can prevent the fireplace from functioning correctly or even cause damage to the gas valve.
Dirty Pilot Assembly: A dirty or obstructed pilot assembly can prevent the pilot light from burning cleanly and efficiently. Clean the pilot assembly with a wire brush and compressed air to remove any debris or corrosion.

Gas Fireplace Won T Stay Lit Magic Touch Mechanical

Identifying Gas Fireplace Parts Www Mygasfireplacerepair Com

Gas Fireplace Won T Stay Lit Magic Touch Mechanical

Gas Fireplace Missing Thermopile

Fireplace Won T Stay Lit This Is How You Fix It

Thermopile Removal Gas Fireplace Doityourself Com Community Forums

How To Test Your Thermopile Www Mygasfireplacerepair Com

Thermo Thermopiles Friendly Fires

How To Test And Replace A Thermopile Wall Furnace Burner Won T Ignite

Thermo Thermopiles Friendly Fires
Related Posts