How To Replace a Gas Fireplace Thermocouple
A gas fireplace thermocouple is a safety device that ensures gas flows to the burner only when the pilot light is lit. This component acts as a sensor monitoring the presence of the pilot flame. When the pilot light ignites the thermocouple, it generates a small electrical current. This current holds the gas valve open, allowing gas to flow to the burner when the fireplace is turned on. If the pilot light goes out, the thermocouple cools down, the electrical current stops, and the gas valve shuts off, preventing a potentially dangerous gas leak. Over time, thermocouples can fail, leading to pilot light issues and rendering the fireplace inoperable. Replacing a faulty thermocouple is a common repair, and with the right tools and knowledge, it can be safely accomplished by a homeowner.
Before beginning any work on a gas fireplace, safety is paramount. Always turn off the gas supply to the fireplace. This is typically accomplished by locating the gas shut-off valve near the fireplace, often on the gas supply pipe. Rotate the valve handle so that it is perpendicular to the pipe. Double-check that the valve is indeed closed. In addition to turning off the gas supply, allow the fireplace to cool completely before starting any repairs. A hot fireplace can cause burns. Gather all necessary tools and materials before beginning the project.
The tools needed for this project are relatively basic. A new thermocouple, compatible with the fireplace model, is essential. This is a crucial point; ensure the replacement thermocouple is the correct type and length for the fireplace. A wrench set is required to loosen and tighten gas fittings. The size of the wrenches will vary depending on the fireplace. A screwdriver set, including both flathead and Phillips head screwdrivers, will also be necessary to remove the fireplace's access panels and to work on the pilot assembly. Penetrating oil can be helpful if any of the fittings are corroded or difficult to loosen. Safety glasses and work gloves are recommended to protect the eyes and hands during the repair. A multimeter can be used to test the old thermocouple to confirm that it is indeed faulty before replacement. Finally, a leak detection solution, such as a soapy water mixture in a spray bottle, is crucial for checking for gas leaks after the replacement is complete.
Identifying a Faulty Thermocouple
Several symptoms can indicate a faulty thermocouple. The most common sign is the pilot light failing to stay lit. If the pilot light ignites but goes out as soon as the pilot knob is released, the thermocouple is likely the culprit. Another indication can be difficulty lighting the pilot light in the first place. In some cases, the pilot light may stay lit for a short period, but then extinguish after the fireplace has been on for a while. Intermittent problems with the pilot light can also be a sign of a failing thermocouple.
Before automatically assuming the thermocouple is the problem, it's wise to rule out other potential issues. A dirty pilot light assembly can also cause the pilot light to extinguish. Dust, debris, and spider webs can obstruct the pilot orifice, preventing a strong, steady flame from reaching the thermocouple. Cleaning the pilot assembly may resolve the issue. Check the gas supply to ensure it is turned on and that there are no issues with the main gas line. If the pilot light still won't stay lit after performing these checks, the thermocouple is the most likely cause.
A multimeter can be used to definitively test the thermocouple's functionality. Set the multimeter to measure millivolts (mV). Disconnect the thermocouple wire from the gas valve. Connect the multimeter leads to the thermocouple wire and the metal body of the thermocouple. Light the pilot light and observe the multimeter reading. A functioning thermocouple should produce a reading of at least 20-30 mV. If the reading is significantly lower than this, or if there is no reading at all, the thermocouple is likely faulty and needs to be replaced.
Step-by-Step Thermocouple Replacement
Once the gas supply is shut off, the fireplace is cool, and the necessary tools are gathered, the actual replacement process can begin. The first step is to access the pilot light assembly. This usually involves removing an access panel or the fireplace's decorative front. The specific method for removing the panel will vary depending on the fireplace model, so consult the owner's manual if necessary.
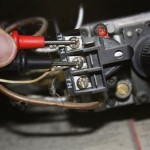
Once the pilot light assembly is accessible, locate the thermocouple. It is a thin, copper rod that sits directly in the pilot flame. One end of the thermocouple is connected to the pilot light assembly with a small bracket or clip. The other end is connected to the gas valve. Using a wrench, carefully loosen the nut that secures the thermocouple to the gas valve. Once the nut is loose, disconnect the thermocouple wire from the gas valve. Next, remove the bracket or clip holding the thermocouple to the pilot light assembly. The thermocouple can now be carefully removed from the fireplace.
Before installing the new thermocouple, compare it to the old one to ensure they are the same length and type. Install the new thermocouple by reversing the removal process. First, attach the thermocouple to the pilot light assembly with the bracket or clip. Then, carefully connect the thermocouple wire to the gas valve. Ensure the nut is snug, but not overtightened. Overtightening can damage the gas valve. Double-check all connections to ensure they are secure.
Post-Replacement Checks and Leak Testing
After the new thermocouple is installed, turn the gas supply back on. Slowly open the gas shut-off valve. Listen carefully for any hissing sounds, which could indicate a gas leak. If a hissing sound is heard, immediately turn the gas supply back off and check the connections. Once the gas is turned back on, attempt to light the pilot light. Follow the manufacturer's instructions for lighting the pilot. The pilot should light easily and stay lit when the pilot knob is released. If the pilot light still won't stay lit, double-check the thermocouple connections and ensure the pilot assembly is clean.
Leak testing is a critical step after replacing any gas component. Prepare a leak detection solution by mixing soapy water in a spray bottle. Spray the solution onto all gas connections, including the connection at the gas valve and the connection at the pilot light assembly. Watch for bubbles forming in the solution. Bubbles indicate a gas leak. If a leak is detected, immediately turn off the gas supply and tighten the connections further. Repeat the leak test until no leaks are detected. If the leaks persist even after tightening the connections, it may be necessary to call a qualified gas technician.
Once the pilot light is lit and the absence of gas leaks is confirmed, allow the fireplace to run for a few minutes. Observe the flame pattern of the burner to ensure it is burning correctly. There should be a steady, blue flame. If the flame is yellow or orange, it could indicate incomplete combustion, which can produce carbon monoxide. If there are any concerns about the flame pattern, or if the fireplace is emitting any unusual odors, turn it off immediately and consult a qualified gas technician.
Finally, replace the access panel or decorative front of the fireplace. Ensure it is securely fastened. The fireplace is now ready for normal use. It's a good practice to monitor the pilot light and the fireplace's performance for the first few uses after replacing the thermocouple to ensure everything is working correctly. Regular maintenance, including cleaning the pilot assembly and inspecting the thermocouple, can help prevent future problems and extend the lifespan of the fireplace.

Gas Fireplace Won T Stay Lit Magic Touch Mechanical

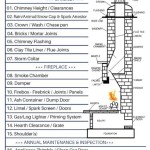
Identifying Gas Fireplace Parts Www Mygasfireplacerepair Com

Gas Fireplace Won T Stay Lit Magic Touch Mechanical

Know How To Replace A Gas Fireplace Thermocouple

How To Replace A Thermocouple The Home Depot

Fireplace Won T Stay Lit This Is How You Fix It

Gas Fireplace Missing Thermopile

Diy Gas Fireplace Repair No Flame Problem Remodeling Cost Calculator

Fireplace Pilot Light Not Working Replacing Thermocouple On A Remote Gas Very Easy

Thermo Thermopiles Friendly Fires
Related Posts