How To Replace a Fireplace Insert
A fireplace insert is a prefabricated unit that sits inside an existing fireplace opening, providing a more efficient and safe way to burn wood or gas. Replacing a fireplace insert can be a worthwhile project for homeowners who wish to upgrade their fireplace, improve its efficiency, or simply change its appearance. This guide will outline the steps involved in replacing a fireplace insert, providing practical advice and safety precautions.
Step 1: Prepare for the Installation
Before starting the replacement process, it is essential to prepare the work area and gather the necessary tools and materials. Disconnect the power supply to the fireplace if it is electric. Ensure adequate ventilation by opening windows and doors. It is also important to have a fire extinguisher readily available in case of any emergencies.
Gather the following tools and materials:
- New fireplace insert
- Level
- Tape measure
- Safety glasses
- Work gloves
- Screwdriver
- Wrench
- Caulk gun
- Heat-resistant sealant
- Fireplace cement
- Fireplace grate
- Fireplace screen
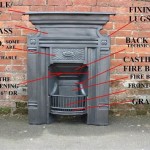
Step 2: Remove the Old Insert
Once the area is prepared, the first step is to remove the old fireplace insert. Begin by disconnecting any gas lines or electrical wires that might be connected to the insert. Carefully remove the existing fireplace grate and any other accessories. Use a pry bar or a hammer to gently remove the insert from the fireplace opening. If the insert is stuck, apply a lubricant to help release it.
After removing the insert, inspect the existing fireplace opening for any damage or cracks. Repair any damage before proceeding with the installation of the new insert. Clean out the fireplace opening thoroughly to remove any debris or ash that might have accumulated.
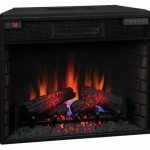
Step 3: Install the New Insert
With the old insert removed and the fireplace opening prepared, you are ready to install the new insert. Position the new unit in the opening, ensuring it is centered and level. Use the level to check that the insert is straight and plumb. If a gas insert is being installed, connect the gas line to the insert according to the manufacturer's instructions.
Secure the insert to the fireplace opening using the provided brackets or other mounting hardware. Ensure the screws are properly tightened and secure. Once the insert is firmly in place, seal any gaps between the insert and the fireplace opening with heat-resistant sealant. This will prevent smoke and drafts from escaping.
Step 4: Install the Fireplace Grate and Accessories
With the new insert installed, you can install the fireplace grate and any other accessories. Place the grate in the insert, ensuring it is level and centered. If you have a fireplace screen, install it in front of the opening to prevent sparks from flying.
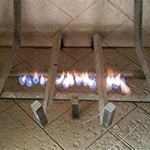
Step 5: Test and Enjoy
Before using the new fireplace insert, conduct a test run to ensure everything is working properly. If you are installing a gas insert, follow the manufacturer's instructions for lighting and operating the unit. If using a wood-burning insert, light a small fire and monitor the smoke and draft to ensure proper operation.
After testing the insert, you can enjoy the warmth and ambiance it brings to your home. Regular maintenance and cleaning are essential to ensure the longevity and safety of your new fireplace insert.

How To Install A Fireplace Insert Diy Save Money

How To Install An Electric Fireplace Insert

Removing An Old Woodstove Fireplace Insert Young House Love

Wood Stoves And Fireplaces How To Install A Burning Fireplace Insert Hearth Com Forums Home

Custom Installation Of Fireplace Inserts Insert Installations Sierra Hearth And Home

How To Remove A Fireplace Insert Tutorial User S Guide

Wood Fireplace Insert Installation Overview By Rockford Chimney Supply

Wood Stove Fireplace Insert Removal And Cleaning

Convert To Gas Installing Fireplace Inserts Doctor Flue

How To Install Gas Fireplace Insert Heat Glo