How To Replace a Wood Burning Fireplace Insert
Replacing a wood burning fireplace insert is a significant home improvement project that requires careful planning, preparation, and execution. A fireplace insert is a self-contained heating appliance designed to fit inside an existing masonry or factory-built fireplace. Replacing an old or inefficient insert can improve heating efficiency, enhance the aesthetic appeal of the fireplace, and potentially increase the home's value. This article provides a comprehensive guide to the process, outlining the necessary steps to safely and effectively replace a wood burning fireplace insert.
Prior to undertaking this project, it is crucial to understand the local building codes and obtain any required permits. Failure to comply with regulations can result in fines, delays, and even the removal of the installed insert. Engage with local building officials and consult with qualified professionals to ensure adherence to all applicable laws and standards.
Safety is paramount throughout the entire replacement process. Wood burning fireplace inserts involve working with heavy equipment, potential fire hazards, and potentially hazardous materials. Always wear appropriate personal protective equipment (PPE), including safety glasses, gloves, and a dust mask. Disconnect the existing gas or electrical supply to the fireplace and ensure the area is well-ventilated. It is highly recommended to have a qualified professional handle the electrical or gas line disconnection.
Key Point 1: Preparing for the Replacement
The initial phase involves thorough preparation, including assessing the existing fireplace and selecting a suitable replacement insert. This stage is critical for ensuring a successful and safe installation.
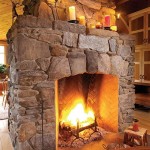
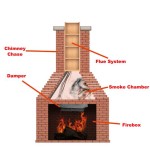
Assessment of the Existing Fireplace: A comprehensive inspection of the existing fireplace is necessary to determine its suitability for a new insert. Examine the firebox for any cracks, deterioration, or structural damage. Pay close attention to the chimney flue, checking for blockages, creosote buildup, or damage. The chimney must be in good working order to safely vent the exhaust gases from the insert. If the chimney requires repairs or cleaning, address these issues before proceeding with the replacement. A professional chimney sweep can provide a thorough inspection and cleaning service.
Measure the firebox opening carefully, noting the width, height, and depth. These measurements are essential for selecting an insert that will fit properly. In addition to the firebox dimensions, consider the fireplace surround and the available space around the fireplace. Ensure that the new insert will not interfere with any existing architectural features or create a safety hazard.
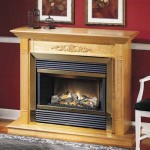
Selecting the Right Replacement Insert: Choosing the appropriate replacement insert is vital for achieving optimal heating performance and aesthetic appeal. Consider the heating needs of the space, the size of the firebox, and the desired style and features of the insert. Wood burning inserts are available in a variety of sizes, styles, and heating capacities. Check the insert's BTU (British Thermal Unit) rating to ensure it is adequate for heating the intended area.
Pay attention to the insert's efficiency rating. A higher efficiency rating indicates that the insert will convert more of the wood's energy into heat, reducing fuel consumption and emissions. Look for inserts that are EPA-certified, as these models meet stringent emissions standards. Research the different types of wood burning inserts available, such as catalytic and non-catalytic models. Catalytic inserts typically offer higher efficiency and lower emissions but may require more maintenance.
Consider the insert's features, such as a blower, a thermostat, and a remote control. A blower can help circulate heat more effectively, while a thermostat can maintain a consistent temperature. A remote control can provide added convenience. Finally, choose an insert that complements the style of the home and the fireplace surround.
Gathering Necessary Tools and Materials: Before starting the replacement process, gather all the necessary tools and materials. This will help to avoid delays and ensure a smooth installation. Some essential tools and materials include: safety glasses, gloves, a dust mask, a tape measure, a level, a wrench set, a screwdriver set, a hammer, a chisel, a pry bar, a vacuum cleaner, a chimney brush, fire-resistant gloves, high-temperature sealant, and any specific tools required by the insert manufacturer.
In addition to the tools, gather the necessary materials for connecting the insert to the chimney flue. This may include a stainless steel chimney liner, connectors, and adapters. Ensure that the chimney liner is the correct diameter and length for the insert. Also, have a supply of fire-resistant mortar or cement on hand for sealing any gaps or cracks in the firebox.
Key Point 2: Removing the Existing Insert
The next step involves carefully removing the existing wood burning fireplace insert. This process can be physically demanding and requires patience and attention to detail.
Disconnecting Utilities: Before removing the insert, disconnect any utilities that are connected to it. This may include disconnecting the gas line or unplugging the electrical cord. If the insert is connected to a gas line, it is essential to have a qualified professional disconnect the gas line to prevent leaks or explosions. Be sure to shut off the gas supply at the main valve before disconnecting the line. If the insert is plugged into an electrical outlet, unplug it and turn off the circuit breaker that controls the outlet.
Detaching the Insert from the Chimney Flue: Once the utilities are disconnected, detach the insert from the chimney flue. This may involve removing screws, bolts, or clamps that secure the insert to the flue. Use a wrench or screwdriver to loosen the fasteners and carefully remove them. Once the fasteners are removed, gently pull the insert away from the flue. Be careful not to damage the flue or the insert during this process. If the insert is difficult to remove, use a pry bar to gently pry it away from the flue. If the existing insert has a chimney liner, it may need to be disconnected and removed as well. Depending on the type of liner, it may be secured with screws, clamps, or a sealant. Carefully disconnect the liner and remove it from the chimney.
Removing the Insert from the Fireplace: With the insert detached from the chimney flue, it can be removed from the fireplace. This may require lifting, sliding, or tilting the insert. Depending on the weight of the insert, it may be necessary to enlist the help of another person. Use proper lifting techniques to avoid injury. Lift with the legs, not the back, and keep the back straight. If the insert is too heavy to lift, use a dolly or hand truck to move it. Protect the surrounding surfaces with blankets or drop cloths to prevent scratches or damage. Once the insert is removed from the fireplace, set it aside in a safe location.
Cleaning the Fireplace: After removing the old insert, thoroughly clean the fireplace. Remove any debris, ash, or soot that may have accumulated in the firebox. Use a vacuum cleaner or brush to clean the walls and floor of the firebox. Inspect the firebox for any cracks, damage, or deterioration. If any problems are found, repair them before installing the new insert. Apply fire-resistant mortar or cement to seal any gaps or cracks in the firebox. This will help to prevent air leaks and ensure that the insert operates efficiently. Also, ensure the damper area is properly sealed or removed according to the new insert's requirements.
Key Point 3: Installing the New Insert
Installing the new wood burning fireplace insert requires careful attention to detail and adherence to the manufacturer's instructions. This stage is crucial for ensuring the insert operates safely and efficiently.
Preparing the Chimney Flue: Before installing the new insert, inspect the chimney flue to ensure it is clean and in good working order. Use a chimney brush to remove any creosote buildup or debris. If the chimney is damaged or deteriorated, repair it before proceeding with the installation. Consider installing a new stainless steel chimney liner if the existing liner is damaged or if the insert manufacturer recommends it. A new chimney liner will help to improve the insert's efficiency and reduce the risk of chimney fires. Follow the manufacturer's instructions for selecting and installing the appropriate chimney liner.
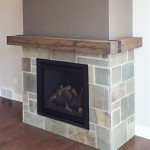
Positioning the New Insert: Carefully position the new insert in front of the fireplace opening. Ensure that the insert is aligned properly and that there is adequate clearance around the insert for ventilation. Refer to the manufacturer's instructions for specific clearance requirements. If necessary, use shims to level the insert and ensure that it is sitting securely in the fireplace opening. Protect the surrounding surfaces with blankets or drop cloths to prevent scratches or damage.
Connecting the Insert to the Chimney Flue: Once the insert is positioned correctly, connect it to the chimney flue. This may involve attaching a connector or adapter to the insert and connecting it to the chimney liner or flue. Use the appropriate fasteners, such as screws, bolts, or clamps, to secure the connection. Ensure that the connection is airtight and that there are no gaps or leaks. Apply high-temperature sealant to any joints or seams to prevent air leaks. Follow the manufacturer's instructions for connecting the insert to the chimney flue.
Connecting Utilities and Final Checks: After the insert is connected to the chimney flue, connect any utilities that are required. If the insert requires electricity, plug it into an electrical outlet and turn on the circuit breaker. If the insert uses gas, have a qualified professional connect the gas line. Be sure to test the gas connection for leaks using a soap and water solution. Once all the connections are made, perform a final inspection of the installation. Ensure that all the fasteners are tightened, that there are no leaks, and that the insert is operating properly. Refer to the manufacturer's instructions for specific operating procedures.
Testing the Insert: Before using the new fireplace insert regularly, test it to ensure that it is operating safely and efficiently. Start by building a small fire and gradually increase the size of the fire over time. Monitor the chimney for any signs of smoke or leaks. Check the insert's temperature and ensure that it is not overheating. Be sure to follow the manufacturer's instructions for breaking in the new insert. This may involve burning a series of small fires over several days to allow the insert to acclimate to the heat. By following these steps, a homeowner can replace a wood burning fireplace insert safely and effectively, improving the heating efficiency and aesthetic appeal of their home.

Wood Stoves And Fireplaces How To Install A Burning Fireplace Insert Hearth Com Forums Home

How To Install A Fireplace Insert Diy Save Money

Removing An Old Woodstove Fireplace Insert Young House Love

Wood Fireplace Insert Installation Overview By Rockford Chimney Supply

Fireplace Insert Installation Wood Burning Inserts

Custom Installation Of Fireplace Inserts Insert Installations Sierra Hearth And Home

Best Fireplace Insert Repair Installs Ton Service

Lodi Wi Installing Fireplace Insert Remodel

Wood Fireplace S Installation Chimney Sweeps Of America

Fireplace Insert Installation Wood Inserts Gas Pellet And Electric
Related Posts