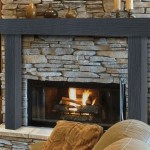
How To Replace A Fireplace Mantel Shelf
Replacing a fireplace mantel shelf can significantly enhance a room's aesthetic. Whether driven by a desire for an updated style or addressing structural issues with the existing mantel, this project is achievable for most homeowners with basic DIY skills. Careful planning and execution are crucial for a successful outcome.
Before beginning, one must gather the necessary tools and materials. Essential tools typically include a stud finder, measuring tape, level, pencil, safety glasses, drill, screwdriver, hammer, pry bar, and appropriate fasteners. Material requirements involve the new mantel shelf itself, potentially new corbels or brackets, and wood shims if needed. Choosing the correct fasteners depends on the wall material (drywall, brick, stone, etc.) and the weight of the new mantel.
The first step involves meticulous measurement of the existing mantel. Record the length, depth, and height, including the distance from the firebox opening to the mantel's bottom surface. This data informs the selection of a suitably sized replacement. Building codes often dictate minimum clearances between the firebox and combustible materials like wood mantels. Research local building codes and ensure compliance when choosing a replacement shelf.
Once the new mantel shelf is acquired, preparation for removal of the old mantel begins. Clear the area around the fireplace of any obstacles, including decorations, and protect the hearth and surrounding surfaces with drop cloths. Depending on the existing mantel's attachment method, locating the supporting structure is the next step.
Mantel shelves are often attached directly to the wall framing, to corbels or brackets, or to a supporting cleat. A stud finder can help locate wall studs if the mantel is attached directly to the framing. If attached to corbels, these will be visible on either side of the mantel. A hidden cleat may require careful inspection underneath the mantel shelf. If the existing mantel is attached with adhesive, careful prying may be required to free it. Scoring the adhesive with a utility knife can assist in this process.
Once the attachment method is determined, the actual removal can commence. If attached with screws or nails, carefully remove them using the appropriate screwdriver or hammer. Exercise caution to avoid damaging the surrounding wall or the mantel itself if it will be reused elsewhere. If attached with adhesive, use a pry bar gently to separate the mantel from the wall. Start from one end and work gradually across to minimize the risk of damage.
With the old mantel removed, the wall surface should be inspected for any damage. Repair any holes or imperfections before installing the new mantel. If the new mantel utilizes the existing support structure, ensure its stability and integrity. If the support system is damaged or inadequate, consider replacing or reinforcing it before proceeding.
If the new mantel requires a different support system, this should be installed next. For direct wall mounting, locate and mark the wall studs. Pre-drill pilot holes in the mantel shelf for the mounting screws. Position the mantel against the wall, aligning it with the marked stud locations. Using the appropriate fasteners, secure the mantel to the wall studs, ensuring it is level and plumb.
If using corbels or brackets, these should be securely attached to the wall first, following the manufacturer's instructions. The mantel shelf is then placed on top of the corbels or brackets and secured with appropriate fasteners. Ensure proper alignment and leveling throughout the process.
For installations using a cleat, attach the cleat securely to the wall at the desired height, ensuring it is level. The mantel shelf can then be placed onto the cleat and attached from below or through the back, depending on the specific design. Concealed fasteners provide a cleaner aesthetic.
Once the new mantel shelf is securely in place, use wood shims as needed to achieve perfect leveling. Shims can be subtly inserted behind the mantel or between the mantel and its supporting structure. Once the mantel is leveled, any excess shim material can be carefully trimmed away.
Finally, caulk any gaps between the mantel shelf and the wall for a finished look. Choose a paintable caulk that matches the wall color or mantel finish. Apply the caulk neatly and smooth it with a damp finger or caulking tool. Allow the caulk to dry completely before painting or staining the mantel if desired.
Proper installation ensures the longevity and safety of the new mantel shelf. Regular inspection and maintenance are recommended to address any potential issues promptly.

How To Replace Your Fireplace Mantel

How To Install A Floating Mantle The Easy Way In Just One Afternoon

How To Install A Fireplace Mantel

How To Install A Floating Mantle The Easy Way In Just One Afternoon

How To Install A Fireplace Mantel Or Floating Shelf

Fireplace Mantel Installation Tips How To Antique Woodworks

Guide Mantel Installation On A Stone Fireplace

How To Install A Floating Mantle The Easy Way In Just One Afternoon

How Do I Remove The Mantle Of A Fireplace Hometalk

How To Remove A Builder Grade Fireplace Surround And Mantel
Related Posts