How To Repaint A Fireplace Surround: A Comprehensive Guide
Repainting a fireplace surround can significantly enhance a room's aesthetic, breathing new life into a focal point. Whether updating an outdated color, concealing damage, or simply refreshing the existing paint, a well-executed repaint can dramatically improve the overall ambiance. This process, while seemingly straightforward, requires careful planning and execution to achieve a professional and lasting finish. This guide offers a detailed, step-by-step approach to repainting a fireplace surround, covering preparation, material selection, painting techniques, and post-painting care.
1. Planning and Preparation: Setting the Stage for Success
Before even considering paint colors, thorough planning and preparation are paramount. This stage determines the quality and longevity of the final result. Neglecting proper preparation can lead to paint adhesion issues, uneven finishes, and ultimately, a less than satisfactory outcome. The initial steps involve assessing the existing surround, gathering necessary materials, and protecting the surrounding area.
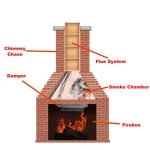
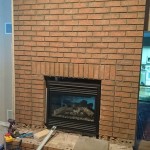
Assessment of the Existing Surround: The first step is to meticulously examine the fireplace surround. Identify the material – is it wood, brick, stone, or a combination? Note any existing damage, such as cracks, chips, or peeling paint. Understanding the surface composition and its condition is crucial for selecting the appropriate primers and paints. For example, brick and stone surfaces will require different preparation techniques and specialized paints compared to wood.
Gathering Necessary Materials: A well-stocked toolkit streamlines the repainting process and ensures a smoother workflow. Essential materials include:
- Cleaning Supplies: Trisodium phosphate (TSP) cleaner or a similar degreasing agent, sponges, scrub brushes, and clean cloths. These are essential for removing dirt, soot, and grease.
- Surface Preparation Tools: Scrapers for removing loose paint, sandpaper (various grits), a sanding block or power sander for smoothing surfaces, and wood filler for repairing cracks and imperfections.
- Primers: Select a primer appropriate for the surround material. Oil-based primers are generally recommended for wood, while masonry primers are designed for brick and stone.
- Paints: Choose a paint specifically designed for fireplaces. High-heat paint is necessary for areas directly exposed to heat, while a durable, heat-resistant paint is suitable for the surround itself. Latex acrylic paints are often preferred for their durability and ease of cleaning. Consider the desired sheen (matte, satin, semi-gloss) – lower sheens are more forgiving of imperfections, while higher sheens are easier to clean.
- Painting Tools: High-quality paintbrushes (angled brushes are useful for detailed areas), paint rollers (appropriate nap length for the surface texture), paint trays, painter's tape, drop cloths, and stirring sticks.
- Safety Gear: Safety glasses, gloves, and a respirator or mask are essential to protect from dust, fumes, and paint splatters.
Protecting the Surrounding Area: Prior to commencing any preparation work, protect the surrounding area from dust, paint splatters, and general mess. Cover the floor with drop cloths, securing them with painter's tape. Tape off the fireplace opening, the wall around the surround, and any adjacent surfaces that need protection. This step minimizes cleanup time and safeguards against accidental damage. Consider removing any nearby furniture or covering it with plastic sheeting.
2. Surface Preparation: Achieving a Pristine Canvas
The surface preparation stage is arguably the most critical aspect of repainting a fireplace surround. A properly prepared surface ensures optimal paint adhesion, a smooth finish, and long-lasting results. This involves cleaning, repairing, and priming the surround before applying the final coat of paint.
Cleaning the Surround: The first step is to thoroughly clean the existing surround. Using TSP cleaner (or a similar degreasing agent) mixed with water according to the manufacturer's instructions, scrub the surface to remove dirt, soot, grease, and any other contaminants. Use a sponge or scrub brush, paying particular attention to areas that are heavily soiled. Rinse the surface thoroughly with clean water and allow it to dry completely. This step is crucial for ensuring proper paint adhesion.
Repairing Damage: Once the surface is clean and dry, inspect it for any damage, such as cracks, chips, or peeling paint. Use a scraper to remove any loose or flaking paint. For cracks and chips, apply wood filler (for wood surrounds) or patching compound (for brick or stone surrounds) according to the manufacturer's instructions. Allow the filler to dry completely and then sand it smooth using fine-grit sandpaper. Ensure the repaired areas are flush with the surrounding surface. Sanding creates a smooth surface for the paint to adhere to and prevents any unsightly bumps or imperfections.
Sanding the Surface: Sanding is essential for creating a slightly rough surface that provides a better grip for the primer and paint. For wood surrounds, use medium-grit sandpaper to lightly sand the entire surface. For brick or stone surrounds, use a wire brush or a masonry sanding block to remove any loose particles and create a textured surface. Be careful not to damage the underlying material. After sanding, thoroughly remove any dust with a tack cloth or a damp cloth. Dust particles can interfere with paint adhesion and create a rough finish.
Applying Primer: Primer acts as a bridge between the existing surface and the new paint, ensuring proper adhesion and creating a uniform base for the topcoat. Select a primer specifically designed for the surround material. For wood surrounds, an oil-based primer is often recommended for its excellent adhesion and ability to seal the wood. For brick or stone surrounds, a masonry primer is necessary to penetrate the porous surface and provide a solid base for the paint. Apply the primer evenly using a brush, roller, or sprayer, following the manufacturer's instructions. Allow the primer to dry completely before proceeding to the next step. A second coat of primer may be necessary for heavily stained or porous surfaces.
3. Painting and Finishing: Achieving a Professional Look
Once the surface is properly prepared, the painting process can begin. This involves applying the chosen paint in thin, even coats, allowing each coat to dry completely before applying the next. Paying attention to detail and using proper painting techniques are essential for achieving a professional and long-lasting finish.
Applying the First Coat of Paint: Stir the paint thoroughly to ensure a consistent color and texture. Using a brush, roller, or sprayer, apply the first coat of paint in thin, even strokes. Avoid applying too much paint at once, as this can lead to drips and runs. Work in small sections, overlapping each stroke slightly to ensure full coverage. Pay particular attention to corners and edges, using an angled brush to achieve clean lines. For brick or stone surrounds, use a brush or roller to work the paint into the texture of the surface. Allow the first coat to dry completely according to the manufacturer's instructions. Drying times may vary depending on the type of paint and the environmental conditions.
Sanding Between Coats (Optional): After the first coat of paint is dry, lightly sand the surface with fine-grit sandpaper. This step helps to smooth out any imperfections and create a better surface for the second coat to adhere to. Remove any dust with a tack cloth or a damp cloth before proceeding. Sanding between coats is particularly important for achieving a smooth, professional finish on wood surrounds.
Applying the Second Coat of Paint: Apply the second coat of paint in the same manner as the first coat, using thin, even strokes and working in small sections. Ensure full coverage, paying attention to any areas that may have been missed during the first coat. Allow the second coat to dry completely according to the manufacturer's instructions. A third coat may be necessary for certain colors or surfaces to achieve optimal coverage and color saturation.
Touch-Ups and Final Inspection: Once the final coat of paint is dry, inspect the surround for any imperfections, such as drips, runs, or missed spots. Use a small brush to carefully touch up these areas. Remove the painter's tape carefully, pulling it away from the painted surface at a 45-degree angle to avoid chipping the paint. Clean up any paint splatters or spills immediately. Finally, step back and admire the newly painted fireplace surround.
Post-Painting Care: After the painting process is complete, allow the paint to fully cure before using the fireplace. Curing times may vary depending on the type of paint, but generally, it is recommended to wait at least 24-72 hours. Once the paint is fully cured, the fireplace surround can be cleaned with a mild soap and water solution. Avoid using harsh chemicals or abrasive cleaners, as these can damage the paint finish. Regular cleaning will help to maintain the appearance and longevity of the painted surround.

How We Painted Our Oak Mantel Channel Updates

How To Spray Paint The Fireplace Surround My Homier Home

How To Paint A Wooden Fireplace Surround

Mantel Makeover With Paint

How To Paint Your Fireplace Brick Surround

How To Spray Paint The Fireplace Surround My Homier Home

How To Paint A Wooden Fireplace Surround

Diy Fireplace Makeover Part Two Kilz Priming And Painting Remodelaholic

How To Paint Your Fireplace Surround Vertical Chimney Care

How To Paint A Fireplace Graham Brown
Related Posts