How To Remodel a Fireplace Surround
Remodeling a fireplace surround can dramatically transform the aesthetic of a living room, breathing new life into a central gathering space. A fireplace often serves as a focal point, and updating its surround can significantly impact the overall style and ambiance of a home. This article provides a comprehensive guide to remodeling a fireplace surround, outlining the key steps, considerations, and potential options involved in the process.
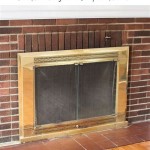
Before embarking on a remodeling project, it is essential to thoroughly assess the existing fireplace and surrounding structure. This includes inspecting the firebox for any signs of damage, such as cracks or deterioration. The chimney should also be inspected to ensure proper ventilation and safety. Furthermore, an evaluation of the existing surround's material and construction is necessary to determine the scope of the remodel and the necessary tools and materials.
Planning is paramount to a successful fireplace surround remodel. A well-defined plan helps avoid costly mistakes and ensures the final result aligns with the desired aesthetic and functional requirements. This process involves not only selecting the new materials and design but also considering building codes, safety regulations, and the overall compatibility of the remodel with the existing architecture of the home.
Key Point 1: Assessment and Planning
The first step in remodeling a fireplace surround is conducting a thorough assessment of the existing setup. This involves examining the firebox, chimney, and existing surround for any signs of damage or deterioration. Cracks, crumbling mortar, or water damage should be addressed before proceeding with the remodel. A professional inspection by a qualified chimney sweep or mason may be necessary to identify hidden problems and ensure the fireplace functions safely.
During the assessment, take accurate measurements of the existing surround. These measurements will be crucial when planning the new surround's dimensions and ensuring a proper fit. Photographing the existing surround from various angles can also be helpful for reference during the demolition and installation phases.
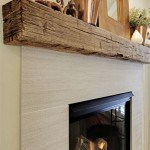
Once the assessment is complete, the planning phase begins. This involves defining the desired aesthetic, selecting appropriate materials, and developing a detailed design. Consider the overall style of the room and choose materials and finishes that complement the existing décor. Common material choices include wood, stone, brick, tile, and metal. Each material offers a unique aesthetic and varying levels of durability and maintenance requirements.
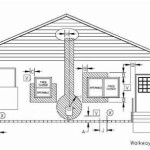
Building codes and safety regulations must be considered during the planning phase. Fire codes typically specify minimum clearances between combustible materials and the firebox. Ensure the proposed design meets all applicable codes to prevent fire hazards and ensure the safety of the home's occupants. Consulting with a building inspector or contractor can provide valuable guidance on code compliance.
A detailed design should include a sketch or rendering of the proposed surround, along with precise measurements and material specifications. This design will serve as a blueprint for the remodel and help to avoid confusion or errors during the installation process. Consider the placement of decorative elements, such as mantels, shelves, or decorative tiles, and ensure they are integrated seamlessly into the overall design.
Key Point 2: Demolition and Preparation
With a detailed plan in place, the next step is to carefully demolish the existing fireplace surround. This process requires patience and attention to detail to avoid damaging the surrounding walls or the firebox itself. Before beginning demolition, protect the surrounding floor and furniture with drop cloths or plastic sheeting.
Start by removing any decorative elements, such as mantels, shelves, or tiles. Use appropriate tools, such as a pry bar, hammer, and chisel, to carefully detach these elements from the surround. Be mindful of any hidden fasteners or adhesives that may be holding the elements in place. If possible, salvage any reusable materials, such as tiles or decorative trim, for use in the new surround or other projects.
Once the decorative elements are removed, focus on dismantling the main structure of the surround. Depending on the material, this may involve removing screws, nails, or mortar. If the surround is made of wood, use a pry bar to gently separate the wood from the wall studs. If the surround is made of stone or brick, use a hammer and chisel to carefully break away the mortar. Wear safety glasses and gloves to protect against flying debris.
After the existing surround is removed, thoroughly clean the area. Remove any remaining debris, dust, or adhesive. Inspect the wall behind the surround for any damage or imperfections. Repair any holes or cracks with patching compound or drywall mud. Ensure the wall surface is clean, smooth, and level before proceeding with the installation of the new surround.
Consider the need for any structural modifications or reinforcements. If the new surround is significantly heavier than the existing one, it may be necessary to reinforce the wall studs or install additional support. Consult with a contractor or structural engineer to determine the appropriate measures.
Prepare the firebox for the new surround. Clean the firebox thoroughly and inspect it for any signs of damage. Repair any cracks or deterioration with fire-resistant mortar. Ensure the firebox opening is properly sized and shaped to accommodate the new surround. Install any necessary fire-resistant insulation or backing material to protect the surrounding walls from heat.
Key Point 3: Installation and Finishing
The installation process will vary depending on the chosen material for the new fireplace surround. Precise measurements and careful attention to detail are crucial for achieving a professional-looking result. Always refer to the manufacturer's instructions for specific installation guidelines.
If installing a wood surround, begin by constructing a frame using wood studs or lumber. This frame will provide support for the decorative elements and ensure the surround is securely attached to the wall. Ensure the frame is level and plumb before attaching it to the wall studs. Use construction adhesive and screws to securely fasten the frame to the wall.
Once the frame is in place, begin attaching the decorative wood panels or trim. Use a nail gun or screws to securely fasten the wood to the frame. Ensure the wood is properly aligned and spaced to create a uniform and aesthetically pleasing appearance. Cut the wood precisely to fit around the firebox opening and any other architectural features.
If installing a stone or brick surround, begin by applying a layer of mortar to the wall. Use a notched trowel to create ridges in the mortar, which will help the stone or brick adhere to the wall. Carefully position each stone or brick, ensuring it is level and plumb. Use spacers to maintain consistent gaps between the stones or bricks. Tap each stone or brick gently with a rubber mallet to set it firmly in the mortar.
Allow the mortar to dry completely before applying grout. Use a grout float to work the grout into the gaps between the stones or bricks. Wipe away any excess grout with a damp sponge. Allow the grout to cure according to the manufacturer's instructions.
If installing a tile surround, begin by applying a layer of thin-set mortar to the wall. Use a notched trowel to create ridges in the mortar. Carefully position each tile, ensuring it is level and plumb. Use tile spacers to maintain consistent gaps between the tiles. Tap each tile gently with a rubber mallet to set it firmly in the mortar.
Allow the thin-set mortar to dry completely before applying grout. Use a grout float to work the grout into the gaps between the tiles. Wipe away any excess grout with a damp sponge. Allow the grout to cure according to the manufacturer's instructions. Seal the grout with a grout sealer to protect it from stains and moisture.
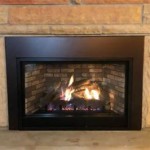
After the surround is installed, focus on finishing details. Install a mantel, shelves, or other decorative elements according to the design plan. Caulk any gaps between the surround and the wall to create a seamless and professional look. Paint or stain the surround to match the existing décor. Clean the entire area thoroughly and remove any remaining debris.
Finally, conduct a test burn in the fireplace to ensure it functions properly and safely. Monitor the temperature of the surrounding walls and the chimney to ensure there are no signs of overheating or fire hazards. If any problems are detected, consult with a qualified contractor or chimney sweep to address them promptly.

5 Amazing Inexpensive Easy Fireplace Remodel Transformations Designed

Looking To Remodel Your Fireplace Tips You Need

47 Amazing Fireplace Remodel Ideas To Diy Artsy Pretty Plants

How To Update A Fireplace Hearth And Mantel Pasha Is Home

17 Fireplace Remodel Before And After How To Your Brick Makeover Redo

Fireplace Remodel Kristen Rinn Design

How To Update A Fireplace Hearth And Mantel Pasha Is Home

30 Fireplace Remodel Ideas For Any Budget

Extreme Fireplace Makeover Renovation Diy

How To Remodel Your Fireplace
Related Posts