How to Remodel a Fireplace: A Comprehensive Guide
Remodeling a fireplace can significantly enhance the aesthetic appeal of a living space and potentially increase a home's value. This guide provides a detailed overview of the process, covering planning, material selection, execution, and safety considerations. The complexity of a fireplace remodel can range from simple cosmetic updates to complete structural overhauls. Understanding the scope of the project and planning accordingly is crucial for a successful outcome.
Before embarking on any remodeling endeavor, a thorough assessment of the existing fireplace is essential. This includes inspecting the firebox, chimney, hearth, and surrounding mantel or facing. Look for signs of damage, such as cracks, crumbling mortar, or water stains. Addressing any pre-existing structural issues is paramount before proceeding with cosmetic enhancements. The chimney should be inspected by a qualified professional to ensure it is properly functioning and free from obstructions. This inspection should include checking for creosote buildup, which can be a fire hazard.
Once the assessment is complete, define the desired outcome of the remodel. This involves determining the style, materials, and overall aesthetic to be achieved. Consider the architectural style of the home and choose elements that complement its existing design. Gather inspiration from magazines, online resources, and design showrooms to develop a clear vision for the project.
Key Point 1: Planning and Design Considerations
Effective planning is the cornerstone of any successful fireplace remodel. This phase involves several crucial considerations that will influence the overall outcome and budget of the project.
Defining the Scope: Clearly define the scope of the remodel. Are you simply updating the facing, or are you planning a more extensive renovation that includes structural changes? A clear understanding of the project's scope will help determine the necessary resources, timeline, and budget.
Budget Allocation: Establish a realistic budget for the project. Fireplace remodels can range significantly in cost, depending on the materials used and the extent of the work involved. Allocate funds for materials, labor (if hiring contractors), permits, and unforeseen expenses. It is prudent to obtain multiple quotes from different contractors to ensure competitive pricing. A contingency fund of approximately 10-15% should also be set aside to cover unexpected costs.
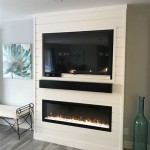
Material Selection: Choosing the right materials is crucial for both aesthetics and functionality. Common materials used in fireplace remodels include brick, stone, tile, wood, and metal. Consider the fire resistance and durability of each material, as well as its aesthetic appeal. The style of the home and the desired look of the fireplace will influence the selection of materials. For example, a modern home might benefit from sleek tile or metal accents, while a traditional home might call for classic brick or stone.
Permitting Requirements: Check local building codes and permitting requirements before starting any work. Many fireplace remodels require permits, especially if structural changes are involved. Failing to obtain the necessary permits can result in fines and delays. Contact the local building department to inquire about specific requirements in your area.
Design Integration: Ensure that the fireplace design integrates seamlessly with the surrounding decor. Consider the color scheme, furniture arrangement, and overall style of the room. The fireplace should enhance the space, not clash with it. Consider the scale of the fireplace in relation to the room. A large fireplace can overwhelm a small room, while a small fireplace might get lost in a large space.
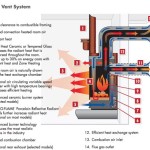
Safety Considerations: Safety is paramount when remodeling a fireplace. Ensure that all materials used are fire-resistant and meet local building codes. When choosing a hearth material, ensure it provides adequate protection for the surrounding flooring. If working with gas lines, hire a qualified professional to ensure proper installation and safety. Always prioritize safety throughout the entire remodeling process.
Key Point 2: Material Preparation and Demolition
Once the planning phase is complete, the next step involves preparing the work area and demolishing any existing elements that need to be removed. This stage requires careful execution to minimize damage and ensure a clean and safe work environment.
Protecting the Work Area: Before starting any demolition work, protect the surrounding area by covering floors, furniture, and walls with drop cloths or plastic sheeting. This will help prevent dust, debris, and potential damage from affecting other parts of the home. Secure the coverings in place with painter's tape to prevent them from shifting during the work process.
Removing Existing Materials: Carefully remove any existing materials that will be replaced, such as the mantel, facing, or hearth. Use appropriate tools, such as a hammer, chisel, and pry bar, to detach these elements. Exercise caution to avoid damaging the underlying structure. For example, when removing tiles, use a thin-set mortar scraper to minimize the risk of damaging the wall behind the tiles. If removing a gas fireplace insert, ensure the gas line is properly shut off by a qualified professional before disconnection.
Cleaning and Preparing the Surface: After removing the old materials, thoroughly clean the surface to ensure it is free from dust, debris, and loose mortar. Use a wire brush or scraper to remove any remaining residue. Repair any cracks or imperfections in the underlying structure with mortar or patching compound. The surface should be smooth and level before applying new materials. Applying a bonding agent can improve the adhesion of new mortar or adhesive.
Disposing of Demolition Debris: Properly dispose of demolition debris in accordance with local regulations. Rent a dumpster or arrange for waste removal services if necessary. Separate recyclable materials, such as metal or concrete, from non-recyclable materials to minimize environmental impact.
Safety Precautions During Demolition: Always wear appropriate safety gear during demolition, including safety glasses, a dust mask, gloves, and hearing protection. Demolition work can generate a significant amount of dust and debris, which can be harmful if inhaled or comes into contact with skin or eyes. Work in a well-ventilated area to minimize exposure to dust and fumes.
Key Point 3: Installation and Finishing Touches
The installation phase involves applying the chosen materials to the prepared surface and creating the desired aesthetic. Precision and attention to detail are crucial during this stage to ensure a professional and lasting result.
Installing the Facing: Begin by installing the chosen facing material, such as brick, stone, or tile. Apply mortar or adhesive to the back of each piece and carefully position it on the prepared surface. Use spacers to ensure consistent spacing between each piece. Ensure the first row is level, as this will be the foundation for the entire facing. Use a level frequently to check for alignment and make adjustments as needed. Allow the mortar or adhesive to dry completely according to the manufacturer's instructions.
Grouting and Sealing: After the facing material is installed, apply grout to fill the spaces between each piece. Choose a grout color that complements the facing material and the overall design. Use a grout float to apply the grout evenly and remove any excess. Allow the grout to dry slightly, then wipe it down with a damp sponge to remove any residue. Seal the grout to protect it from stains and moisture. Applying a sealant to natural stone can help protect it from staining and damage.
Installing the Hearth: Carefully position the hearth in front of the fireplace opening. Ensure that it is level and securely attached to the floor. If using stone or tile for the hearth, follow the same installation procedures as for the facing. The hearth should extend far enough from the fireplace to provide adequate protection for the surrounding flooring.
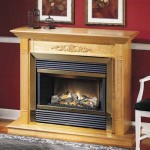
Adding the Mantel: Install the mantel according to the manufacturer's instructions. Ensure that it is securely attached to the wall and properly aligned. If using a wooden mantel, apply a finish to protect it from heat and moisture. The mantel should be positioned at a safe distance above the fireplace opening to prevent it from overheating.
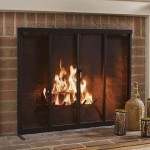
Adding Finishing Touches: Complete the remodel by adding finishing touches, such as decorative trim, artwork, or accessories. Consider adding a fire screen or glass doors to enhance safety and prevent sparks from escaping the fireplace. Clean the entire area thoroughly to remove any remaining dust or debris. Inspect the fireplace for any imperfections and make any necessary adjustments.
Final Inspection: Once the remodel is complete, conduct a final inspection to ensure that everything is working properly and meets safety standards. If a gas fireplace insert was installed, have it inspected by a qualified professional to ensure that it is properly connected and functioning safely.
Remodeling a fireplace is a significant undertaking that requires careful planning, attention to detail, and adherence to safety guidelines. By following these steps, homeowners can transform their existing fireplace into a stunning focal point that enhances the beauty and value of their home.

17 Fireplace Remodel Before And After How To Your Brick Makeover Living Room Decor

30 Fireplace Remodel Ideas For Any Budget

Looking To Remodel Your Fireplace Tips You Need

Fireplace Remodel Kristen Rinn Design

5 Amazing Inexpensive Easy Fireplace Remodel Transformations Designed

Fireplace Remodel Renovation Gas Wood Electric

30 Fireplace Remodel Ideas For Any Budget

83 Fireplace Remodels Ideas Remodel Home

Custom Fireplace Remodeling In North Agape Home Services

Fireplace Remodel Project Cait Minschy
Related Posts