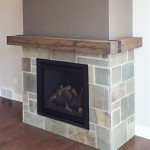
How to Refinish a Wood Fireplace Mantel
A wood fireplace mantel serves as a focal point in a room, adding character and warmth. However, over time, exposure to heat, smoke, and everyday wear and tear can diminish its beauty. Refinishing a wood fireplace mantel can breathe new life into the piece, restoring its aesthetic appeal and enhancing the overall ambiance of the space. This article provides a comprehensive guide to refinishing a wood fireplace mantel, outlining the necessary steps, tools, and techniques for a successful outcome.
Before commencing the refinishing process, meticulous preparation is crucial. This involves assessing the condition of the mantel, gathering the required materials, and ensuring a safe and organized workspace. A thorough assessment will help determine the extent of the damage, the existing finish, and the appropriate refinishing approach.
Key Point 1: Preparing the Workspace and the Mantel
The first step is to prepare the workspace. Cover the surrounding areas, including the floor and the fireplace opening, with drop cloths or plastic sheeting to protect them from dust and debris. Adequate ventilation is essential, so open windows and doors whenever possible. If necessary, consider using a dust mask to avoid inhaling fine particles.
Next, prepare the mantel itself. Begin by thoroughly cleaning the surface with a mild detergent and water solution. Remove any loose dirt, grime, or cobwebs. Allow the mantel to dry completely before proceeding to the next stage. Inspect the mantel for any loose or damaged sections. If necessary, use wood glue and clamps to repair any cracks or splits. Allow the glue to dry completely before moving on.
If the mantel is securely attached to the wall, it may be easier to refinish it in place. However, if possible, removing the mantel will provide easier access to all surfaces and allow for a more thorough refinishing process. If removing the mantel, carefully detach it from the wall, noting the location of any screws or brackets. Place the mantel on a stable work surface, such as a workbench or sawhorses.
Key Point 2: Removing the Existing Finish
Removing the existing finish is a critical step in the refinishing process. The method used will depend on the type of finish and the desired outcome. Common methods include sanding, chemical stripping, and heat gun application.
Sanding is a manual process that involves using abrasive paper to remove the existing finish. Begin with a coarse-grit sandpaper (e.g., 80-grit) to remove the bulk of the finish. Progress to finer grits (e.g., 120-grit, 180-grit, 220-grit) to smooth the surface and prepare it for refinishing. Use a sanding block or orbital sander for larger, flat surfaces. For intricate details and hard-to-reach areas, use hand sanding or a detail sander. Ensure that the sanding is uniform and that the surface is smooth and even.
Chemical stripping involves applying a chemical stripper to the mantel, allowing it to soften the existing finish, and then scraping it away. This method can be effective for removing multiple layers of finish or for intricate details that are difficult to sand. Follow the manufacturer's instructions carefully when using chemical strippers. Wear appropriate personal protective equipment, including gloves, eye protection, and a respirator. Work in a well-ventilated area. Apply the stripper evenly to the entire surface and allow it to sit for the recommended time. Use a scraper or putty knife to remove the softened finish. Clean the mantel with mineral spirits to remove any remaining residue. Allow the mantel to dry completely before proceeding.
Heat gun application involves using a heat gun to soften the existing finish and then scraping it away. This method can be faster than chemical stripping, but it requires caution to avoid scorching the wood. Hold the heat gun a few inches away from the surface and move it slowly and evenly. Use a scraper or putty knife to remove the softened finish. Clean the mantel with mineral spirits to remove any remaining residue. Allow the mantel to dry completely before proceeding.
Key Point 3: Refinishing and Protecting the Wood
Once the existing finish has been removed and the mantel is smooth and clean, the refinishing process can begin. This involves applying a new finish to protect the wood and enhance its appearance. Common finishing options include staining, painting, and clear coating.
Staining involves applying a colored stain to the wood to enhance its natural grain and add depth. Choose a stain color that complements the surrounding décor. Apply the stain evenly to the entire surface using a brush, rag, or foam applicator. Allow the stain to sit for the recommended time and then wipe away any excess. Apply multiple coats of stain to achieve the desired color intensity. Allow each coat to dry completely before applying the next.
Painting involves applying a coat of paint to the wood to provide a solid, opaque finish. Choose a paint color that complements the surrounding décor. Apply a primer to the mantel to improve adhesion and coverage. Allow the primer to dry completely before applying the paint. Apply the paint evenly to the entire surface using a brush, roller, or sprayer. Apply multiple coats of paint to achieve the desired color and coverage. Allow each coat to dry completely before applying the next.
Clear coating involves applying a clear finish to the wood to protect it from moisture, scratches, and wear and tear. Choose a clear coat that is compatible with the stain or paint used. Common clear coats include polyurethane, varnish, and lacquer. Apply the clear coat evenly to the entire surface using a brush, sprayer, or rag. Apply multiple coats of clear coat to provide adequate protection. Allow each coat to dry completely before applying the next. Lightly sand between coats with fine-grit sandpaper to remove any imperfections.
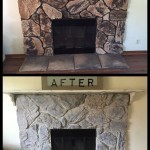
After the final coat of finish has dried completely, carefully inspect the mantel for any imperfections. Touch up any areas as needed. Reattach the mantel to the wall, ensuring that it is securely fastened. Clean the surrounding area and remove any drop cloths or plastic sheeting. The refinished wood fireplace mantel will now enhance the appearance of the fireplace and the surrounding room.

How To Re A Fireplace Mantel True Value Hardware

Diy Fireplace Makeover How To Strip Stain Mantel Before After The Confused Millennial

How To Repaint A Fireplace Mantel Diy Project And Special Message

Diy Fireplace Makeover How To Strip Stain Mantel Before After The Confused Millennial

Diy Rustic Fireplace Mantel The Cure For A Boring

Transform Your Fireplace Mantel In 20 Minutes

Oak Mantel Makeover Centsational Style

My Fireplace Mantel Reveal A Makeover With Paint Setting For Four Interiors

How To Change A Painted Mantel Stained Wood

Mantel Makeover With Paint
Related Posts