How To Reface Your Fireplace Yourself: A Comprehensive Guide
Refacing a fireplace can dramatically transform the aesthetic of a living space. It provides an opportunity to update a dated look, integrate a fireplace into a new design scheme, or simply refresh a worn-out feature. While hiring a professional is always an option, refacing a fireplace is a manageable project for a confident DIY enthusiast. This article provides a comprehensive guide to the process, outlining the necessary steps, materials, and considerations involved in successfully refacing a fireplace.
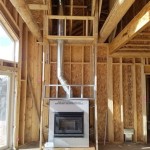
Before embarking on this project, it is crucial to understand the existing fireplace structure. Fireplaces typically consist of a firebox (the area where the fire burns), a smoke chamber, a flue (the chimney passage), and a surround or facing. Refacing primarily addresses the surround or facing, which is the visible part of the fireplace in the room. The firebox and flue are critical for safe operation and should not be altered without professional guidance. Understanding the existing material of the surround is also key, as this will influence the choice of refacing material and the preparation steps required.
Planning and Preparation: The Foundation for Success
Proper planning is paramount to a successful fireplace refacing project. This stage involves assessing the existing fireplace, deciding on the desired aesthetic, selecting appropriate materials, and gathering the necessary tools. Rushing this process can lead to errors, increased costs, and a less-than-satisfactory final result.
Begin by thoroughly inspecting the existing fireplace surround. Identify the material it is made of: brick, stone, wood, or tile are common. Determine the condition of the existing surface. Are there cracks, loose pieces, or signs of water damage? Addressing these issues before applying new materials is essential for a durable and aesthetically pleasing outcome. Existing loose materials should be removed. Cracks may need to be filled and repaired with appropriate patching compounds.
Next, consider the desired aesthetic. Research different fireplace designs and materials. Popular options include natural stone veneer, manufactured stone, tile, wood, and concrete. Each material offers a unique look and requires different installation techniques. Consider the style of the room and how the refaced fireplace will complement the existing décor. Collect images of fireplaces that resonate with your personal style to serve as inspiration.
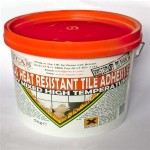
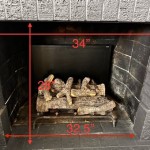
Once a design and material are selected, calculate the amount of material needed. Measure the height and width of the area to be refaced. Add a small percentage (5-10%) to account for cuts and waste. Purchase the chosen refacing material, along with any necessary adhesives, grout, sealants, and fasteners. Ensure the selected materials are suitable for fireplace applications and meet local building codes.
Finally, gather the necessary tools. This will typically include a measuring tape, level, trowel, notched trowel (for applying adhesives), tile saw or wet saw (for cutting tile or stone), hammer, chisel, safety glasses, dust mask, gloves, and a sponge or rag for cleaning. Depending on the existing material and the chosen refacing material, additional tools may be required.
Removing the Existing Surround (If Necessary)
In some cases, the existing fireplace surround may need to be removed entirely before refacing. This is often necessary if the existing surround is severely damaged, structurally unsound, or incompatible with the chosen refacing material. However, if the existing surround is in good condition and provides a solid base, it may be possible to reface directly over it, saving time and effort.
If removal is necessary, take precautions to protect the surrounding area. Cover the floor with drop cloths and mask off any adjacent walls or surfaces. Wear safety glasses and a dust mask to protect against debris. Begin by carefully removing any decorative elements, such as mantels or trim. These may be attached with screws, nails, or adhesive. Use a screwdriver, pry bar, or utility knife to remove them gently.
Next, use a hammer and chisel to carefully remove the existing surround material. Work from the edges inward, taking care not to damage the underlying structure. If the surround is attached with mortar, use the chisel to break the mortar joints. If it is attached with adhesive, use a scraper or heat gun to soften the adhesive and then carefully pry the material away. Exercise caution to avoid damaging the firebox or chimney.
Once the surround is removed, thoroughly clean the underlying surface. Remove any remaining mortar, adhesive, or debris. Use a wire brush or scraper to ensure a clean, smooth surface for the new refacing material. If the underlying surface is uneven or damaged, it may need to be repaired with patching compound. Allow the patching compound to dry completely before proceeding.
Installing the New Facing Material
With the planning complete and the existing surround prepared or removed, the next step is to install the new facing material. This is where the chosen aesthetic vision comes to life. The specific installation techniques will vary depending on the material selected, but the general principles remain the same: careful measurement, precise cutting, and secure attachment.
Start by laying out the materials to plan the layout. Dry-fit the tiles, stones, or wood pieces to ensure they fit properly and create the desired pattern. This step allows for adjustments before applying any adhesive or fasteners. Pay attention to symmetry and spacing. Use spacers to maintain consistent grout lines if using tile or stone. For natural stone, consider the arrangement of different sizes and shapes to achieve a visually appealing effect.
After the dry-fit, apply adhesive or mortar to the back of the material, following the manufacturer's instructions. Use a notched trowel to create ridges in the adhesive, ensuring even coverage and a strong bond. Press the material firmly into place on the fireplace surround. Use a level to ensure the material is aligned correctly. For larger pieces, use temporary supports to hold them in place while the adhesive dries.
Continue installing the material row by row, working from the bottom up. Regularly check the level and alignment to ensure a consistent and professional result. For materials that require cutting, use a tile saw or wet saw to make precise cuts. Always wear safety glasses when cutting materials. When working with wood, use a miter saw or hand saw to make accurate cuts. Secure wood pieces with nails, screws, or adhesive, depending on the type of wood and the existing surface.
Once all the material is installed, allow the adhesive or mortar to dry completely according to the manufacturer's instructions. Avoid disturbing the new facing during this time. After the adhesive is dry, apply grout to fill the gaps between tiles or stones, if applicable. Use a grout float to press the grout into the joints, and then wipe away the excess with a damp sponge. Allow the grout to dry and then buff the surface with a clean cloth. Apply a sealant to protect the grout from stains and moisture.
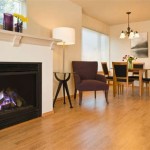
Finally, install any decorative elements, such as mantels, trim, or hearths. Secure these elements with screws, nails, or adhesive, ensuring they are properly aligned and level. Clean the entire fireplace surround to remove any dust or debris. Inspect the finished product for any imperfections and make any necessary adjustments. The refaced fireplace is now ready to be enjoyed.
Throughout the project, meticulous attention to detail and adherence to manufacturer's instructions are important. Refacing a fireplace is a rewarding project that can significantly enhance the beauty and value of a home. With careful planning, preparation, and execution, a DIY enthusiast can achieve professional-looking results and create a stunning focal point for their living space.

15 Fabulous Fireplace Refacing Ideas Average But Inspired

Diy Fireplace Makeover Wood Slat

Our Transformed Fireplace Before After Reface Diy Update

25 Beautiful Diy Brick Fireplace Makeovers

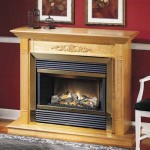
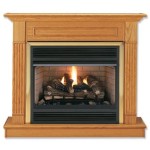
Fireplace Refacing So You Want To Bob Vila

47 Stellar Diy Fireplace Remodel Makeover Ideas Remodelaholic

Fireplace Refacing So You Want To Bob Vila

Fireplace Refacing So You Want To Bob Vila

47 Amazing Fireplace Remodel Ideas To Diy Artsy Pretty Plants

25 Beautiful Diy Brick Fireplace Makeovers
Related Posts