How to Reface a Brick Fireplace with Marble Tile
Refacing a brick fireplace with marble tile offers a significant aesthetic upgrade to a living space. Marble provides a timeless elegance and increased property value. This process, though involving several steps, is manageable for a homeowner with basic DIY skills. Careful planning and meticulous execution are crucial to achieving a professional-looking result. This article provides a comprehensive guide on how to reface a brick fireplace with marble tile.
Preparation and Planning
Before commencing any physical work, thorough preparation is paramount. This stage involves assessing the existing fireplace, gathering necessary tools and materials, and meticulously planning the tile layout. The condition of the brick is the first consideration. Any loose, crumbling, or damaged bricks must be addressed prior to adhering any new materials. The stability of the existing structure is critical to the longevity of the tile installation.
Next consider the tools and materials required. You will need marble tiles of your chosen size, style, and color. It is advisable to purchase approximately 10% more tile than calculated to account for cuts and potential breakage. Other essential items include thin-set mortar specifically designed for natural stone, grout, a notched trowel (the size of the notch will depend on the tile size and manufacturer instructions), a wet saw for cutting tiles, a level, a measuring tape, a pencil, safety glasses, gloves, a sponge, buckets, and a mixing drill with a paddle attachment. Grout sealer is also necessary to protect the marble from staining.
Planning the tile layout is crucial for a visually appealing outcome. Measure the fireplace surface accurately and determine the desired layout. Decide if you want full tiles to dominate, or if a pattern involving cut tiles is preferred. Consider the presence of a mantel and how the tile will integrate with it. Draw a visual representation of the planned layout, noting the location of any cuts and ensuring symmetry. This blueprint will serve as a guide during the installation process.
Removing the Existing Fireplace Facing (If Necessary) and Preparing the Brick Surface
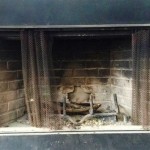
This step depends on the existing condition of the fireplace surround. If there's existing tile or a decorative element that needs to be removed, proceed carefully to avoid damaging the underlying brick. Utilize a chisel and hammer to gently remove the existing facing. Wear safety glasses to protect your eyes from flying debris.
Once the existing facing has been removed (or if there was none to begin with), carefully clean the brick surface. Use a wire brush to remove any loose mortar, soot, or debris. A solution of trisodium phosphate (TSP) diluted in water can be used to further clean the brick, removing any grease or grime. Thoroughly rinse the brick surface with clean water and allow it to dry completely. This step is critical for ensuring proper adhesion of the thin-set mortar.
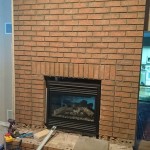
After cleaning, the brick surface may need to be leveled. Significant unevenness can cause problems during tiling. Apply a thin layer of mortar to fill in any deep cracks or depressions in the brick. Use a level to ensure a flat and even surface. Allow the mortar to dry completely according to the manufacturer's instructions. This leveling process will create a more stable and uniform surface for the marble tile.
Applying Mortar and Setting the Marble Tile
Mixing the thin-set mortar according to the manufacturer's instructions is crucial. Use a mixing drill with a paddle attachment to create a smooth, consistent mixture. Avoid adding too much water, as this can weaken the mortar. The desired consistency should be similar to peanut butter.
Apply the thin-set mortar to the brick surface using the notched trowel. Hold the trowel at a 45-degree angle and create ridges in the mortar. These ridges will help the tile adhere properly to the surface. Work in small sections to prevent the mortar from drying out before the tiles are set. Typically, working in sections of 2-3 square feet is advisable.
Carefully position the marble tiles onto the mortar bed, pressing firmly to ensure good contact. Use tile spacers to maintain consistent grout lines. Regularly check the alignment of the tiles with a level to ensure a professional and even installation. Use a rubber mallet to gently tap any tiles that are slightly uneven.
For tiles that require cutting, use a wet saw. Measure and mark the tile accurately before cutting. A wet saw provides clean, precise cuts and minimizes the risk of chipping or cracking the marble. Wear safety glasses when operating the wet saw.
Continue setting the tiles, working your way across the entire fireplace surface. After all the tiles are set, allow the mortar to cure completely according to the manufacturer's instructions. This usually takes at least 24-48 hours.
Grouting, Sealing, and Final Cleaning
Once the mortar is fully cured, remove the tile spacers. Prepare the grout according to the manufacturer's instructions. Apply the grout to the tile surface, using a grout float to press it into the grout lines. Work diagonally across the tiles to ensure the grout fills the lines completely.
After applying the grout, use a damp sponge to remove excess grout from the tile surface. Rinse the sponge frequently with clean water. Be careful not to remove grout from the grout lines. This process requires patience and attention to detail. Allow the grout to haze over slightly, then use a clean, dry cloth to buff the tile surface. This will remove any remaining grout residue and reveal the natural beauty of the marble.
After the grout has fully cured (typically after 72 hours), apply a grout sealer to protect the grout from staining and moisture. Follow the manufacturer's instructions for applying the sealer. Finally, clean the marble tiles with a pH-neutral cleaner specifically designed for natural stone. This will help maintain the tile's luster and prevent damage. Regularly cleaning the tile will help preserve its appearance for years to come.

Our 200 Fireplace Makeover Marble Tile A New Mantel Young House Love

Our 200 Fireplace Makeover Marble Tile A New Mantel Young House Love

Our 200 Fireplace Makeover Marble Tile A New Mantel Young House Love

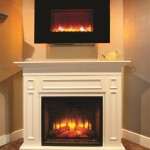
Diy Marble Fireplace Mantel Makeover White Painted Surround

How To Tile Over A Brick Hearth Shine Your Light

Our 200 Fireplace Makeover Marble Tile A New Mantel Young House Love

Our 200 Fireplace Makeover Marble Tile A New Mantel Young House Love

Our 200 Fireplace Makeover Marble Tile A New Mantel Young House Love

Reface Fireplace Farmhouse Decor Home

15 Fabulous Fireplace Refacing Ideas Average But Inspired