How To Redo A Fireplace Surround
Redoing a fireplace surround can significantly enhance the aesthetic appeal of a living space, transforming it from drab to sophisticated or from dated to modern. This project involves careful planning, preparation, and execution to ensure a safe and visually pleasing outcome. The scope of the project can range from a simple cosmetic update, such as a fresh coat of paint or the addition of decorative elements, to a complete overhaul involving demolition and reconstruction. The right approach depends on the existing surround material, desired style, and budget.
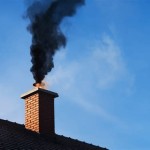
Before commencing any work, a thorough assessment of the existing fireplace surround is essential. This assessment should include identifying the materials used (e.g., brick, stone, wood, tile), checking for any structural damage (cracks, loose components), and evaluating the overall condition. It is crucial to determine if the existing surround is simply outdated or if it poses a safety hazard due to deterioration or non-compliance with current building codes. For example, a wooden surround positioned too close to the firebox could present a fire risk and require modification or replacement.
This article provides a comprehensive guide on how to redo a fireplace surround, covering aspects from initial planning to final finishing touches. It will address key considerations such as material selection, safety precautions, and step-by-step instructions for various renovation scenarios.
Key Point 1: Planning and Preparation
Planning is arguably the most crucial stage of any home renovation project, and redoing a fireplace surround is no exception. This phase involves defining the desired outcome, establishing a budget, selecting appropriate materials, and acquiring the necessary tools and safety equipment. A well-defined plan helps to minimize errors, prevent unexpected costs, and ensure a smooth and efficient execution.
The first step in planning is to define the desired esthetic. Researching different fireplace surround styles, such as contemporary, traditional, rustic, or minimalist, can provide inspiration. Consider the overall style of the room and how the new surround will complement the existing décor. Gathering images from magazines, websites, or home improvement stores can help visualize the final result.
Once the desired style is determined, the next step is to establish a budget. This should include the cost of materials, tools, and any professional services that may be required. Obtaining quotes from different suppliers and contractors can help to get a realistic estimate of the overall cost. It is also wise to include a contingency fund to cover unexpected expenses that may arise during the project.
Material selection is a critical aspect of planning. The choice of materials will depend on the desired style, budget, and the existing structure of the fireplace. Common materials include brick, stone, tile, wood, and manufactured stone veneer. Each material has its own advantages and disadvantages in terms of cost, durability, ease of installation, and aesthetic appeal. For instance, natural stone offers a timeless and elegant look but is generally more expensive than manufactured stone veneer. Wood provides warmth and character but requires careful consideration of fire safety regulations.
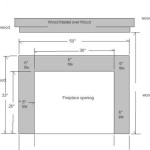
Before purchasing any materials, it's crucial to measure the existing fireplace surround accurately. These measurements will determine the amount of materials needed and ensure a proper fit. Draw a detailed sketch of the existing surround, noting all dimensions, angles, and any irregularities. This sketch will also be helpful when installing the new surround.
Finally, gather all the necessary tools and safety equipment. Depending on the scope of the project, these may include a hammer, chisel, screwdriver, drill, level, measuring tape, safety glasses, gloves, dust mask, and ear protection. If demolition is required, a sledgehammer and demolition bar may also be needed. For cutting materials, a tile saw, circular saw, or miter saw may be necessary. Ensure that all tools are in good working order and that all safety equipment is readily available.
Key Point 2: Demolition and Preparation of the Fireplace Structure
Demolition is often a necessary step when redoing a fireplace surround, especially if the existing surround is damaged, outdated, or incompatible with the new design. However, it is essential to proceed with caution to avoid damaging the underlying structure of the fireplace or creating a safety hazard. Proper preparation and the use of appropriate tools are crucial for a successful demolition.
Before commencing any demolition, protect the surrounding area by covering the floor and furniture with drop cloths. This will help to prevent dust and debris from damaging or soiling the room. Seal off the room with plastic sheeting to contain the dust and minimize disruption to the rest of the house. Turn off the gas supply to the fireplace if applicable, and ensure that the fireplace is completely cool before starting any work.
Begin the demolition process by removing any decorative elements, such as mantels, shelves, or trim. These can usually be removed with a screwdriver or pry bar. Next, carefully remove the existing surround material using a hammer and chisel or a demolition bar. Start at the edges and work your way inwards, being careful not to damage the underlying brick or stone. If the surround is tiled, use a tile chisel and hammer to remove the tiles one by one.
During demolition, wear safety glasses, gloves, and a dust mask to protect yourself from flying debris and dust. If the demolition generates a lot of dust, consider wearing a respirator. Dispose of the debris properly in a designated container. Be mindful of lead paint or asbestos, especially in older homes. If you suspect that the existing surround contains these materials, consult with a qualified professional for safe removal.
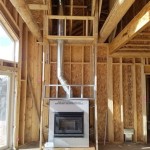
Once the existing surround has been removed, inspect the underlying structure for any damage. Repair any cracks or loose bricks with mortar. Clean the surface thoroughly to remove any dust, debris, or old adhesive. A wire brush and a solution of water and detergent can be used for cleaning. Rinse the surface with clean water and allow it to dry completely before proceeding with the new surround installation.
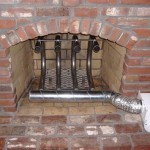
If the existing fireplace has a metal firebox, inspect it for any signs of rust or corrosion. Clean the firebox with a wire brush and apply a heat-resistant paint to protect it from further damage. Ensure that the firebox is properly sealed to prevent smoke from leaking into the room.
Key Point 3: Installation of the New Fireplace Surround
The installation of the new fireplace surround is the final and most rewarding stage of the project. This involves carefully applying the chosen materials to create the desired aesthetic. The specific installation techniques will vary depending on the type of material being used, but the general principles remain the same: accuracy, precision, and attention to detail.
Before beginning the installation, lay out the materials in the desired pattern to ensure a proper fit. This will help to identify any potential problems and make necessary adjustments before permanently attaching the materials. For example, if using tile, dry-fitting the tiles will allow for adjustments to be made to ensure a symmetrical and balanced layout.
When installing brick or stone, apply a layer of mortar to the back of each unit and carefully position it in place. Use a level to ensure that the units are aligned properly. Maintain consistent spacing between the units to create a uniform appearance. Remove any excess mortar with a trowel and allow it to cure according to the manufacturer's instructions.
When installing tile, apply a layer of thin-set mortar to the back of each tile and carefully position it in place. Use tile spacers to maintain consistent spacing between the tiles. Once the thin-set mortar has dried, apply grout to fill the spaces between the tiles. Remove any excess grout with a sponge and allow it to cure according to the manufacturer's instructions. Seal the grout to protect it from moisture and stains.
When installing wood, cut the wood pieces to the desired size and shape using a saw. Attach the wood pieces to the fireplace structure using nails, screws, or construction adhesive. Ensure that the wood is properly sealed and finished to protect it from moisture and heat. Adhere to fire safety regulations regarding distance to the firebox.
After the new surround has been installed, inspect it carefully for any imperfections. Fill any gaps or cracks with caulk or sealant. Touch up any paint or stain as needed. Clean the surround thoroughly to remove any dust or debris. Allow all materials to cure completely before using the fireplace.
Consider hiring a qualified professional for any part of the project that feels overwhelming or beyond skill level. This is especially important when dealing with gas lines or structural modifications.

5 Amazing Inexpensive Easy Fireplace Remodel Transformations Designed

Looking To Remodel Your Fireplace Tips You Need

Fireplace Mantle Redo In Time For Diary Of A Quilter Quilt Blog Home Living Room With Brick Makeover

30 Fireplace Remodel Ideas For Any Budget

Diy Fireplace Makeover At Home With The Barkers

30 Fireplace Remodel Ideas For Any Budget

Diy Fireplace Makeover At Home With The Barkers

Custom Fireplace Surround Refacing Many Surrounds To Choose From

17 Fireplace Remodel Before And After How To Your Brick Makeover Redo
:max_bytes(150000):strip_icc()/MaisondePaxAfter-5bb2507646e0fb0026d9558d.jpg?strip=all "Before And After Fireplace Makeovers")
Before And After Fireplace Makeovers
Related Posts