How To Put Up Stone on a Fireplace Wall
Installing stone veneer on a fireplace wall is a transformative home improvement project that can dramatically enhance the aesthetics of a living space. The installation process, while achievable for a determined do-it-yourselfer, requires careful planning, precise execution, and an understanding of the materials involved. This article provides a comprehensive guide to successfully installing stone veneer on a fireplace wall, covering preparation, installation, and finishing touches.
Key Considerations Before Starting
Before embarking on the project, several critical factors must be addressed to ensure a successful outcome. These considerations range from structural integrity to aesthetic preferences, and neglecting them can lead to complications and unsatisfactory results.
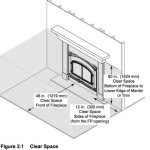
1. Structural Assessment and Fire Safety: The first step involves assessing the structural integrity of the existing fireplace and the wall where the stone veneer will be applied. It is crucial to ensure that the wall can support the added weight of the stone. Consultation with a structural engineer may be necessary, especially in older homes or if the stone veneer is particularly heavy. Fire safety is paramount. Building codes dictate specific clearances between the firebox opening and combustible materials. These clearances must be strictly adhered to. If the existing fireplace surround is combustible, it will need to be removed and replaced with a non-combustible material, such as cement board, before the stone veneer is installed. Check local building codes for specific requirements regarding fireplace construction and clearances.
The existing fireplace may require modification to accommodate the stone veneer. This might involve removing an existing mantel, facing, or hearth. If the existing fireplace is a zero-clearance unit, ensure that adding the stone veneer will not obstruct the unit's ventilation or compromise its fire-safety features. Consult the manufacturer's instructions for the fireplace unit for specific guidelines.
2. Stone Selection and Design: Choosing the right stone veneer is essential for achieving the desired aesthetic. Stone veneer comes in a wide variety of styles, colors, and textures, ranging from natural stone to manufactured stone. Natural stone offers a unique, organic look, but it is generally heavier and more expensive than manufactured stone. Manufactured stone is a more cost-effective alternative that mimics the appearance of natural stone. It is also typically lighter in weight and easier to install.
Consider the overall design of the room and the existing architectural style when selecting the stone. A rustic stone veneer might be suitable for a country-style home, while a sleek, modern stone veneer might be more appropriate for a contemporary space. The color of the stone should complement the existing color scheme of the room. Create a design plan that outlines the layout of the stone on the fireplace wall. This plan should include the size and shape of the stones, the spacing between the stones, and any decorative elements, such as keystones or mantels. Consider using a digital design tool or sketching the design on paper to visualize the finished product.
3. Budget and Material Estimation: Establishing a realistic budget is crucial for managing the project effectively. The cost of the project will depend on the type of stone veneer chosen, the size of the fireplace wall, and the labor costs if a professional installer is hired. Obtain quotes from several stone suppliers to compare prices. In addition to the stone veneer, other materials will be needed, including mortar, cement board screws, flashing, metal lath, and sealant. Estimate the quantity of each material required based on the size of the fireplace wall and the manufacturer's recommendations. Purchase slightly more stone veneer than estimated to account for cuts and waste. This will also ensure consistency in color and texture.
Preparing the Fireplace Wall
Proper preparation of the fireplace wall is critical for ensuring that the stone veneer adheres securely and that the finished product is aesthetically pleasing. This preparation involves several steps, including cleaning, surface preparation, and installing a suitable substrate.
1. Cleaning and Inspection: Begin by thoroughly cleaning the existing fireplace wall. Remove any dust, dirt, grease, or loose paint. Use a wire brush or scraper to remove any loose mortar or debris. Inspect the wall for any cracks or damage. Repair any cracks or damage with patching compound before proceeding. A clean and sound surface is essential for proper adhesion of the mortar and stone veneer.
2. Installing Cement Board: In most cases, it is necessary to install cement board as a substrate for the stone veneer. Cement board provides a stable, moisture-resistant surface that is ideal for supporting the weight of the stone. Cut the cement board to size using a utility knife or circular saw. Apply a layer of thin-set mortar to the back of the cement board and press it firmly against the fireplace wall. Secure the cement board to the wall using cement board screws, spacing the screws approximately 8 inches apart. Ensure that the cement board is flush with the surrounding wall surface. Cover the seams between the cement board panels with fiberglass mesh tape and apply a thin layer of thin-set mortar over the tape.
3. Applying Metal Lath: After the cement board is installed, apply a layer of metal lath. Metal lath provides a mechanical key for the mortar, improving its adhesion to the cement board. Cut the metal lath to size using tin snips. Attach the metal lath to the cement board using nails or screws, overlapping the edges of the lath by at least 2 inches. Ensure that the metal lath is securely fastened to the cement board. The metal lath will provide a rough surface for the mortar to grip, ensuring a strong bond.
Applying the Stone Veneer
The application of the stone veneer is the most visually impactful stage of the project. This process requires patience, attention to detail, and adherence to the manufacturer's instructions for the specific stone veneer being used.
1. Mixing the Mortar: Prepare the mortar according to the manufacturer's instructions. Use a mortar mixer or a large bucket and mixing paddle to thoroughly combine the mortar and water. Add water gradually until the mortar reaches a consistency similar to that of peanut butter. The mortar should be workable but not too runny. Allow the mortar to slake for a few minutes before using it. Slaking allows the mortar to fully hydrate, improving its workability and bond strength.
2. Applying Mortar to the Stone: Using a margin trowel, apply a generous layer of mortar to the back of each stone veneer piece. The mortar should be thick enough to create a strong bond with the metal lath. Ensure that the edges of the stone are completely covered with mortar. This will prevent water from penetrating behind the stone and causing damage. It is advisable to work in small sections to prevent the mortar from drying out before the stones are placed.
3. Placing the Stone on the Wall: Press the stone veneer piece firmly against the metal lath, ensuring that it is level and plumb. Wiggle the stone slightly to help it bond with the mortar. Use a rubber mallet to gently tap the stone into place. Maintain consistent spacing between the stones. Use spacers to ensure uniform joints if desired. Remove any excess mortar that oozes out from the joints. Start at the bottom of the wall and work upwards, allowing the mortar to set before applying the next row of stones. This will prevent the stones from sliding down the wall.
Finishing Touches
After the stone veneer has been applied, several finishing touches are necessary to complete the project and ensure a professional appearance.
1. Grouting the Joints: Once the mortar has dried for at least 24 hours, grout the joints between the stones. Use a grout bag or a grout float to apply the grout. Fill the joints completely, being careful not to smear grout on the face of the stones. Smooth the grout using a grout sponge or a jointing tool. The depth and profile of the grout joints can significantly affect the overall appearance of the stone veneer. Research different grouting techniques to achieve the desired look.
2. Cleaning the Stone: After the grout has dried, clean the stone veneer using a mild detergent and water. Use a soft brush or sponge to remove any grout residue or dirt. Rinse the stone thoroughly with clean water. Avoid using harsh chemicals or abrasive cleaners, as they can damage the stone veneer. Consider sealing the stone veneer to protect it from staining and weathering. A sealant will also enhance the color of the stone and make it easier to clean.
3. Sealing and Final Inspection: Apply a sealant to the stone veneer to protect it from the elements and prevent staining. Choose a sealant that is specifically designed for use on stone. Apply the sealant according to the manufacturer's instructions. Inspect the finished fireplace wall for any imperfections. Touch up any areas that need attention. Ensure that all clearances around the firebox opening are maintained. The final completed stone veneer fireplace wall is a significant upgrade to any living space, adding character and value to the home.

Diy How To Install Stone On Your Fireplace Easily

How To Install Stone Veneer On A Fireplace Step By Guide

Thin Stone Veneers Make A Fireplace Update Easy Swenson Granite 100 Natural Stones

Diy How To Install Stone On Your Fireplace Easily

How To Install A Stone Veneer Fireplace Shoe Makes New

How To Install Stacked Stone Tile On A Fireplace Thrifty Decor Diy And Organizing

B S Diy Stacked Stone Fireplace Surround Genstone

12 Stacked Stone Fireplace Ideas For Optimal Coziness

Modern Stone Installation Tips Diy

Diy Stone Veneer Fireplace Installation Yes You Can Do It Yourself Part 1