How To Put Tile Over a Brick Fireplace
Updating a brick fireplace can drastically change the aesthetic of a room, offering a modern or personalized touch. While brick has its own inherent charm, covering it with tile presents an opportunity to create a focal point that aligns with current design preferences or complements a specific decor style. This article provides a comprehensive guide on how to successfully install tile over a brick fireplace, outlining the necessary steps, materials, and precautions to ensure a durable and visually appealing result.
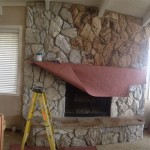
Before commencing the tiling project, it is crucial to thoroughly assess the condition of the existing brick. Any loose, crumbling, or damaged bricks must be repaired or replaced. Furthermore, ensuring the brick surface is clean and free of debris, soot, or any existing coatings is essential for proper adhesion of the tiling materials. Neglecting these preliminary steps can compromise the long-term integrity of the tiled surface and lead to costly repairs down the line.
Preparing the Brick Surface
The initial step involves a meticulous cleaning of the brick surface. This can be achieved using a wire brush and a solution of trisodium phosphate (TSP) diluted in water, following the manufacturer's instructions. This solution effectively removes grease, grime, and soot that may have accumulated over time. After scrubbing the surface thoroughly, rinse it with clean water and allow it to dry completely. This drying period is crucial, as moisture can interfere with the adhesion of the subsequent layers.
Once the brick is clean and dry, inspect it for any loose or damaged areas. Cracks and crumbling mortar joints should be repaired using a patching compound specifically designed for masonry. Follow the manufacturer's instructions for mixing and application. Apply the compound to the affected areas, ensuring it fills the voids completely. Allow the patching compound to cure fully according to the manufacturer's recommendations before proceeding. This will create a stable and even base for the tile installation.
To enhance the adhesion of the mortar, consider applying a bonding agent to the brick surface. This liquid primer creates a stronger bond between the brick and the mortar bed. Apply the bonding agent evenly using a brush or roller, following the manufacturer's instructions. Allow the bonding agent to dry completely before moving on to the next step. This additional step is particularly important when working with smooth or non-porous bricks, as it significantly improves the bond strength and reduces the risk of tile delamination.
In some cases, particularly if the brick surface is uneven, it may be necessary to apply a scratch coat of mortar. This thin layer of mortar helps to level the surface and create a uniform plane for the tile. Mix the mortar according to the manufacturer's instructions and apply it to the brick surface using a trowel. Use a level to ensure the scratch coat is as even as possible. Allow the scratch coat to cure fully before proceeding. This step ensures a professional finish and prevents any unevenness from being transferred to the tiled surface.
Selecting the Right Materials
Choosing the correct materials is paramount to the success of the tiling project. The type of tile, mortar, grout, and sealant must be suitable for the specific application and the environmental conditions to which the fireplace will be exposed. Consider factors such as heat resistance, moisture resistance, and ease of maintenance when making these selections.
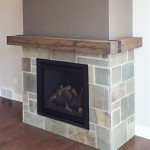
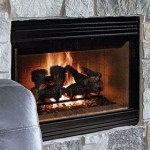
When selecting tiles, consider the overall aesthetic you wish to achieve and the heat resistance of the tile. Porcelain and ceramic tiles are generally good choices for fireplace surrounds due to their durability and heat resistance. Natural stone tiles, such as slate or travertine, can also be used, but ensure they are properly sealed to prevent staining. Avoid using tiles that are not rated for high-temperature environments, as they may crack or warp under prolonged heat exposure. The size and shape of the tile will also influence the overall look of the fireplace. Larger tiles can create a more modern and seamless appearance, while smaller tiles offer more intricate design possibilities.
Selecting the appropriate mortar is equally important. A modified thin-set mortar specifically designed for tiling over brick is recommended. This type of mortar provides excellent adhesion and flexibility, allowing it to withstand the expansion and contraction caused by temperature fluctuations. Avoid using premixed mortars, as they may not provide sufficient bond strength for this application. Mix the mortar according to the manufacturer's instructions, ensuring a smooth and consistent consistency. Use a notched trowel to apply the mortar to the brick surface, creating ridges that will help to grip the tile.
Grout fills the spaces between the tiles and helps to prevent water from penetrating the underlying brick. Choose a grout that is suitable for the type of tile you are using and the expected level of moisture exposure. Epoxy grout is a good option for fireplace surrounds, as it is highly resistant to stains and moisture. Cement-based grout is another option, but it requires sealing to prevent staining. Select a grout color that complements the tile and the overall design of the fireplace. Apply the grout according to the manufacturer's instructions, using a grout float to push it into the joints. Remove excess grout with a damp sponge and allow the grout to cure fully before sealing.
Sealing the grout and the tile (if necessary) is crucial for protecting the tiled surface from stains and moisture. Apply a high-quality sealant specifically designed for the type of tile and grout you are using. Follow the manufacturer's instructions for application, ensuring that the sealant is applied evenly and thoroughly. Allow the sealant to dry completely before using the fireplace. Regular maintenance, including cleaning and resealing, will help to keep the tiled surface looking its best for years to come.
The Tiling Process
The tiling process requires careful planning and execution to ensure a professional finish. Start by laying out the tiles in a dry run to determine the best layout and to identify any necessary cuts. Use tile spacers to maintain consistent grout lines. Once you are satisfied with the layout, begin applying the mortar and setting the tiles, working in small sections at a time.
Before applying any mortar, conduct a "dry run" to determine the optimal tile placement. This involves arranging the tiles on the brick surface without any adhesive to visualize the final layout and identify any necessary cuts. Use tile spacers to ensure consistent grout lines. Pay attention to the alignment of the tiles and make any necessary adjustments to achieve a balanced and symmetrical appearance. This step is crucial for avoiding costly mistakes and ensuring a professional-looking finished product. Mark the locations of the tiles with a pencil or tape to guide the mortar application.
Using a notched trowel, apply a layer of mortar to the brick surface, covering an area that you can comfortably tile within a reasonable timeframe (typically, no more than a few square feet at a time). The size of the notches on the trowel will depend on the size and type of tile you are using. Consult the manufacturer's recommendations for the appropriate trowel size. Press each tile firmly into the mortar, using a slight twisting motion to ensure good adhesion. Use tile spacers to maintain consistent grout lines between the tiles. Periodically check the level of the tiles with a level and make any necessary adjustments to ensure a flat and even surface.
Cutting tiles is often necessary to fit them around corners, edges, and openings. A wet saw is the most effective tool for cutting tiles accurately and cleanly. Use a tile nipper for making small, irregular cuts. Always wear safety glasses and gloves when cutting tiles to protect yourself from flying debris. Carefully measure and mark the tiles before cutting. When cutting with a wet saw, feed the tile slowly and steadily to avoid chipping or cracking. After cutting, smooth the edges of the tile with a file or sandpaper to remove any sharp edges.
After the mortar has cured for the recommended time (typically 24-48 hours), remove the tile spacers and apply the grout. Use a grout float to push the grout into the joints, ensuring that they are completely filled. Remove excess grout with a damp sponge, wiping diagonally across the tiles to avoid pulling the grout out of the joints. Rinse the sponge frequently in clean water. Allow the grout to dry slightly, then use a clean, dry cloth to buff the tiles and remove any remaining grout haze. After the grout has fully cured, seal it with a grout sealer to protect it from stains and moisture.

How To Tile A Brick Fireplace Jenna Kate At Home

How To Tile A Fireplace Even If It S Brick The Handyman Daughter

Tiling Over A Brick Fireplace Ceramic Tile Advice Forums John Bridge

How To Tile A Fireplace Even If It S Brick The Handyman Daughter

How To Tile Over Brick Fireplace Surround

First Timer Looking To Put Stacked Slate Over Brick Fireplace Ceramic Tile Advice Forums John Bridge

How To Tile A Fireplace Even If It S Brick The Handyman Daughter

How To Tile Over A Brick Hearth Shine Your Light

How To Tile Over A Brick Fireplace Surround Shine Your Light

Tiling A Marble Herringbone Pattern Young House Love
Related Posts