How To Install Stacked Stone Over a Brick Fireplace With a Mantel
Updating a brick fireplace with stacked stone is a popular home renovation project that adds texture, visual interest, and a focal point to a living space. The process, while relatively straightforward for a capable DIY enthusiast, requires careful planning, preparation, and execution to achieve a professional-looking result while working around a mantel.
This article provides a comprehensive guide to installing stacked stone over a brick fireplace with a mantel, covering crucial steps such as surface preparation, stone selection, adhesive application, stone installation techniques, and mantel integration. Following these instructions will help ensure a successful transformation of the fireplace.
Key Point 1: Surface Preparation and Planning
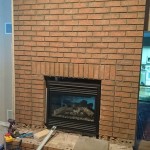
The foundation for a successful stacked stone installation lies in thorough surface preparation. Firstly, the existing brick fireplace needs to be cleaned to remove any dust, soot, grease, or loose debris. A wire brush and a mixture of water and trisodium phosphate (TSP) can be used for effective cleaning. Rinse the brick thoroughly with clean water and allow it to dry completely before proceeding.
Next, assess the condition of the brick. Repair any cracks or crumbling areas with a brick patching compound. If the brick surface is particularly smooth, roughen it up with a grinder or by etching the surface with muriatic acid (always wear appropriate safety gear). This will provide a better bonding surface for the mortar.
Consider the placement of the mantel. If the mantel is removable, taking it down offers a clearer working space and simplifies the stone installation process. If the mantel is permanently affixed, extra care will be needed when cutting and fitting the stacked stone around it. Measure the dimensions of the fireplace, including the area surrounding the mantel, to calculate the amount of stacked stone required. It is always advisable to purchase 10-15% extra material to account for cuts, waste, and potential errors.
Finally, plan the layout of the stacked stone. Dry-fitting the stones on the floor before installation allows for experimentation with different patterns and ensures a visually appealing arrangement. Pay attention to color variations and stone sizes to create a balanced and natural look.
Key Point 2: Selecting Materials and Applying Adhesive
Choosing the appropriate stacked stone and adhesive is crucial for durability and aesthetics. Stacked stone is available in various materials, including natural stone, manufactured stone veneer, and faux stone. Natural stone offers unique textures and colors, while manufactured stone veneer is lighter and often more cost-effective. Consider the overall design of the room and select a stone that complements the existing décor.
The adhesive used to adhere the stacked stone to the brick is equally important. A high-quality modified thin-set mortar specifically designed for stone veneer is recommended. This type of mortar provides superior bonding strength and flexibility, which is essential for withstanding temperature fluctuations and preventing cracks.
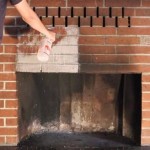
When applying the adhesive, follow the manufacturer's instructions carefully. Mix the mortar according to the specified powder-to-water ratio, ensuring a smooth and consistent consistency. Apply a generous layer of mortar to the back of each stone, using a notched trowel to create ridges that enhance adhesion. Press the stone firmly against the brick surface, ensuring good contact and proper alignment. Avoid getting mortar on the face of the stones, as this can be difficult to remove later. Use a damp sponge to wipe away any excess mortar immediately.
For areas around the mantel, precise cuts may be required. A wet saw with a diamond blade is ideal for cutting stacked stone. Always wear safety glasses and gloves when operating a wet saw. Make accurate measurements and cut the stones to fit snugly against the mantel, leaving a small gap for expansion and contraction.
Key Point 3: Installing the Stacked Stone and Integrating the Mantel
The stacked stone installation process typically begins at the bottom of the fireplace and progresses upwards. Use a level to ensure that the first row of stones is perfectly horizontal, as this will serve as the foundation for the entire installation. Use spacers between the stones to maintain consistent grout lines and create a uniform appearance.
As the installation progresses, stagger the vertical joints between the stones to create a more natural and visually appealing pattern. This also adds structural integrity to the wall. Periodically check the alignment of the stones with a level or straightedge to ensure that the wall remains plumb and square.
Integrating the mantel requires careful attention to detail. If the mantel was removed, reinstall it after the stacked stone installation is complete. Ensure that the mantel is securely attached to the underlying structure. If the mantel remained in place during the installation, fill any gaps between the stone and the mantel with grout or caulk that matches the color of the stone. This will create a seamless transition and prevent water or debris from entering behind the stones.
Once the stacked stone installation is complete, allow the mortar to cure for the recommended time period, typically 24-48 hours. After the mortar has cured, apply a sealant specifically designed for stone veneer to protect the surface from moisture and staining. The sealant will also enhance the color and texture of the stone.
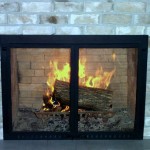
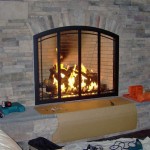
After the sealant has dried, inspect the fireplace for any imperfections or areas that require touch-up. Address any issues promptly to ensure a long-lasting and aesthetically pleasing result. Consider adding decorative elements such as candles, plants, or artwork to enhance the overall ambiance of the fireplace.

Transform Your Home Stone Veneer Over Brick Fireplace Guide

Thin Stone Veneers Make A Fireplace Update Easy Swenson Granite 100 Natural Stones

Diy Fireplace Transformation With A Custom Hearth

How To Install Real Stacked Stone Complete Diy Guide Fireplace Wall Part 4 Builds By Maz

How To Diy A Stacked Stone Feature Over Existing Brick

B S Diy Stacked Stone Fireplace Surround Genstone

Stacked Stone Over Brick Fireplace Remodel Quartz Hearth

How To Update Your Fireplace With Stone Evolution Of Style

12 Stacked Stone Fireplace Ideas For Optimal Coziness Angi

Fireplace Mantel Installation Before And After
Related Posts